
Twinmotion 2023 – Adding Imperfections to Your Car Paint
January 19, 2023

Had a little time recently to experiment with an easy to make car paint material and add imperfections, scratches etc.. to add a little more fine detail to my car model renders, especially paintwork and chrome wheels. It’s a really quick process if you want to add fine details to your 3D models. Twinmotion 2023 has its own native car paint materials now, with lot’s of new parameters, and very good indeed. This method is for making your own imperfections with marks and scratches etc.
With this method it’s important to use a plain color material and not something with a texture in it. Twinmotion’s native plastic material, its pink , for example is a good place to start. You can change the color easily then to whatever you like. We then have to scale our material up or down to get the desired effect. Being a plain colored material nothing will change when scaling up or down only the size of the imperfection we added will change in size. If we used something with a pattern in it, and then scaled it, it would obviously distort and resize the pattern of the material.
I tried a few imperfections from Quixel Megascans. You only need to download the Roughness map. You then apply it to the Roughness channel of your material and adjusted the scale until it looks reasonably ok, size wise, and to the extent where you can see it in the light.
Step 1.
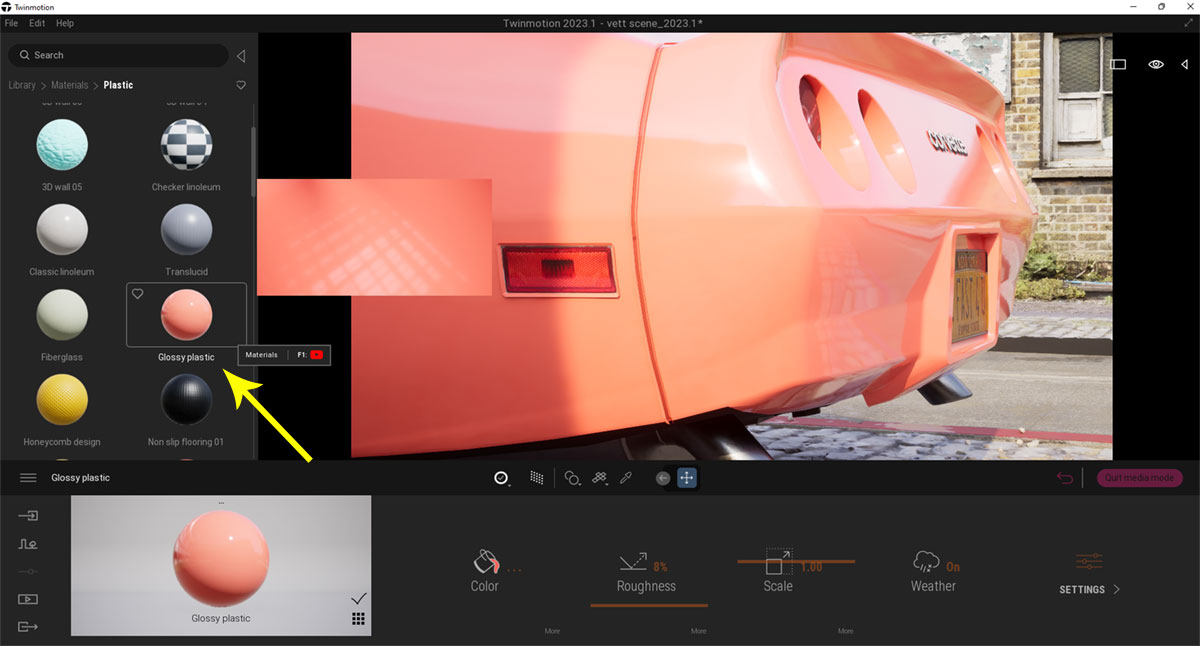
Apply Twinmotion’s native Glossy Plastic Material and Adjust Color
Step 2.
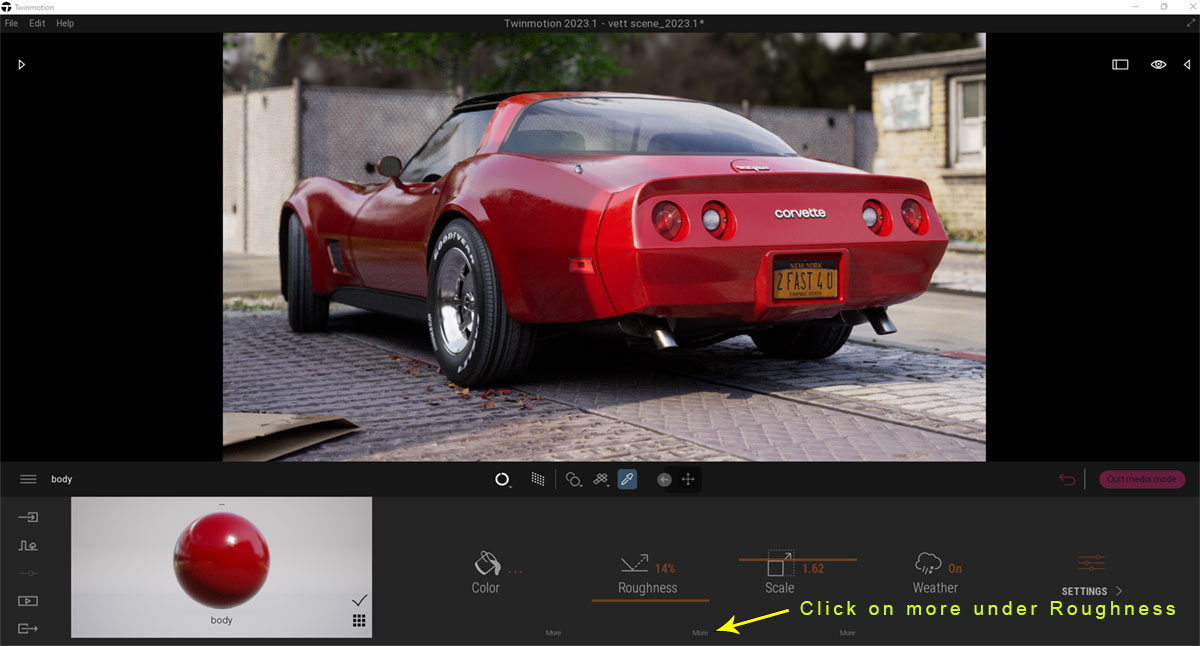
With Color Adjusted Click on more Under Roughness
Step 3.
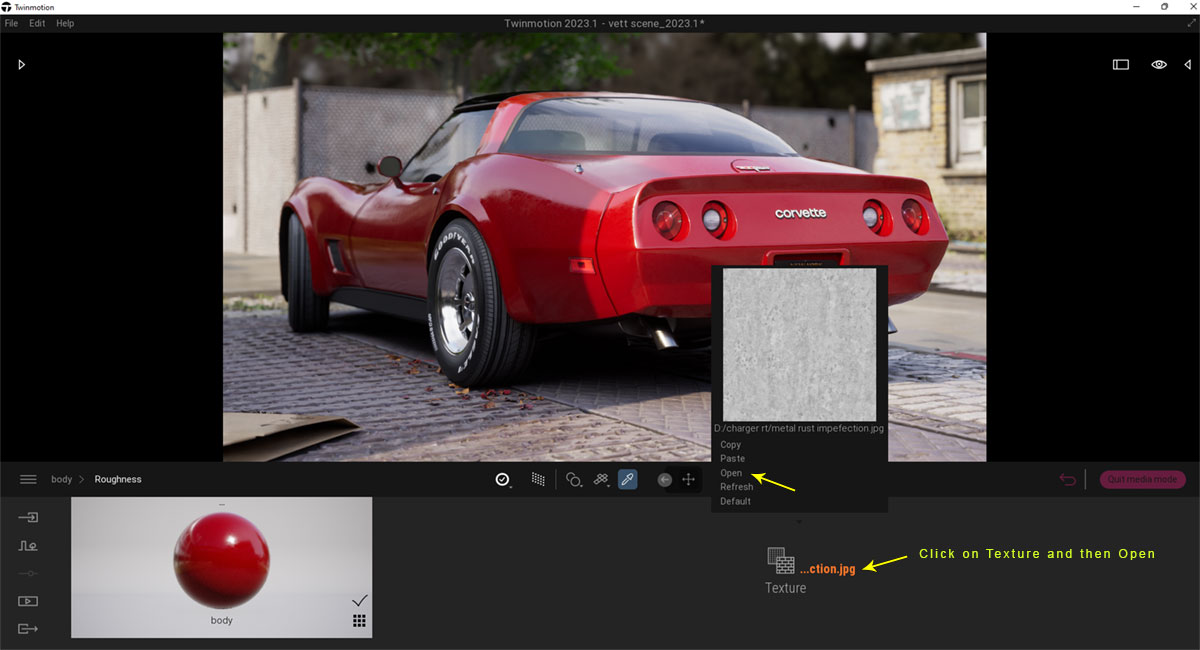
Next Click on Your Image File and Then Open to Add New Image
Step 4.
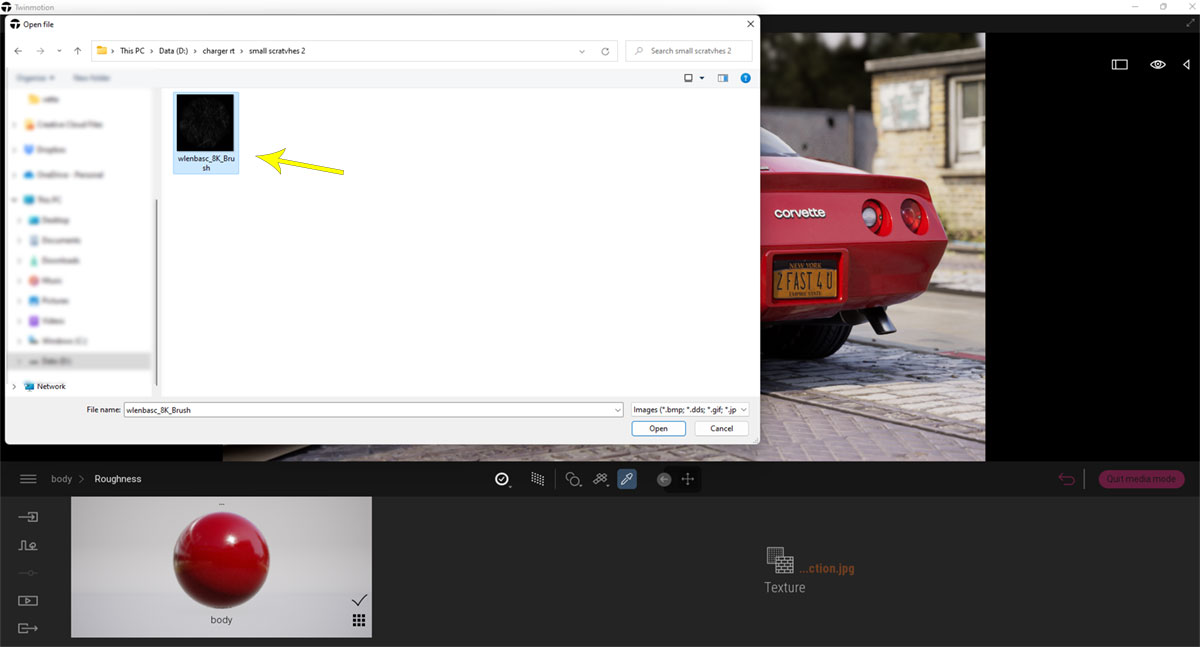
Go to Where You Downloaded Imperfection and Open It
Step 5.
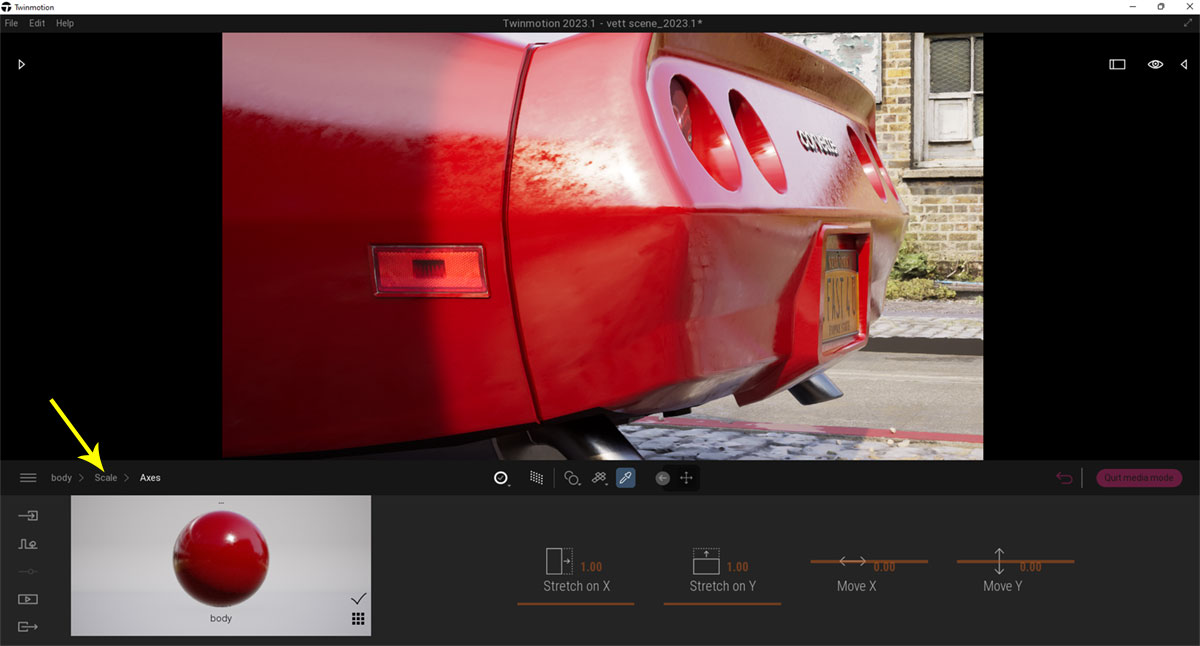
Adjust Scale to Improve Look of Imperfection. You can Click more Under Scale for Further Adjustments if Needed
Final Image
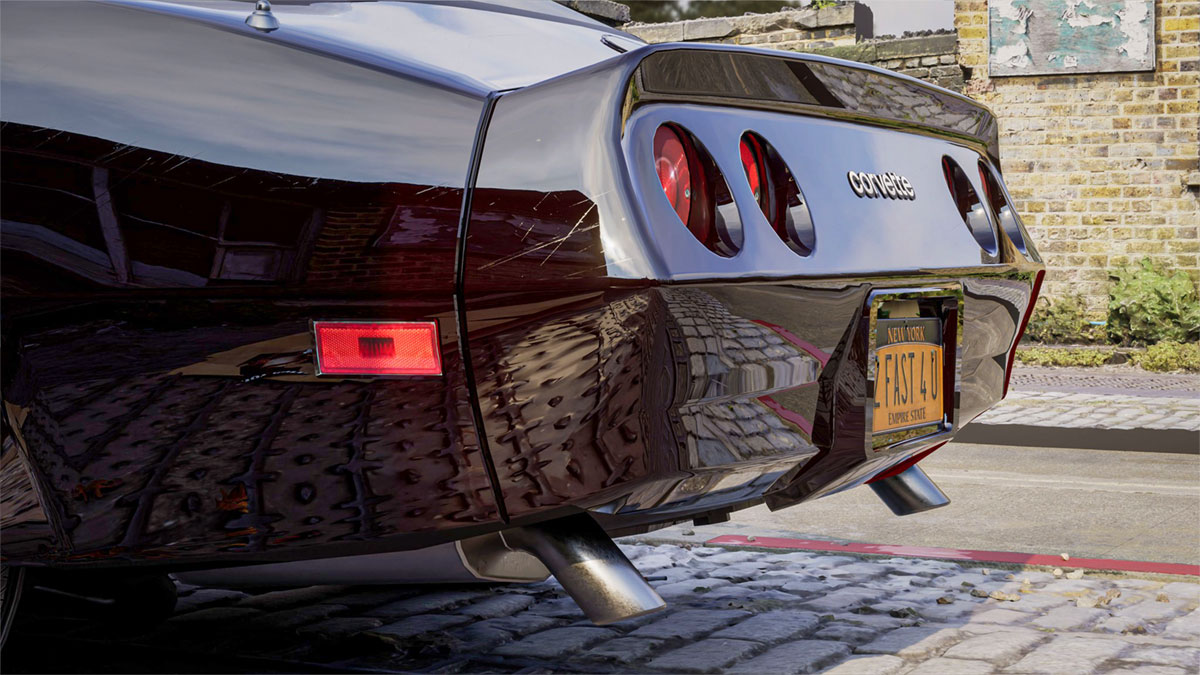
Final Image After Adjustments and Color Change
Image of Exhaust Metal Using Same Process
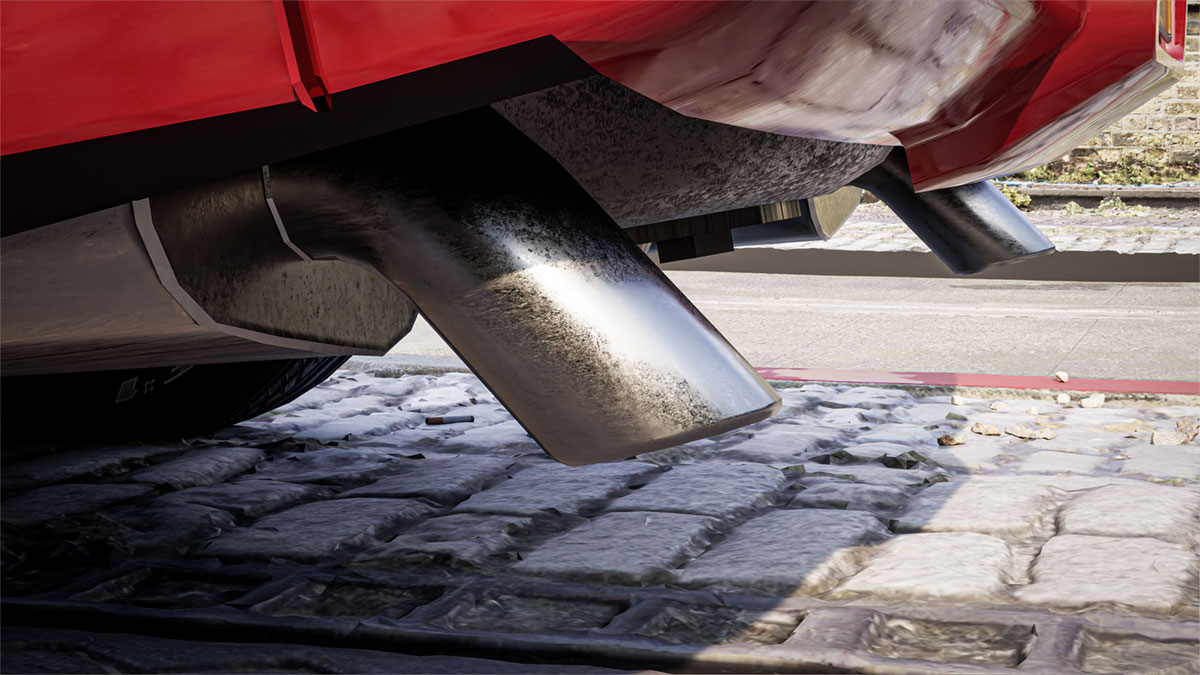
Click on Image
Experiment with different Imperfections as some will work better than others. Hope you found this useful and that it may help in your future projects. Thanks for reading.
James Hannigan (aka SketchUpArtists)
More of my work here at Artstation and Twinmotion Official Community Group.
Prints On Glass Surface V-Ray for SketchUp
October 31, 2020
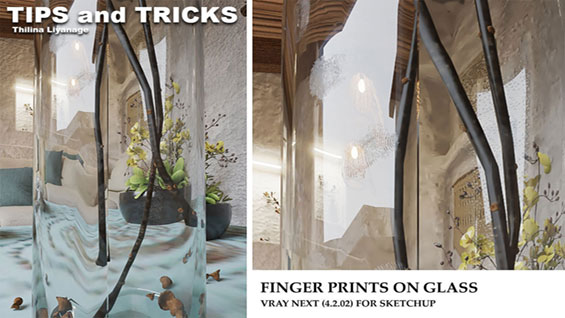
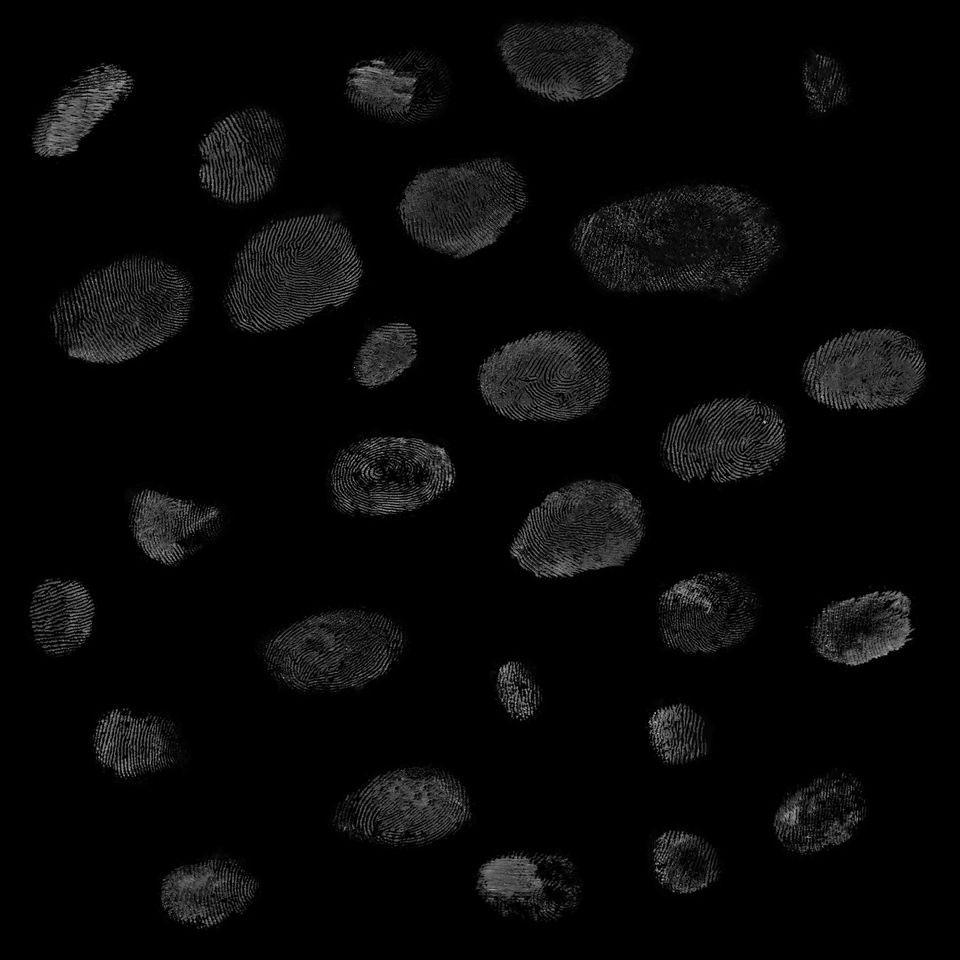
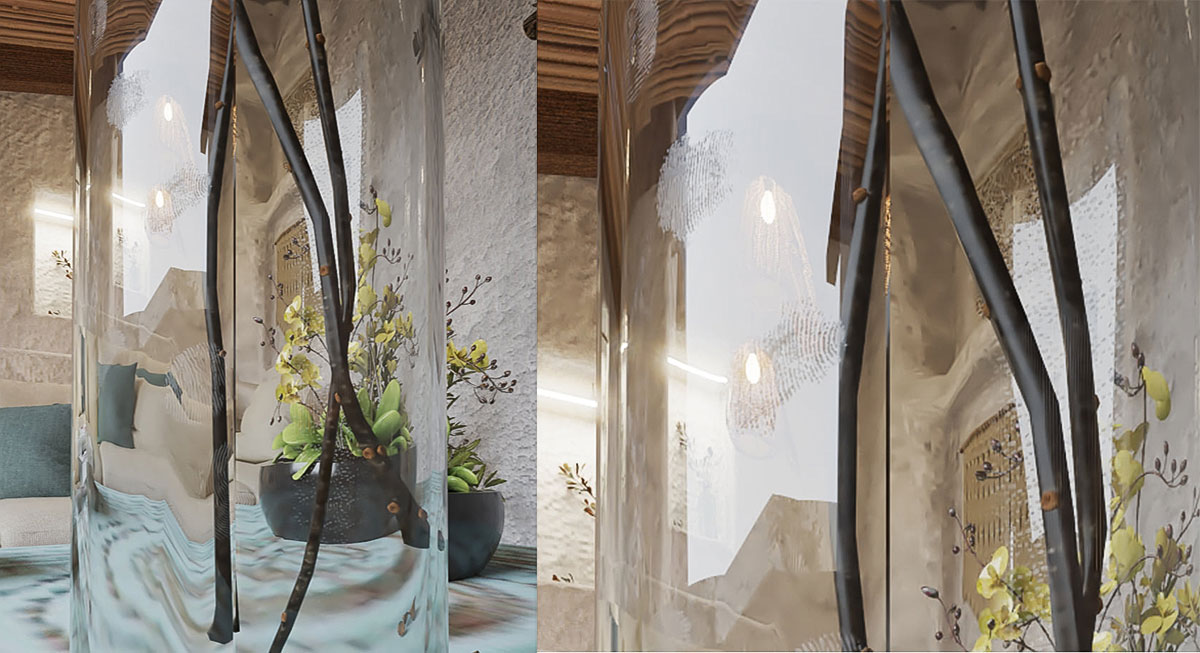
Quick tip from Thilina Liyanage on how to apply finger prints on a glass surface using V-Ray 4.2.02 for SketchUp.
Finger Print
Process
 Final Image
You can see more of Thilina Liyanage’s work here.
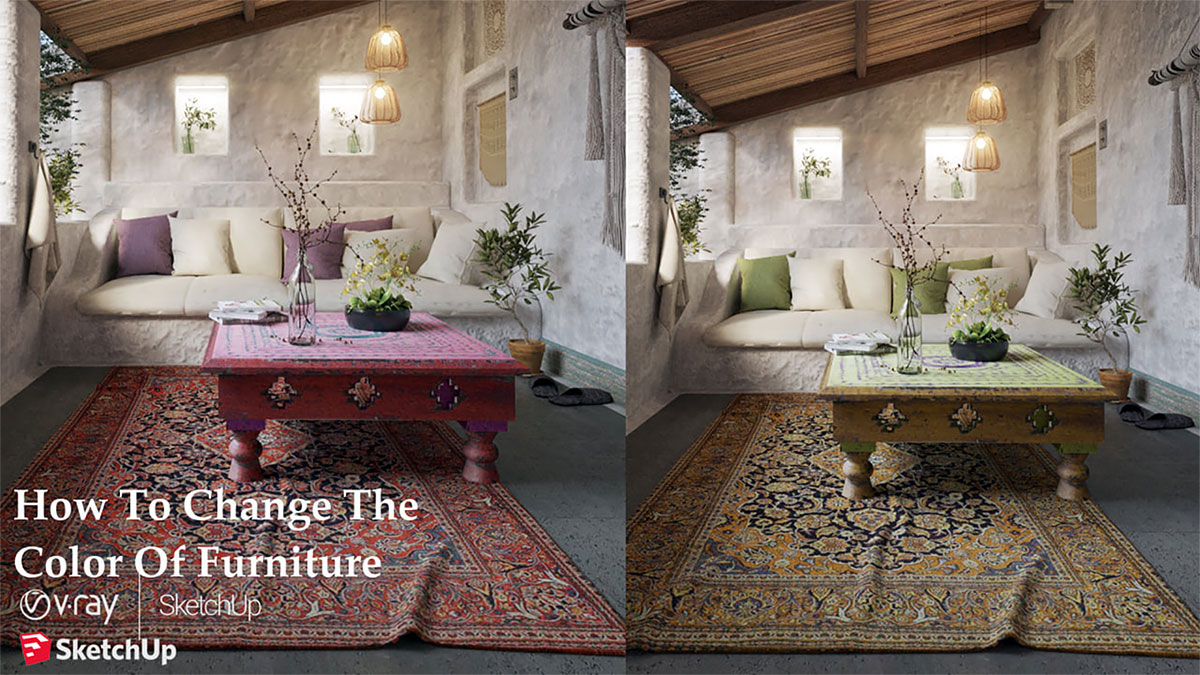
How To Change The Colors Of Materials V-Ray Next For SketchUp
October 21, 2020

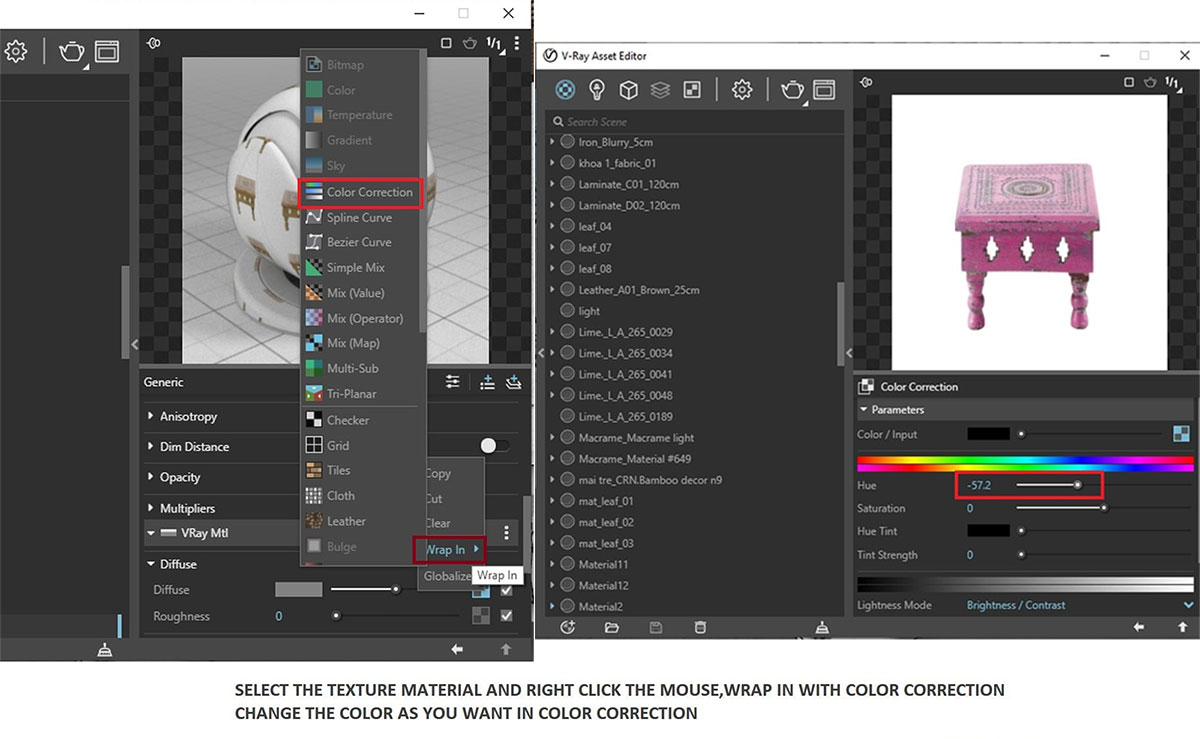
Quick tip from Thilina Liyanage on how to change color of materials in this furniture for example, using V-Ray Next for SketchUp.
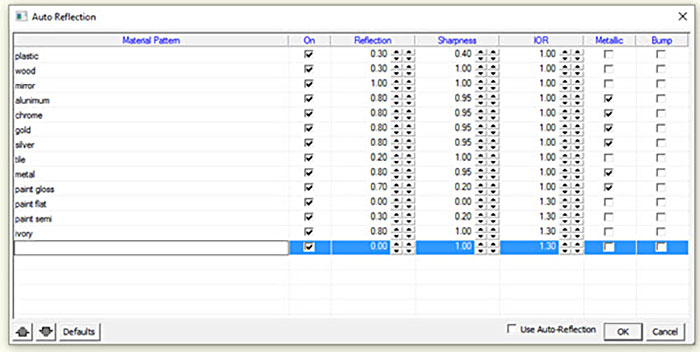
Rendering Tip – Auto Reflection
May 16, 2016

IRender nXt Plugin for SketchUp
Use Auto Reflection for Materials
There are quite a few very useful features in IRender nXt with advantages that aren’t necessarily obvious. One such feature is “Auto-Reflection”. Auto-Reflection uses material name pattern matching to preset reflection intensity and sharpness. Many of the materials in the SketchUp library are included in the standard list. This option uses preset reflection values for materials. Just turn on Auto Reflections and render your model.
SketchUp Material Assignments
Below is a simple model with SketchUp materials.
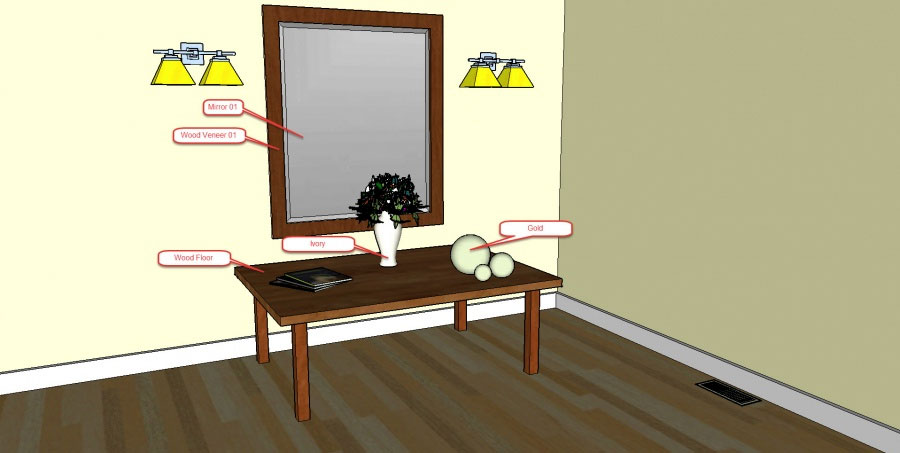
Model and materials
First Rendering
When rendered, the materials from the SketchUp library do not have reflection values set.
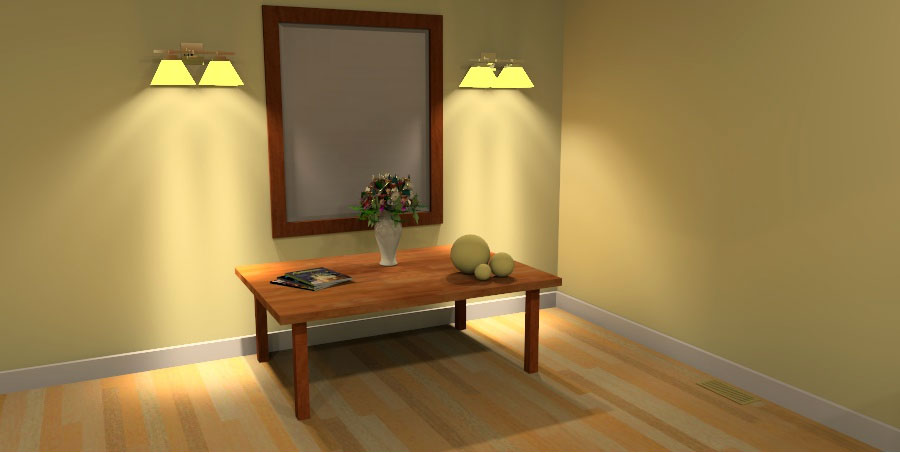
Image was processed with Auto-Reflection set to “Off”
Turn Auto Reflection ON
- Click Styles on the IRender nXt Setup Options dialog
- Check Use Auto Reflections
- Start a rendering
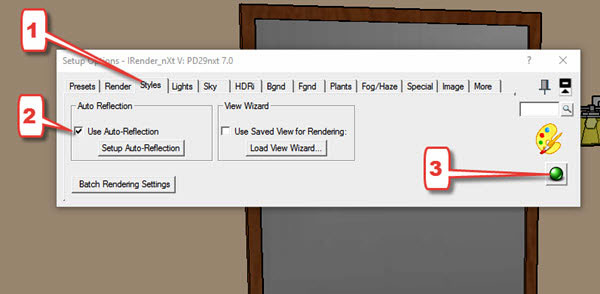
Setup options
Auto Reflection uses the material name to set reflection values. Just turn Auto Reflection on and render!
Final render with Auto Reflection on
Thanks for reading!
Russell Houlden
If you would like to discover more about using the IRender nXt plugin for SketchUp visit their homepage here.
Place Making with a SketchUp Model
November 1, 2013

Jim Leggitt recently created a blog post about visualizing a re-purposed alley in Boulder, Colorado using quickly generated hand drawings. That effort evolved into a more detailed exploration of the alley improvements in the format of a presentation SketchUp model.
This collection of images below show how Jim constructed the SketchUp model which revealed a series of alternative alley uses, shadow studies and eye-level views. Jim gathered from this exercise that there are design projects that may not require any drawings to communicate their basic concepts and that a well crafted SketchUp model may be more than adequate to convey your big idea. Jim explains more…
Re-purposed Alleys
Many downtown service alleys are being converted to commercial uses such as restaurants, concert venues and special events. These photos are from two alleys in San Francisco that were transformed into outdoor dining spaces during certain hours of the day and then converted back to their original service use all other times. These were the inspiration for how I approached building the SketchUp model (below).

Alley in San Francisco

Alley in San Francisco
Base SketchUp Model
I call this type of SketchUp model a “stage set model” for it is constructed with no more than a series of empty shapes with photographic facades applies to each face. I photographed all of the existing buildings and applied them to specific faces of the model. The resulting 3D SketchUp model was accurate enough to convey the existing neighborhood condition and spaces between buildings. The base image (streets and sidewalks) was saved from Google Earth.

SketchUp Model
Strategic Model Views
You can see from these two views that there is a large open space in the central portion of the alley. I developed several different design scenarios using that space as an outdoor food court with food trucks (shown) or as an art fair with tents, or even as an outdoor movie theater. Each alternative was saved on a different layer in the model. I then established a series of more than 10 model scenes (views) that showed the alley from above and at eye level. Those views were very helpful for studying and documenting how the sun cast shadows at different times of the day and season.

Model Views
Alley Entrance Signage
This view angle of the Lawry Lane alley entrance was established as if I were observing from a second floor window across the street. The building facades are from digital photographs I took during a site visit. I constructed the sign, furniture and populated the model with a mix of 2D and 3D people, plants and other elements to establish the character of the alley space.

Entrance Signage
Alley SketchUp Entourage
Look carefully at the many different elements that have been placed into the basic alley model. I added 3D sign letters to the building facade, decorative “buttons” on the glass storefront, 3D and 2D people, custom umbrellas with red banding, and regularly spaced poles with banners. I added the red colored stripe on the banners to coordinate with the umbrellas and inserted images of bicycle racers that I photographed at a local competition. I fabricated the Grants Cafe sign from an image I downloaded from the internet and made into a SketchUp component.

SketchUp Entourage
Central Food Court
I created a scene with several food trucks (downloaded from SketchUp 3D Warehouse) surrounding an outdoor seating area with shade umbrellas. This important urban space adjacent to the alley was developed with three different design options: food court, arts festival and outdoor movie theater. I exported jpegs of the three options from these two overhead and eye-level views.

Eye Level View

Overhead View
Strategically Placed Shade
This scene included a small pocket park adjacent to the alley planted with shade tress. I positioned the sun angle in such a way to cast tree shadows across the alley surface. Those shadows in combination with the umbrella shadows enhanced the setting. If I had more time to invest in the model detail, I would have added some elements to the table surfaces and seating in the pocket park. Flower pots and additional landscaping in the park would have also been worth adding to the model.

Strategically Placed Shade
Night Movie Scene
This outdoor movie theater scene wasn’t easy to create alone in SketchUp. I established the basic view and then added the bike race photograph and a dark gray overlay in Adobe Photoshop. Given more time, I could have created a more successful night time effect using other graphic alternatives. I don’t think this scene was very convincing – especially when you see hard shadows beneath each individual!

Night Movie Scene
If you have a design project that has a high level of complexity and the need to be represented with multiple alternatives and views, consider building a semi-detailed SketchUp model and export different views for your presentation. One last note: all of my model views were exported at a high resolution 4000 pixels wide and saved as jpegs. Each had a consistent horizontal format and dimension.
Thanks for reading!
Jim
Look for other interesting articles on Jim’s blog and visit his website www.drawingshortcuts.com. Don’t forget to read his new book Drawing Shortcuts Second Edition.
Setting up IES Lights in V-Ray for SketchUp
February 27, 2013

In this mini-tutorial, Onel Pabico shows you how to set up your IES lights in V-Ray for SketchUp, includes some simple tips for adjusting the amount of light generated from your lights by changing the Unit type.
1. Initial view with the Units set to Meters.

Step 1
2. Place your IES light in position. Right click on it to edit its parameters.

Step 2
3. Settings 1.

Step 3 - Settings 1
4. Settings 2.

Step 4 - Settings 2
5. Settings 3

Step 5 - Settings 3
6. Settings 4.

Step 6 - Settings 4
7. Color correction.

Step 7
Final rendered image.

Final Render
TIP: changing the Units can drastically change the lighting strength.

Tip - Changing Units
TIP: if your not familiar with Power settings try changing Units.

Tip: Change Units
Color corrected example in millimeters and IES Power set at 200.0

Example 1
Example again in millimeters but IES Power set at 20.0

Example 2
Color corrected render.

Color Corrected Image
Hope you found this mini tutorial and tips useful in your use of IES lighting in V-Ray for SketchUp.
Thanks for reading
Onel
Motion Blur Composition in Photoshop
May 21, 2012


Ronel Pabico is an interior designer and 3D visualizer, currently based in Riyadh, Saudi Arabia. He shows you how to add some motion to a static car in his rendered image using the Motion Blur Filter in Photoshop.
Step 1
This SketchUp model has been rendered and shows a static car in the foreground. We are going to select this car and put it on another Layer so we can work on it.

Step 1
Step 2
If you wish, you can use the selection tool of your own choice. In this particular case I used the Rectangular Marquee Tool (M) to select the car which I then copied and pasted onto a new Layer (Ctrl C > Ctrl V). I named this Layer Car.

Step 2
Step 3
Next erase what you don’t need, keeping the car and its shadow.

Step 3
Step 4
Make a copy of the Car Layer and while it is the active Layer go to Filter>Blur>Motion Blur.

Step 4
Step 5
Next you want to tweak the settings in the Motion Blur dialog box.
- The Angle sets the angle of motion.
- The Distance blurs it, which in general softens the edges.
First set the Angle of the Motion Blur streaks so that they match the direction your car is moving in. In many cases, the direction movement will be horizontal, either left to right or right to left. Set an angle of 2°, which in this particular case works perfectly. Next drag the Distance slider at the bottom of the dialog box to set the length of the Motion Blur streaks. Dragging the slider all the way to the right will give you the longest streaks but keep an eye on your image as you drag the slider for a preview of the results.

Step 5
Step 6
You can now fine tune and adjust the Car Layer. You can move it to the most suitable spot, adjust opacity or even duplicate it to strenghten the effect. Here I duplicated the layer twice as you can see in the Layer stack.

Step 6
Final Image

Final Image - before and after
Thanks for reading this little tutorial and I hope you will find it useful in future projects.
Ronel
Wooden Armchair Modeling Tutorial
May 2, 2012


Great little tutorial on modeling a Spanish style wooden single seater chair by Ronel Pabico. With the basic parts modeled you can use them to expand the collection. Ronel is a interior designer and 3D visualizer based in Riyadh, Saudi Arabia.

The Base and Backrest

Armrest

Balusters

Backrest Crown

Backrest Decor

Seat Cushion

Conpleted Chair

Components Added Together

End Table Using Existing Components

Larger Center Table

Full Seating Area

Rendered Scene
Thanks for reading. My chair model is available for download here if you want to check it out.
Ronel
NPR Trees in Photoshop
February 20, 2012
In this mini-tutorial, Onel Pabico shows you how to create non-photo realistic trees in Photoshop and create an action for this process so you can use it again and again, speeding up your work process.
Step 1
Open your png format tree which has no background. Double click on the layer to unlock its state. Press ALT+ F9 (Option+F9 for Mac) to show the Actions panel.

Step 1
Step 2
In the Actions panel click on ‘Create new action’ icon, rename it and press Record.

Step 2
Step 3
Select your layer first so it is active. From the Actions panel select the new action you named and you will now see that the record button is active. Next go to Filter>Filter Gallery.

Step 3
Step 4
Select the Artistic folder in the Filter Gallery and choose the Palette Knife Filter. Adjust the Stroke Size and Softness as shown in the image below.

Step 4
Step 5
Your tree now looks like a watercolor render. Press the Stop button indicated by the red arrow in the image below. You have now created your new watercolor Action for NPR trees.

Step 5
Step 6
To use your new Action, open a new tree to be converted and select its Layer. In the Action panel select your new Action and press the Play button as indicated below.

Step 6
Step 7
This new Action will convert your trees into a watercolor effect within seconds…enjoy!

Step 7
I hope you found this little tutorial useful and you will use it to speed up your artistic workflow.
Onel
Make a Tablecloth in SketchUp
February 13, 2012
In this mini tutorial Bayu Yudistiro shows you how to model a 3D tablecloth using SketchUp and Dale Marten’s very useful organic modeling plugin ‘SubdivideAndSmooth’. This tutorial could also be adapted for modeling a blanket for a bed.
Step 1
Model your basic 3D shape (extrude a rectangle).
Step 2
Using the arc tool, draw arcs at the bottom of your basic 3D shape and delete any unecessary geometry.

Step 1-2
Step 3
Draw a fold for each corner of your 3D box

Step 3
Step 4
Make three extra simple folds for each side of the box.

Step 4
Step 5
Connect the point of the folds with lines as shown in image below.

Step 5
Steps 6 and 7
Using the Subdivide and Smooth plugin, select’Subdivide Selection’. Do this two times too divide up the geometry.

Steps 6 and 7
Step 8
Using the the plugin again click on ‘Smooth all connected geometry’.

Step 8
Step 9
The final step. Select ‘Subdivide and Smooth’ in the plugin and set the ‘Iterations’ value at 2. You should end up with something similar too the image below.

Step 9
I hope you find this useful in your 3D modeling projects and daily workflow.
Cheers
Bayu
Profile Builder 4

Artisan Organic Toolset

PlaceMaker Version 3
Skimp Pro Import Extension

BIM Bundle Special Offer!
SketchPlus Artist Bundle !
Bevel Tool
V-Ray 5 for SketchUp E-Book
