Maxwell for SketchUp – architectural visualization part 2

Victor Hugo Hernandez is an architect specializing in architectural visualization. He is a member of the Swedish Association of Architects and based in Lund, Sweden. Victor is currently working for Malmö based architectural practice [reform] arkitekter and kindly shares the second part of his tutorial for us. Part 1 can be found here.
This tutorial is the second of a two part tutorial about the use of the Maxwell for SketchUp on architectural visualization.
1. Materials
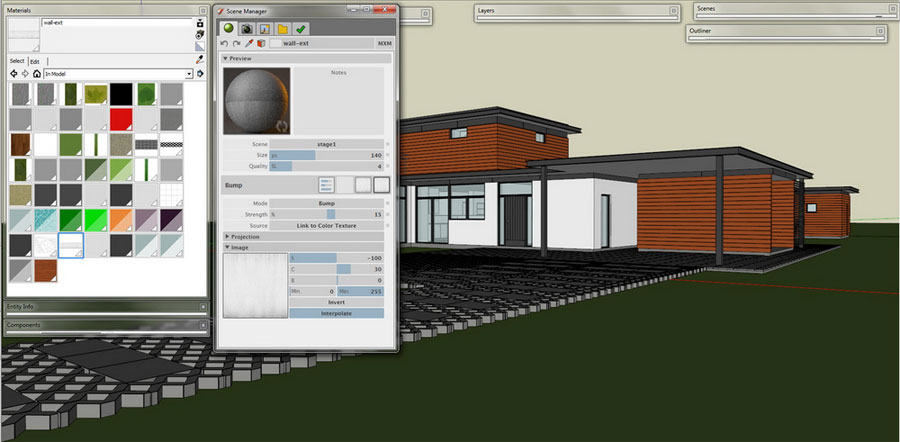
‘Materials in the plugin exist as a set of parameters which are attached to each individual SketchUp material contained in the document’. I normally create and assign each material as a SketchUp material. Then I do the editing in the plugin’s Material Editor user interface.
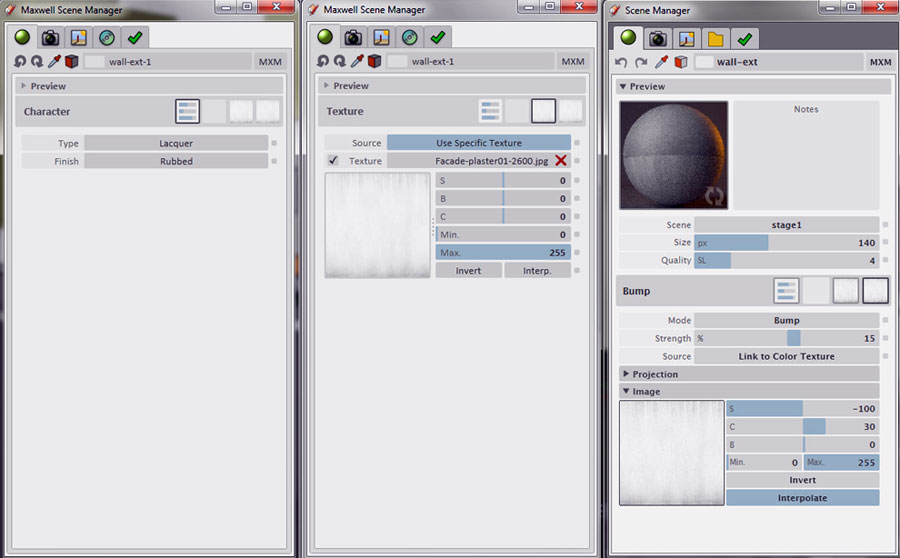
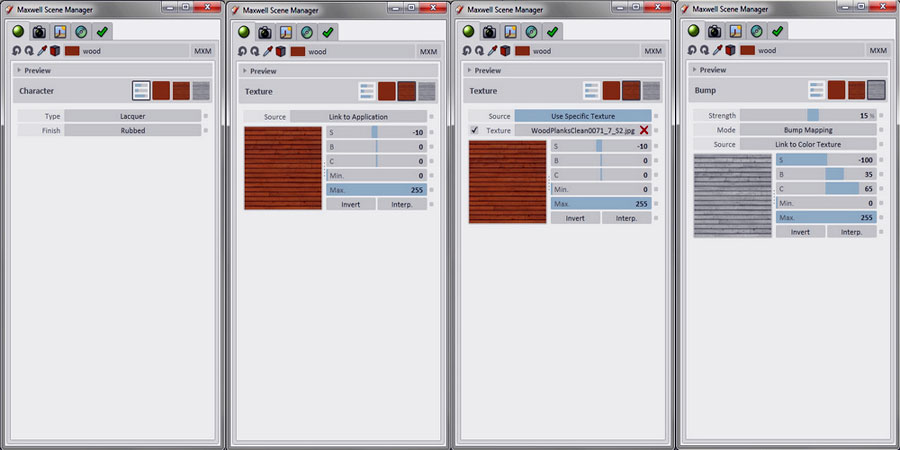
Here are the settings for some of the materials used on the scene.
Exterior Walls
Wood Panels
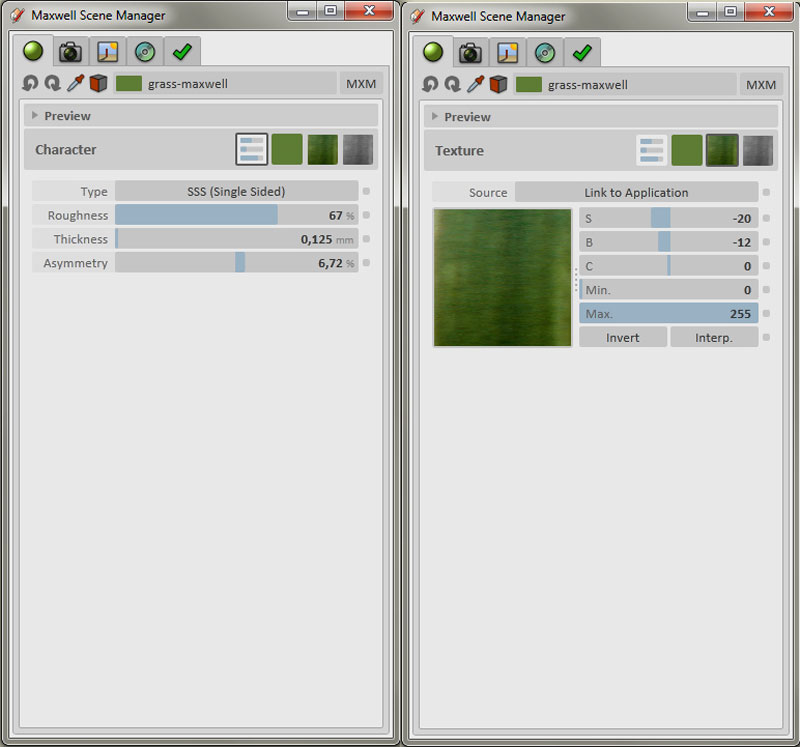
Grass
For grass I used type SSS (Single Sided) and used a texture from visualization artist, Peter Guthrie’s grass tutorial part 2:
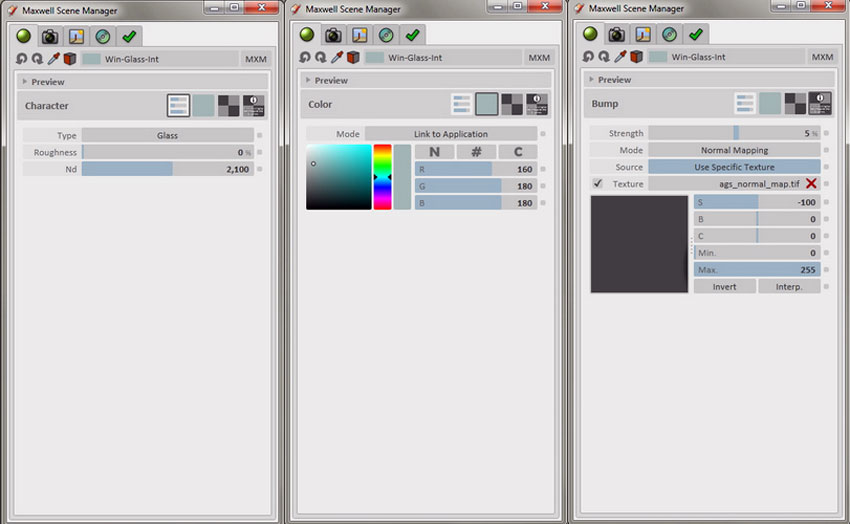
Glass
‘Glass materials should only be used on objects which have a closed volume’.
Lighting
Image Based environment type was selected for illuminate this scene, I used Peter Guthrie’s 1928 Dusk Sun HDRI. With the use of the HDRI map my shadows were not sharp enough, so after reading the making of The Museum ‘Field Project’ by Bertrand Benoit, I decided to test Bertrand’s trick by lowering the gamma of the HDRI in Photoshop. Render preview using the HDRI with gamma 1.00
Render preview using the HDRI gamma lowered to 0.75
Image Based settings used:
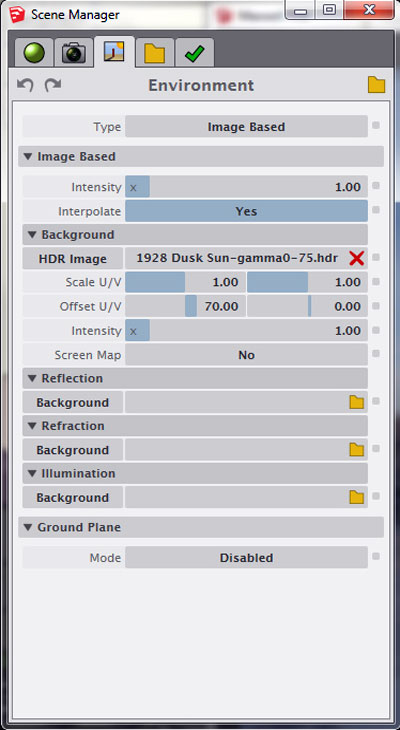
Scene Manager - Environment
Camera & Camera Settings
‘For each Scene in your SketchUp document, the plugin will create and maintain an associated Maxwell camera.’ In SketchUp I set my camera to perspective and adjust cameras field of view, then navigate the scene until I find a point of view that is interesting and do small adjustements, when Im happy with the view I save the scene. Before rendering, I do set up my camera, by opening the Maxwell’s Scene Manager and selecting the tab ‘camera’. In this case I set the output resolution to 1600×800, focus and exposure could be set to the default ‘automatic mode’, personally I don’t like to leave it to the luck, so I adjust as follows:
f/stop = 11 or higher, lower values causes DOF which is going to make to render slower (unless I want to use DOF, then I go for lower values). Shutter and ISO film are adjusted to lighting conditions (as a real camera).
Now do a test render and adjust shutter and ISO.
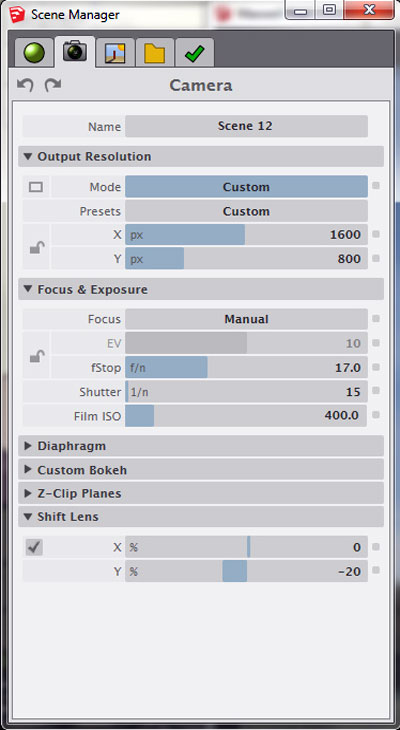
Scene Manager - Camera
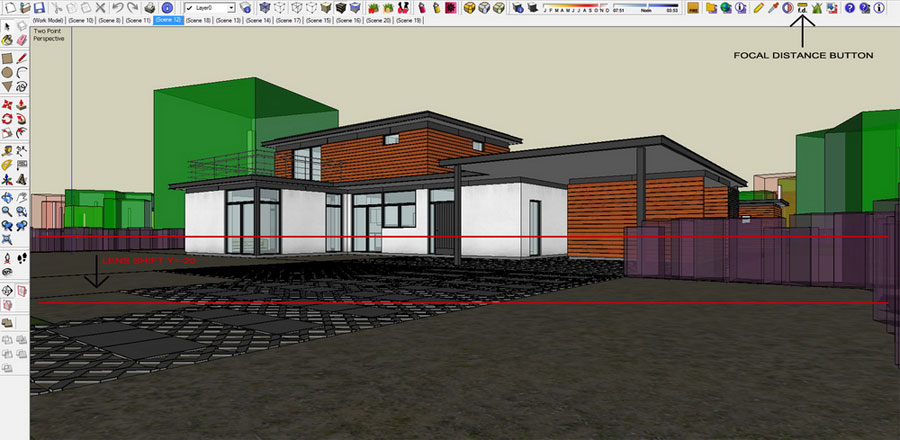
Click the ‘Set Focal Distance’ button, you will be prompted to select a point in the scene. Next select a point on a face you want to be focused. To finish, I set my camera to ‘Two-point perspective’ in order to correct the perspective distortion. Shift Lens allows to shift the camera’s film along its X and Y axes, with respect to the lens.
‘The effect of the shift lens cannot be visualized in the SketchUp viewport, due to SketchUp’s API limitations. It can, however be visualized using Maxwell Fire’.
Rendering
Maxwell’s plugin is so simple to use. To render just launch Maxwell Fire, by default, the scene will immediately be transferred to Maxwell Fire and its rendering begun, the engine settings are quite minimal.
- SL: Sets the sampling level at which rendering will stop.
- Threads: Sets the number of threads which will be used by the render engine.
- Engine: Allows you to specify whether rendering be done using Maxwell Render’s Draft or Production render engine.
When a final image is being rendered, it is desirable that inadvertent actions, for example, scrolling in the SketchUp viewport, be ignored, so that the rendering is not interrupted. This may be done by enabling the ‘Lock’ button.
Postwork
Once the render is completed I saved the image as PNG. Maxwell’s plugin unfortunately does not support channels. If you use very large HDR maps or you dont want to compose your sky in postwork, then you don’t need a sky alpha channel. In some cases I use Maxwell’s Physical Sky and then compose a sky image in the background with Photoshop. After some experiments I found my own technique to generate a sky alpha channel with this simple method:
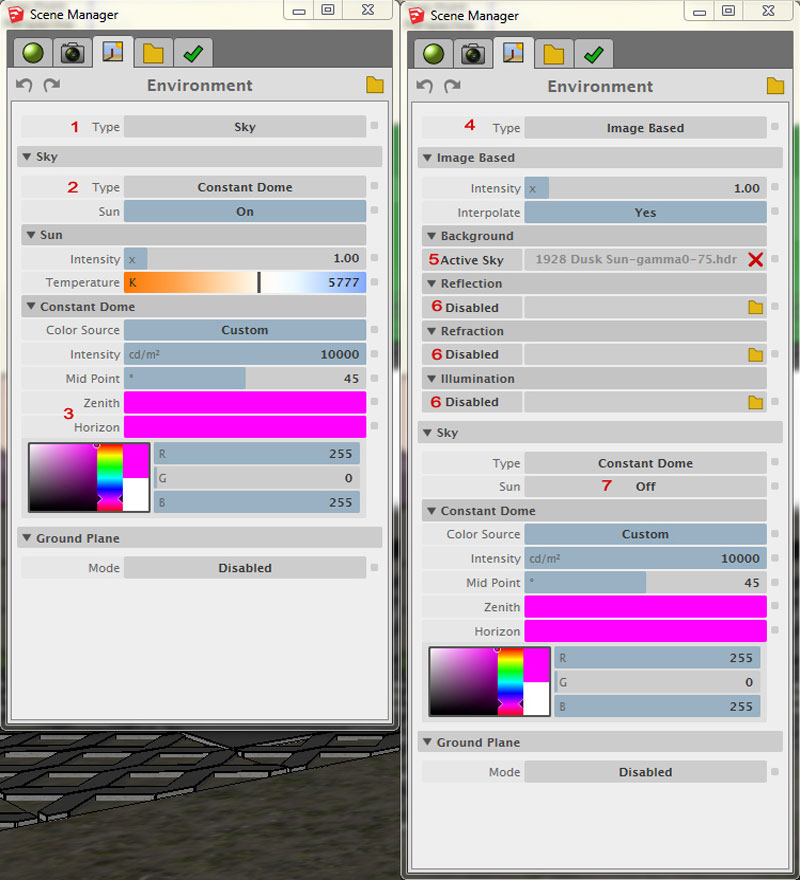
- First, hide any emitters or IES in your scene
- In Maxwell Scene Manager set environment type to Sky
- Set sky type to ‘constant dome’
- Customize zenith and horizon colours to magenta
- Change then environment type to Image Based
- In Image Based, set the background channel to ‘active sky’
- Disable the rest of channels: reflection, refraction and illumination
- Turn OFF sun
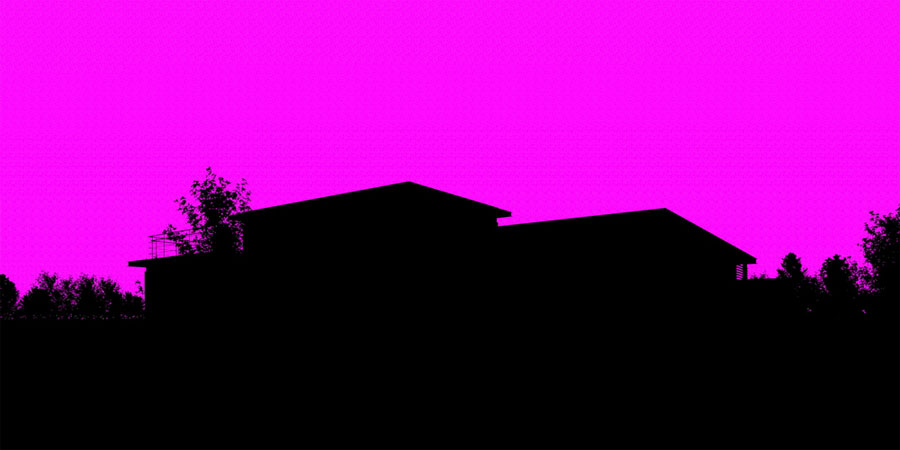
Launch Maxwell Fire….this is how the image should look now. Save the image.
Now you can compose your raw render with a sky backplate.
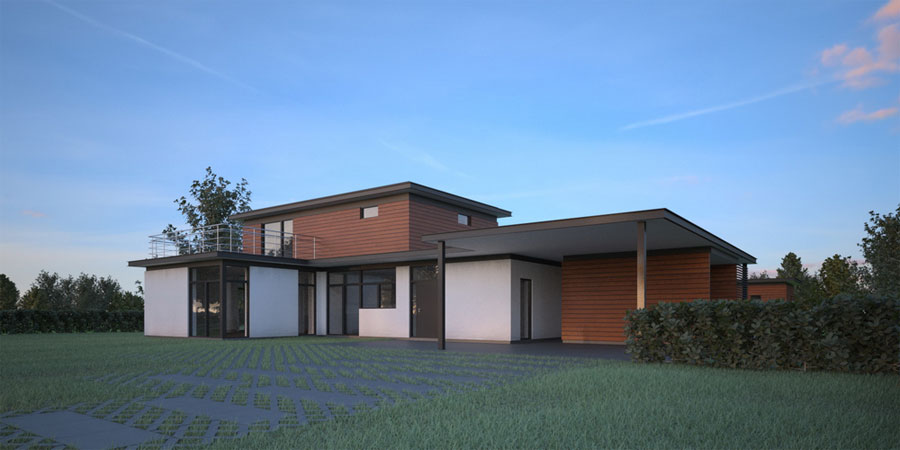
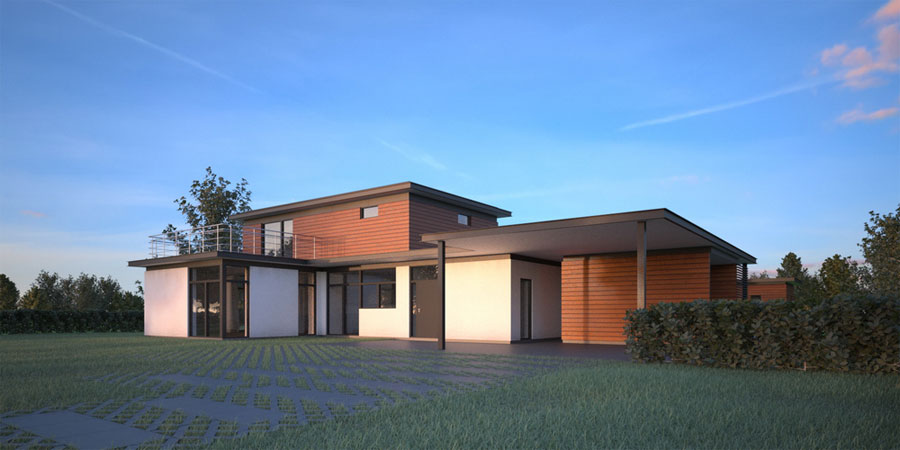
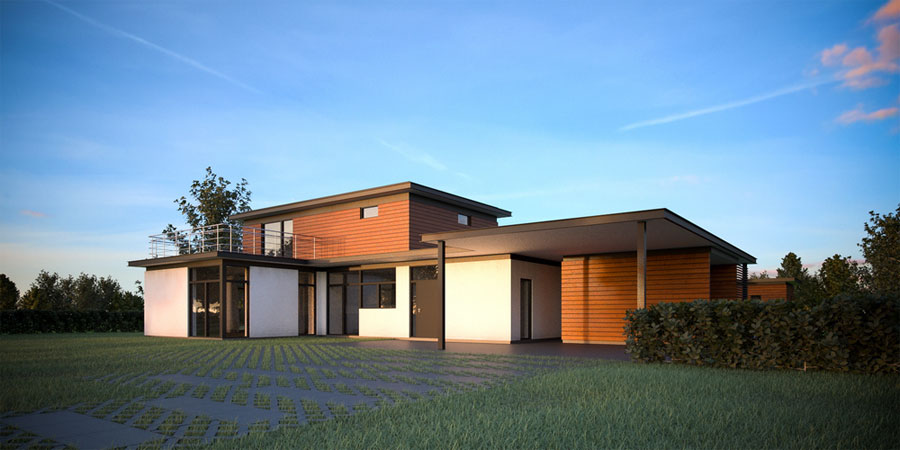
In this case I did not compose the sky in Photoshop, just left the one integrated with the HDRI used in environment. Final image, after adding subtle corrections in Lightroom.
That’s it, hope you find this tutorial helpful, thanks for your interest.
Victor






Hi Victor! Thank you for sharing your workflow. How do you lower the Gamma of the HDR exactly. When i open a (Peter Guthrie) HDR in Photoshop i do only see white (upper half) and black (lower half). Is that normal?
Best regards, Sebastian