Drawing Clouds in Piranesi

By Snoopywang
This tutorial is going to demonstrate how to use the mouse to draw clouds with a watercolor effect brush in Piranesi. You will be using your mouse to achieve this effect as not everyone may have the use of a graphics tablet. The final picture is a SketchUp model completed with this process for making the clouds.
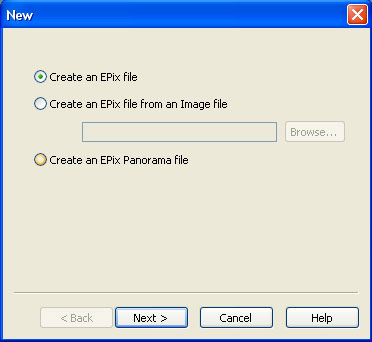
Step 1. In Piranesi select File> New. The following window will open. Select Create an Epix file and then click Next.

Step 1
The following window will open. Do not modify any parameters and just click Finish.

Click Finish
Step 2. Select the Brush tool. Click on the top left corner Style Selector and select Piranesi Tools and Brush marks from the drop down menu. Select the brush marked Powdery paint.

Step 2
Step 3. Adjust the brush parameters. Go to the toolbar to the top right where it says Grain, Opacity and Blend. Leave Grain unchecked. Set Opacity to 50 % and select Ink for Blend.

Step 3
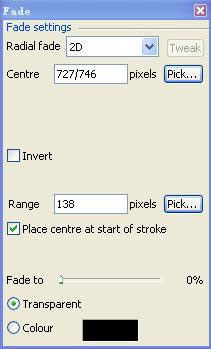
Step 4. Next click on the blue circle to the right of the Blend panel. This is the Radial fade button. Then click on the “>>” icon which is for more detailed grain and fade settings. Set Radial fade to 2D mode – You are going to select the center or the most saturated part of the fade by clicking on pick… and clicking once in the drawing area. Now make sure Place center at start of stroke is ticked. Now you are going to choose the range of the fade. Click on Pick…next to the Range box and drag your brush to the right to determine the range of Fade. You can also type in the range you want, so let’s set it at about 138-140. You can experiment with these settings to get the brush stroke you want.

Step 4
Step 5. In the Tool Options toolbar (top left) adjust the Angle of the brush to -83 degrees, so that the brush strokes will be set to vertical. Set the Brush pixel size to 120-125. You can experiment with the brush sizes if you want and see what difference it makes. For now we will use these settings below.

Step 5
Step 6. You are now ready for drawing. Experiment now using the path of the mouse. If you drag the mouse quickly you would get a “sand pen” effect. If you drag slowly the start point is dark, fading out to the parameters you set.

Step 6
If you do not want a “sand pen” effect then you can modify the parameters of the brush as follows:
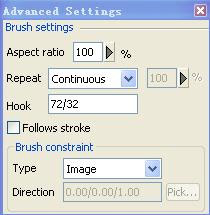
In the Tool Options toolbar shown here, click on “>>” icon

Modify the Parameters
In the dialogue box that opens you can see, Repeat Normal is the default option. In this setting if the mouse is dragged quickly, it is possible that some parts can not be drawn because of the gaps you get. If you drag slowly, then it will be uniform in all areas of the painting. In this way when dragging the mouse again you will find that the effect has changed.

Repeat - Normal
With Repeat Continuous selected, regardless of how fast you drag the mouse, it will be evenly colored from saturated to fade. You only need to change the Repeat option to Continuous to get this effect.

Repeat - Continuous
Step 7. Combination Strokes. Attention to the convergence of the brush strokes can be used to complete the local halo. The converging faded halo can also be used in places where it has not begun to converge.

Step 7
Various combinations –

Variations
You can also be flexible with brush application and other functions, such as change the existing overlay mode (Blend) for Paint. It is all a process of experimentation once you have the basic brush setup and using different strokes.

Different Blend Mode
Final image using this process for the clouds.
Hope you found this tutorial useful and it has helped extend your knowledge of Piranesi.
Cheers
Wang


I am new with piranesi, and would like to know how to create your own styles
Great! thanks!
fantastic an great thanks!
Just to know if is posible to found yet Piranesi Software and where?
Thanks