Quick Concept Sketching using SketchUp and Photoshop

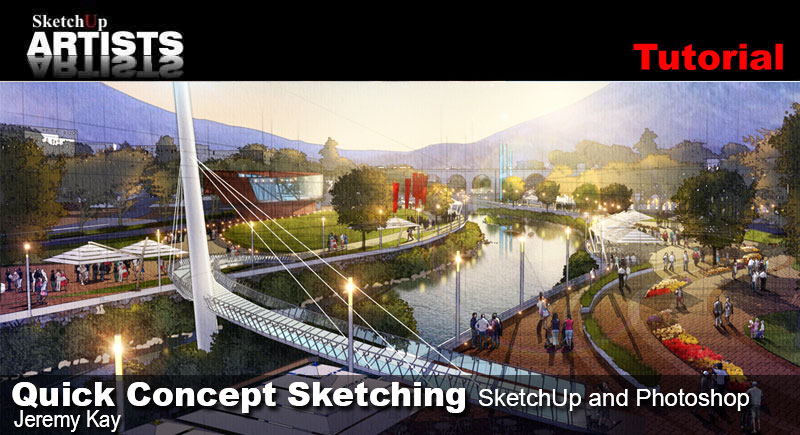
Exploring further workflows in Architectural Visualization, SketchUpArtists would like to present a NPR (Non-Photorealistic) rendering approach kindly contributed to us by Jeremy Kay. No rendering software was used in this tutorial, only basic SketchUp output, with all final work carried out in Photoshop.
There is great power in an effective concept drawing. Hovering somewhere between a hand sketch and a realistic rendering, it has the ability to communicate the design intent and convey the spirit of place while avoiding getting mired in the small details of a more polished piece.
To me, there may not be a more fluid combination of software than SketchUp and Photoshop when used together. The speed and depth of both programs create an extremely potent pipeline for producing quick imagery that sell ideas. The following tutorial illustrates just how quickly you can develop an effective concept drawing using just these two programs. This image used in the tutorial was done as a part of a larger master plan for a new river-front revitalization in Peru with the uber-talented group at PLACE Alliance. Laid out below is my workflow…
For your reference, here is the simple SketchUp model that I used. You can see that I’ve built it up over top of a hand-sketched master plan.
In SketchUp
Image Export
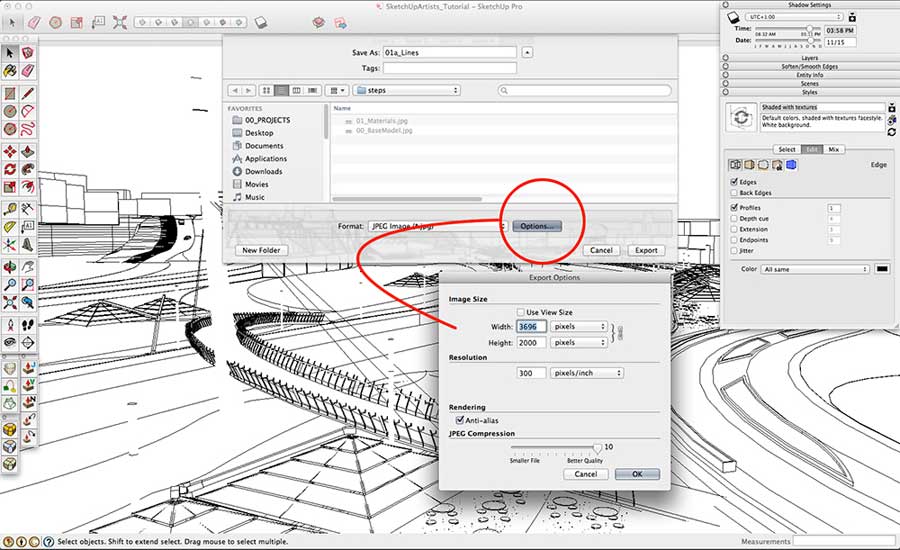
I’ll typically export out three main Layers out of any given model. The linework, the shadows and a ‘color selection’ Layer (more on that later). When exporting out an entire scene from SketchUp, I’ll set the height at a minimum of 2000px.
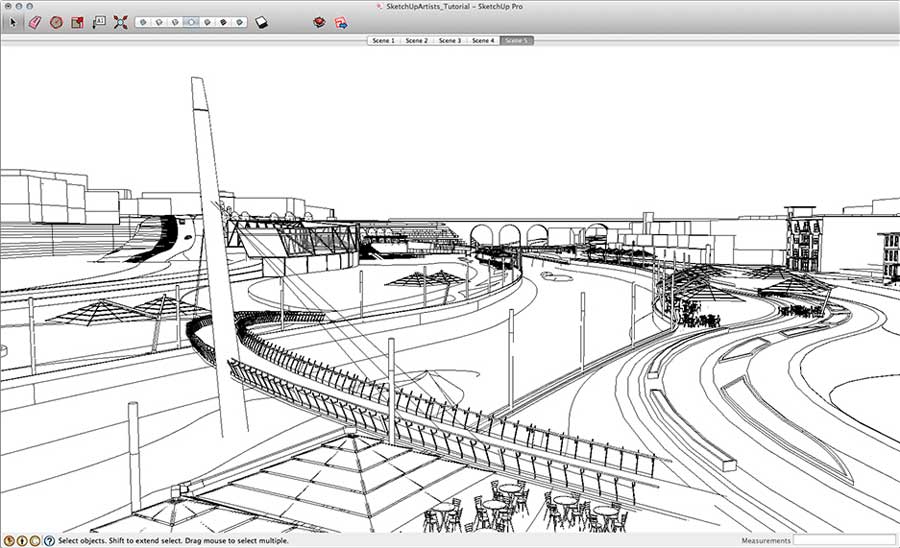
Now that I have my export size set, I’ll export just the lines. It’s important to make sure that your background settings in your Styles pallet are all set to white, otherwise you’ll end up exporting a color in your sky, which we don’t want right now. Also, set your line Profiles to 1. This ensures that any curved surfaces will also export with a line.
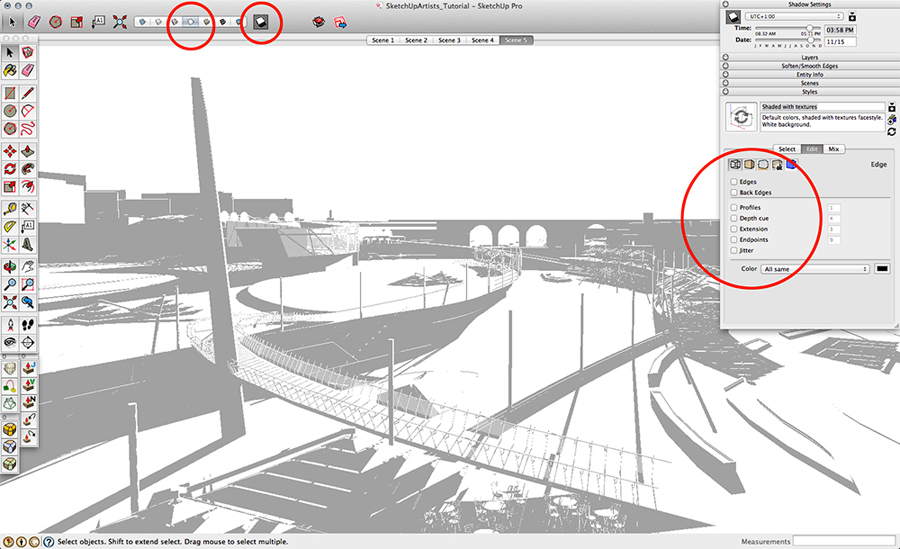
Next, I’ll export out just the Shadows. This is achieved by unchecking your Line Styles, turning your scene to the Black and White Line Mode and then pressing the Shadow icon. Your model should look like the image below.
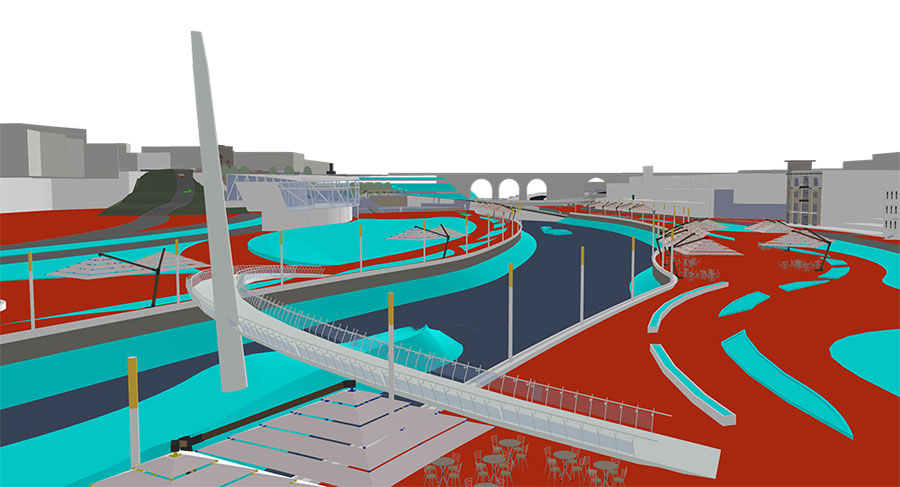
Next I’ll export a ‘color selection’ Layer. This is achieved by painting large areas of the same materials very vibrant colors within your SketchUp model. This will greatly aid you in your selections for painting in Photoshop. Once you have colored and exported your image, you don’t need to save these colors and can just undo them within SketchUp until you’re back to your original colors.
Element Export
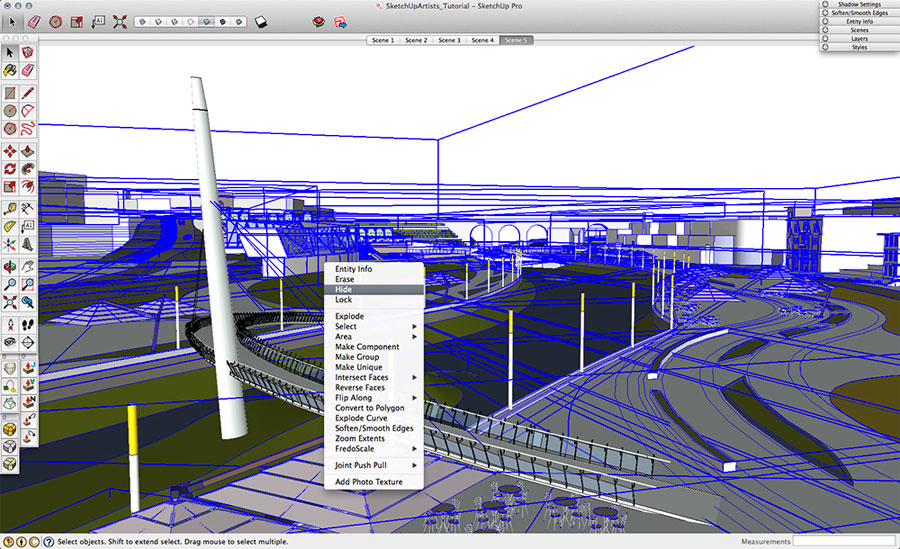
One shortcut that helps in both selections and layering in Photoshop is to just export certain elements from SketchUp. I’ll usually just export certain pieces that are important to the scene. In this case, I exported out just the bridge section and the tables and chairs with their large umbrellas. In the image below, you can see that I’ve just done a ‘Select All’ within my model, then, holding SHIFT (on a mac), I deselect the bridge piece. I then ‘Hide’ the rest of the model and I am just left with the element I wish to export.
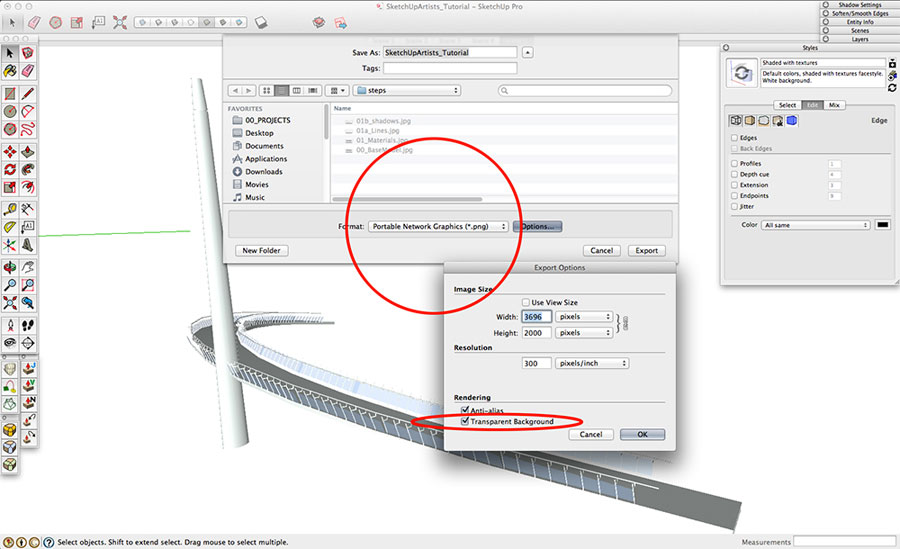
Now that I just have the element I want, I’ll export this selected piece at the same resolution as the overall images I exported before. One major difference here is that I’m now exporting this piece as a .png file. This will create a file we can use in Photoshop that will only have the element we need on a transparent (and not white) background. Make sure you have ‘Transparent Background’ checked in the appropriate dialogue box.
Mac has better support for transparent image export straight from SketchUp, this option is not available on PC. If you have LayOut, there is a workaround for PC users to obtain a transparent background. LayOut is a kind of a presentation tool for SketchUp, that comes with the Pro version. This workaround will be of no use to those using the free version (SketchUp Make) as LayOut doesn’t come with it. You will have to resort to removing the background in Photoshop (Magic Wand possibly).
- Go to Window >Styles >Edit, then check through the options until you get to some little check boxes that say ‘Sky’ and ‘Ground’. Turn off Sky and Ground and make sure that the background is set to perfectly white (RGB values: 255,255,255).
- Save it and go to File>Send to LayOut.
- Once open in Layout, save it as a PDF. It will then open in Photoshop with transparent background.
Once I have exported all my elements as .png’s from SketchUp, I’m ready to work in Photoshop now.
Photoshop
Set Up
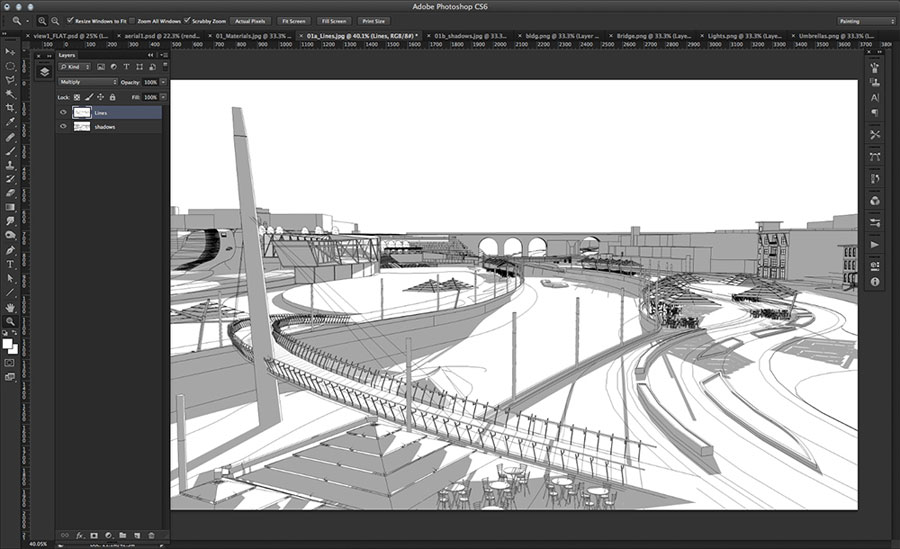
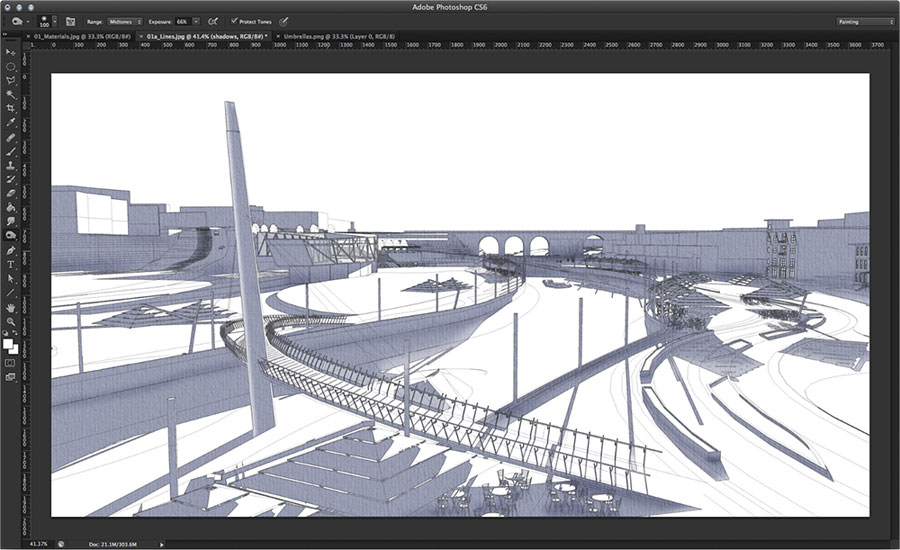
Once inside Photoshop, I’ll open the linework, shadow and color selection files. Starting with the linework file, double-click on the Background Layer in the Layers Pallet and change the Layer from a locked background to an editable Layer. I usually rename this Layer ‘Lines’. I then set this Layer to ‘Multiply’ in order for the paint Layers to show through beneath it. I then place in my Shadow Layer in this file and set the Shadow to Multiply too.
To make sure your files come in precisely on top of (or below) one another, go to the file you want to import, do a ‘Select All’ command, then come back to your original file and ‘Paste in Place’. I’ll do this for all the files I’ve exported from SketchUp. You’ll notice that your elements should come in exactly where you want them as well.
One technique I have been using for years is to import some sort of paper texture. I find this helps ‘roughen’ up the drawing a bit, adds great depth and helps to keep the image conceptual in nature. You can find countless paper textures on-line. I’ll bring in the one I like, Desaturate it, then play with the Layer settings until I get a texture that feels pretty good. It’s important to find the settings that work for you, so have fun and experiment.
You’ll see that I have now got some great texture within the Shadow Layer already and more will continue to show through once I continue painting. At this point, I’ll also mess with the Hue/Saturation of my Shadow Layer to bring it from a dead grey to a more natural hue. Finally, while still on the Shadow Layer I’ll ‘Burn’ in some areas to mimic a bit of Ambient Occlusion.
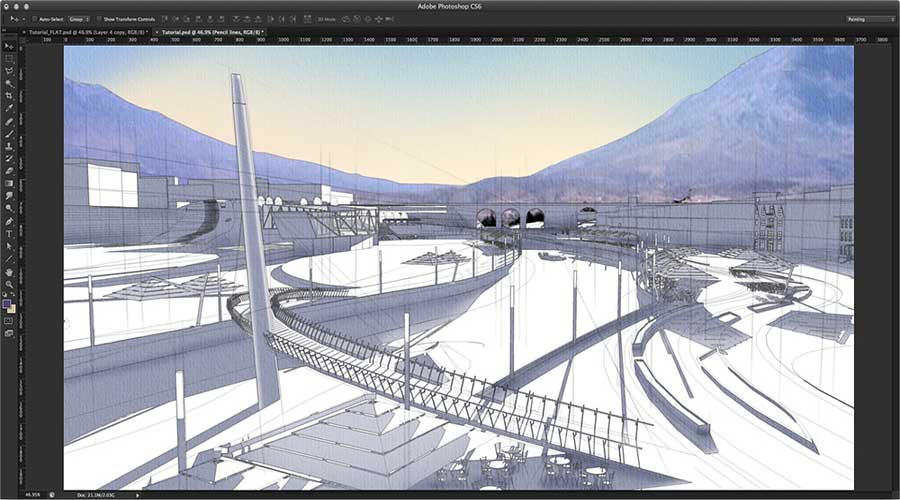
One last item I’ll add to my drawings is a bunch of construction lines. Growing up in the age where I did a fair amount of work by hand, this type of setup was vital to getting an accurate drawing. Even though 3D modeling has done away with the need to have this type of linework, to me there is a richness of craft that carries over to the digital drawing. The images seem to feel deeper and much more layered. It also really helps the drawing to stay in the conceptual realm. You can use a myriad of techniques to achieve these lines so I encourage you to explore to find a method that works for you as you find your artistic voice.
Paint
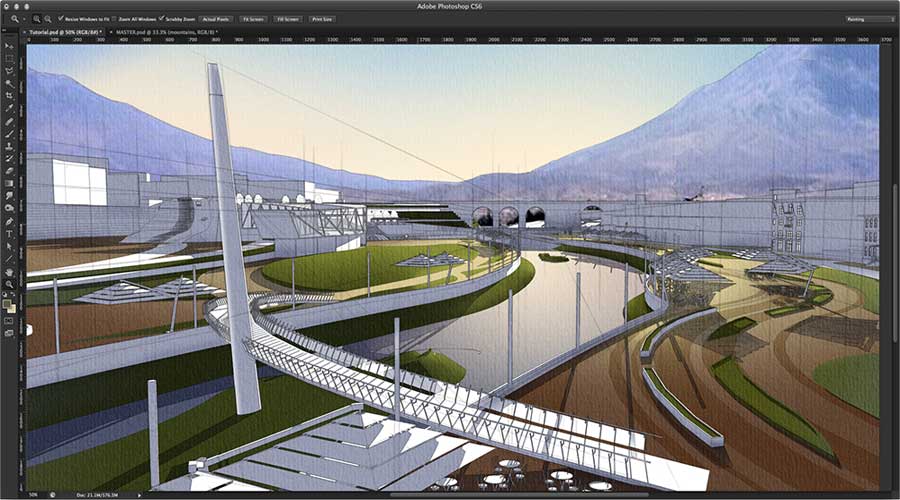
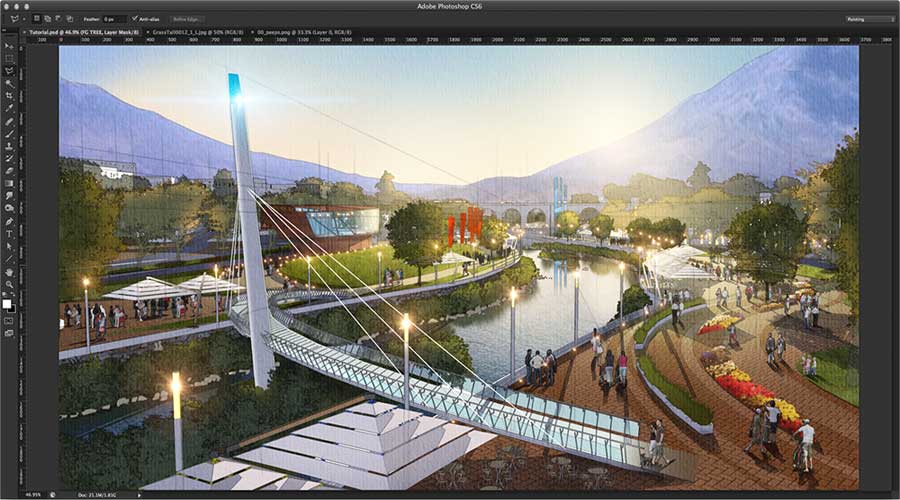
I’m now ready to start layering in paint. I’ll always create new Layers for each new section I’m painting in. For instance, in the image below, I have painted in the sky on its own Layer using the Gradient Tool and then layered in a photograph of some of the mountains that exist near the site on their own Layer. This not only makes it easy to edit each painted area, but it also allows for quick selections of everything on that layer (On a mac, hold the Command key over the Layer thumbnail image and click).
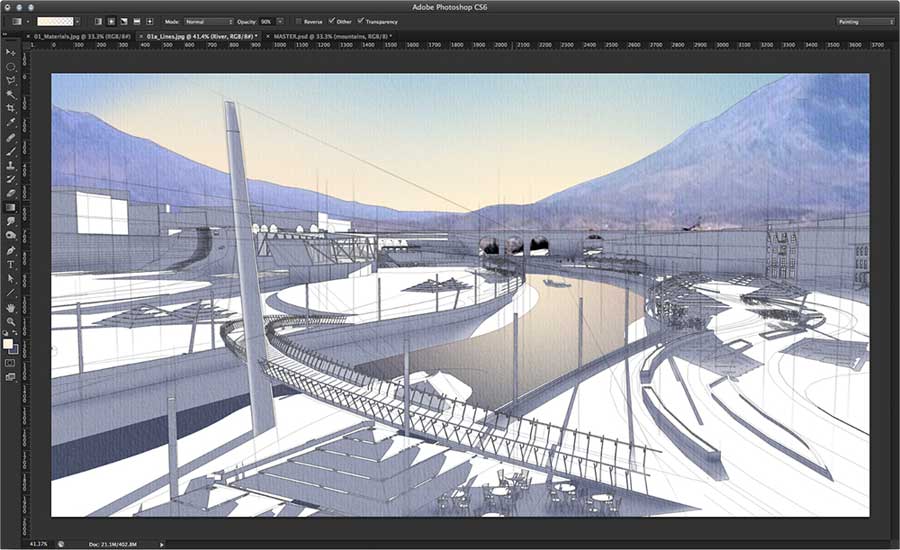
Next, I have layered in the river on its own Layer, using colors sampled from the sky and mountains to keep the mood consistent.
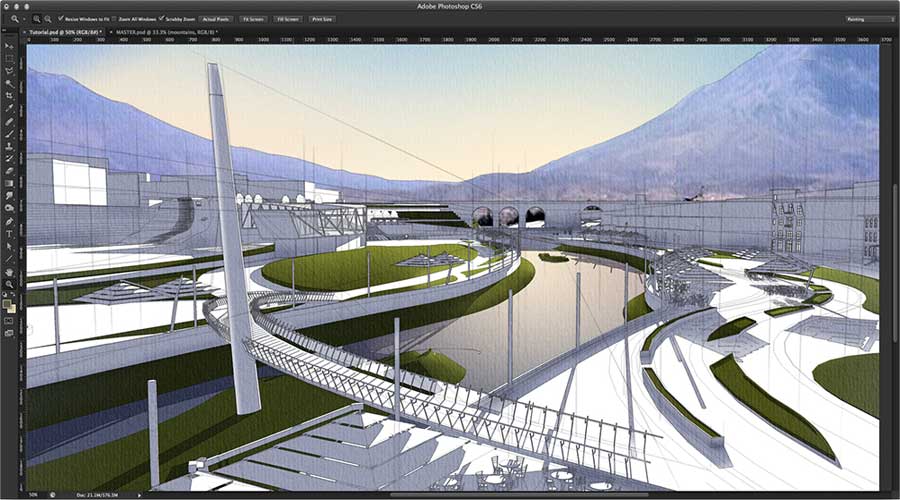
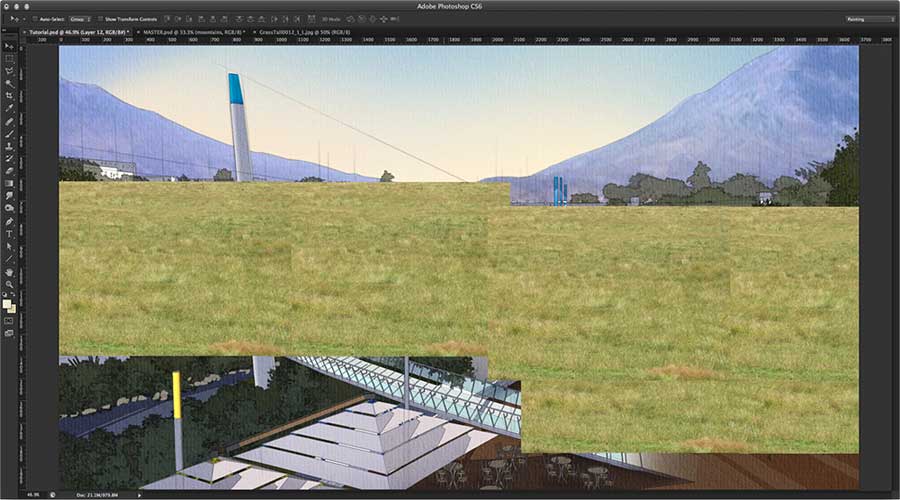
Then, the grassy areas. I’m able to quickly select all the areas of green by utilizing my ‘Color Selection’ Layer. I will select the aqua color and then right click and select Similar.
With the Gradient Tool, I then painted in the paver areas. For the darker striping, I was able to use the Magic Wand Tool on my ‘Line’ Layer and select just the bands I wanted. With them selected, I went back to the Layer with the paver color and adjusted the Hue/Saturation.
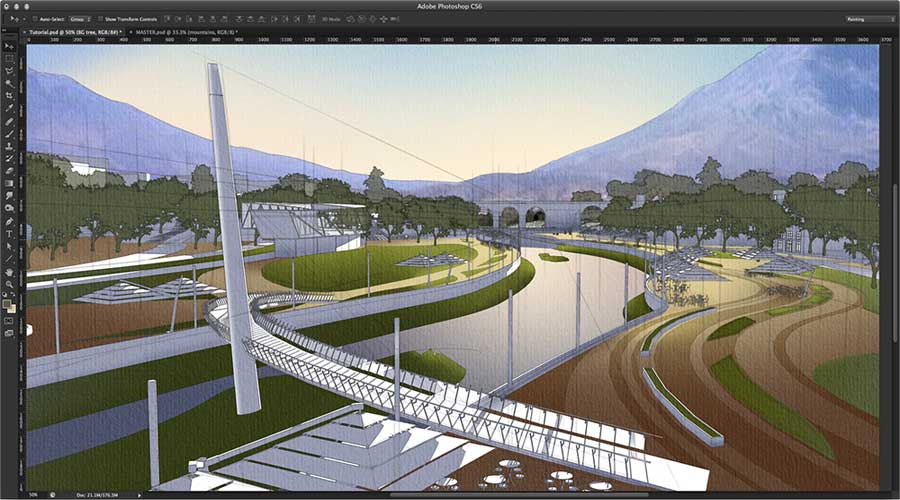
Next, I’ll start blocking in trees. Because this is a quick concept drawing and not a final rendering, I want something that is fast and believable to add a bunch of trees to the scene. I downloaded some free tree brushes off the internet and ’stamped’ in a bunch of different trees into the scene. I’ll typically add a dark Stroke around the trees to make them mimic the SketchUp linework.
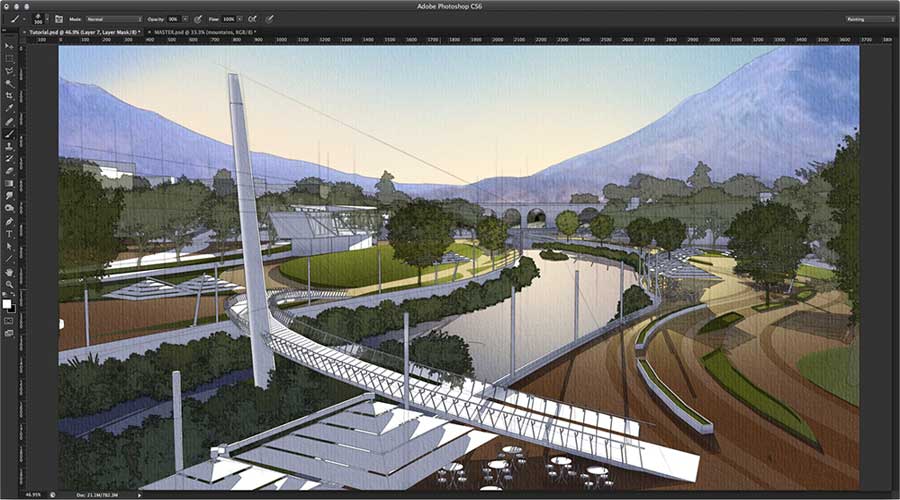
Using the same process above, I’ll paint more trees into the scene on a new Layer.
And some more… and within a few minutes I have a scene that looks like this.
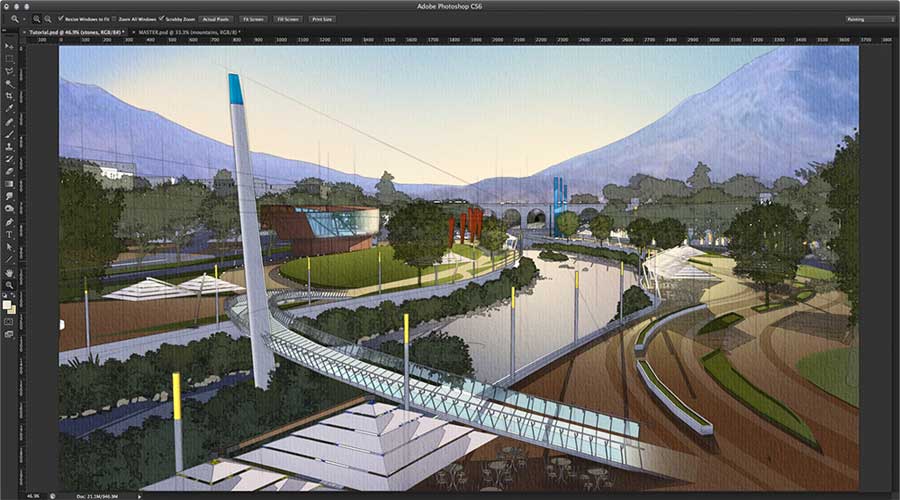
When the vegetation is massed in, I’ll start painting in color on the architecture.
Next, I’ll add some more colorful details, like the windows in the background buildings, banners and some kind of art piece in the background, each on their own Layer of course, so it’s easy to modify if need be.
Texturing
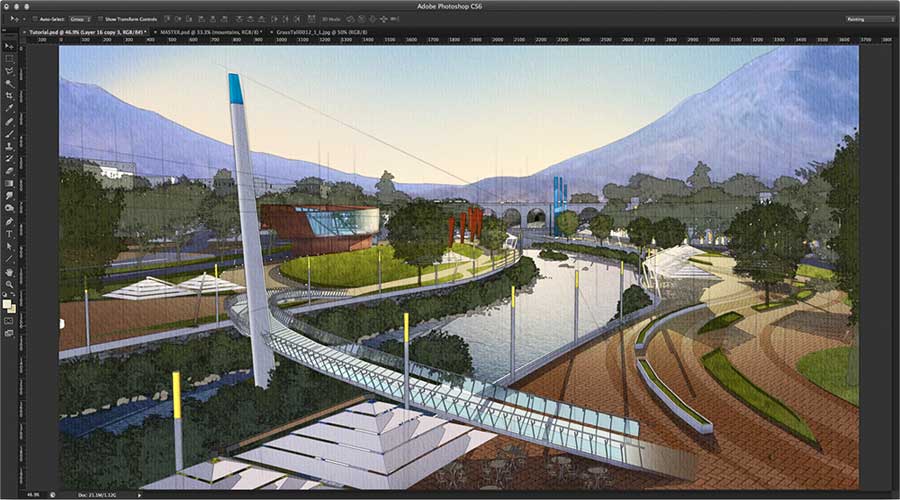
Once I’m done with the general blocking in of color, I’ll start to bring some textures into the image. To do this, I’ll grab photographs and place them over the areas I want to give texture to. I’ll then set the Layer to Overlay and then create a clipping mask to contain the textures just to the areas I want.
In the following image, you can see that I used this method to texture the grassy areas, pavers and river.
Lighting
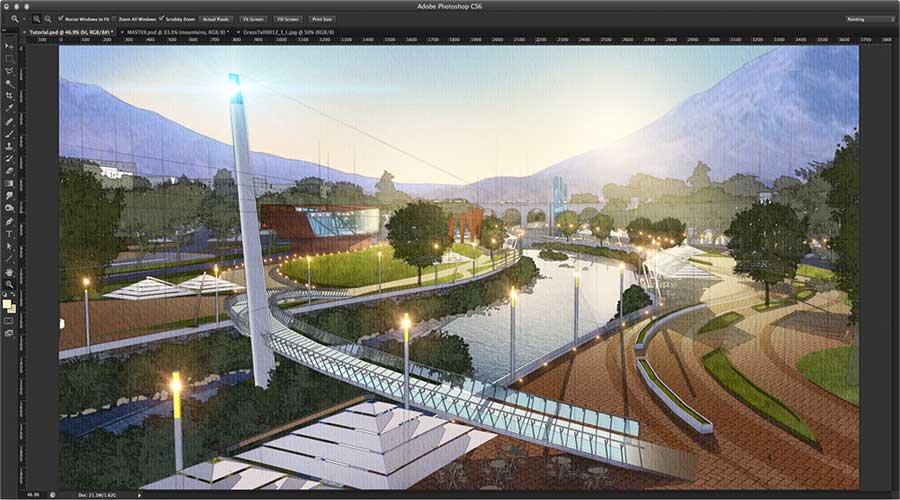
Once I texture the areas I want, I am ready to light my scene. To start, I really wanted a nice procession of lighting to lead the viewer through the scene and let them experience the curvature of the ‘river walk’. To achieve the small point lights, I’ll grab a lens flare image from the internet and set the Layer Mode to Screen.
Next I’ll paint in a setting sun and some atmosphere.
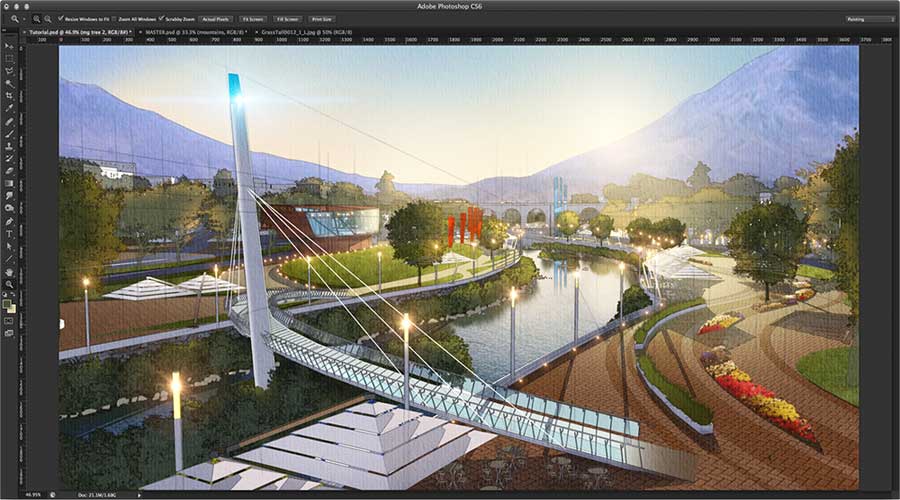
Now I am ready for some final detailing of the image. Here, I blocked in some flower beds, pumped up the red banners, added bridge cables and added some reflection to the river. I also created a new Layer and named it ’Tree light’ (real creative, I know) and lightly painted in some warmer tones on the areas of the trees that would be catching light (20.jpg)
People
One tip you can use for appropriately scaling people to your scene is to create a whole bunch of 2D people in your SketchUp model and scatter them throughout your model. Then, export just the 2D people using the method outlined earlier in the ‘Image Export’ section. If you paste them in place in your Photoshop file they’ll show up as perfect scale figures to scale your Photoshop entourage to. (22.jpg)
Shadows
Using a Multiply Layer, I paint in shadows for the trees and people. I sampled the same shadow color on my SketchUp Shadow Layer to get the same tones.
Final Color Corrections
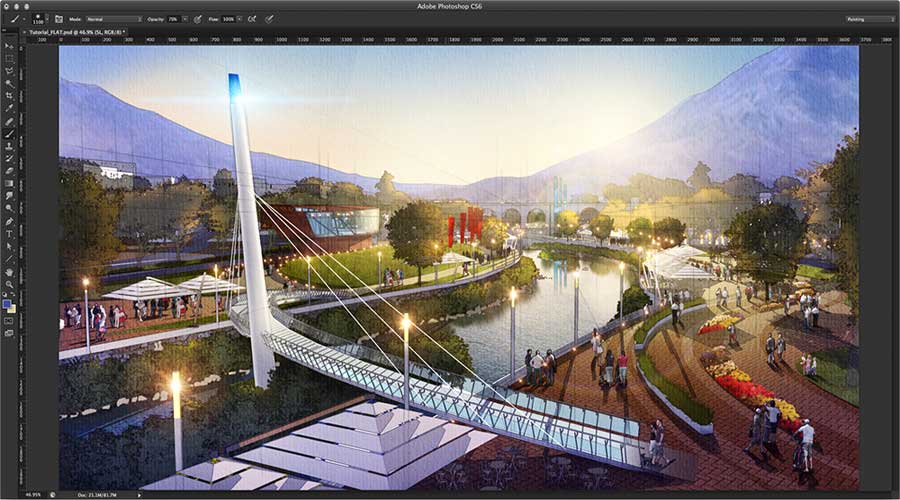
At this point, the drawing is nearly done and I’ll save a copy of the Photoshop file and flatten it. In this particular image, I felt like I needed to bring in more of the blues and purples of the mountains down into the bottom of the scene. Using a new Layer set to a low Opacity, I painted in some more of the ambient color by sampling the mountain color. This really helped unify the drawing. Finally, I adjusted some of the levels for the overall scene and the bridge element to get it to pop more.
Final Image
After some final tweaking, and realizing I forgot the light reflections in the water, I officially called this sketch done.
I’m often asked how long these types of drawings take. My answer is typically ‘as long as It takes to effectively communicate the idea’. This particular drawing was put together in one very long afternoon.
I hope you find this tutorial helpful, and that the steps listed above become more tools for your ever growing tool chest.
Jeremy Kay
‘Colorado based Architectural Illustrator Jeremy Kay opened studioJDK in the fall of 2010 where he produces innovative and forward thinking design strategies that draw from architecture, environmental branding, graphic design and research that ultimately lead to differentiated, meaningful and engaging spaces. Before starting studioJDK, Jeremy began his career as a designer for Communication Arts in Boulder having obtained a degree in Environmental Design from the University of Colorado. During his time there he was involved in multiple large scale entertainment and retail oriented projects located around the world and learned the value of blending the disciplines of architecture, graphic design and place making to create unique projects’.










Very good tutorial. I would love to see this done as a video.
Wow!! nice tutorial! thx so much.
I am just a new learner, could you pls teach me how to draw a 3d ship or import a picture.?
very nice indeed 🙂
[…] http://www.sketchupartists.org/tutorials/sketchup-and-photoshop/quick-concept-sketching-using-sketch… […]
Thank you for being so generous and sharing your skills and talent.
This is a super tutorial!
Jeremy, EXCELLENT TUTORIAL, a really nice step by step process… Very admirable digital Rendering. Thank you for sharing your knowledge.
great work
I’ve never tried to your ‘color selection’ method before because I often rely on Vray’s render-ID. Thanks for sharing this. Now I know that there is an easier way to create a color selection layer for photoshop without rendering the model inside sketchup. =)
Thank you Jeremy, that’s a well presented tutorial and one I will use. Having just done a concept drawing for a customer, I wish I’d seen your superb method first!
Muy bueno, a probar haciendo algo sencillo…Gracias por compartir sus conocimientos!
great tutorial. I so need to get there with my business. I know some photoshop and I have to learn sketch up. thanks
Very cool!!! Love the feel and look! I’m an Illustrator at an architectural firm on 16th Street Mall in Denver! Go Colorado!!
thanks for sharing, very awesome!
a very concise tutorial, and one that makes me think I can do it easily enough for myself.
and the the finished image has LIFE.
very good.
thanks.
Jeremy just reading this tutorial in the UK .10/10 Excellent .
wow nice
Jeremy, Great work, but what do you mean by black and white line mode? Where do you find that? Or do you mean hidden line style? Thanks
[…] http://www.sketchupartists.org/tutorials/sketchup-and-photoshop/quick-concept-sketching-using-sketch… […]
Wow, Jeremy! – You really raised the bar with that one. Amazing work. Well done, and thanks for sharing your know-how.
Just went through this great tutorial here in Sweden after I saw your presentation on the Sketch Up Basecamp 2014 on youtube the other day. Love your work and thanks for sharing so generously! Very inspiring!
very inspiring and simple. Thanks very much Jeremy.
this truly inspiring and simple. do you think this technique can be implied on architectural plans?
what is “color selection”?
I didn’t understand how to do it…
Where in the tutorial does it mention this OSI ?
This is what it says :
“Next I’ll export a ‘color selection’ Layer. This is achieved by painting large areas of the same materials very vibrant colors within your SketchUp model………”
Its areas colored and put on a specific layer in SketchUp that can then be exported as a jpg into Photoshop. These areas are very easy to select in Photoshop then….
Beautiful 🙂
great tutorial,love the style of the final image,just wondering how is the constrcution line done?
Love this tutorial… i like how you focus on the details. like the sunlight falling on the trees etc. However I didnt get how you painted the glass on the bridge with a translucent blue
Surabhi, in photoshop just paint those glass panels blue then reduce the opacity of them on that layer, then they’ll become partially see through.
Hey Jeremy,
I have enjoyed your illustrations in ASAI in the past and really found this tutorial excellent. I have used Sketchup and Photoshop together for years, but usually deadlines, and other time constrictions don’t allow as mush exploration of the available tools.
I shall be doing some exploring – thank you for posting this!
e
You are a very talented individual, its like trying to follow a master.
The final piece is sooo great! I wish this was available in a video.
Thank you so much. I can do some of the sketch up, such a hack,
photoshop, I took a short course, I’m lost, too much unknown.
I’m old school paper, pencil and paint. I don’t know how to bridge the gap. Keep up the great work!
[…] Quick Concept Sketching using SketchUp and Photoshop […]