Photomontage Tutorial
 By Teofilo Pardo
Teofilo Pardo currently works with his uncle in there new architects office based in Merida, Yucatán, México. He has been using SketchUp for about 5 years now and V-Ray for about 3 years. Teo believes that making photomontages is probably one of the hardest things to do successfully in postproduction. With this tutorial Teo will show us how to get better results and maybe pick up some of his tips and tricks in the process. This is a relatively detailed tutorial by Teo and the software used was SketchUp, V-Ray for SketchUp and Photoshop.
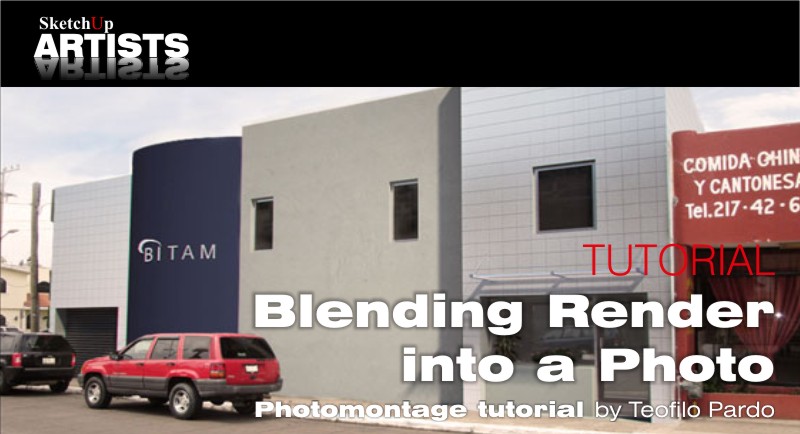
In this tutorial I am going to show you how to blend a render to a real photograph. This is my post-processing method. It is not perfect maybe but I hope it will help you with this kind of work. You will need some basic knowledge in SketchUp Photo Match and Photoshop.
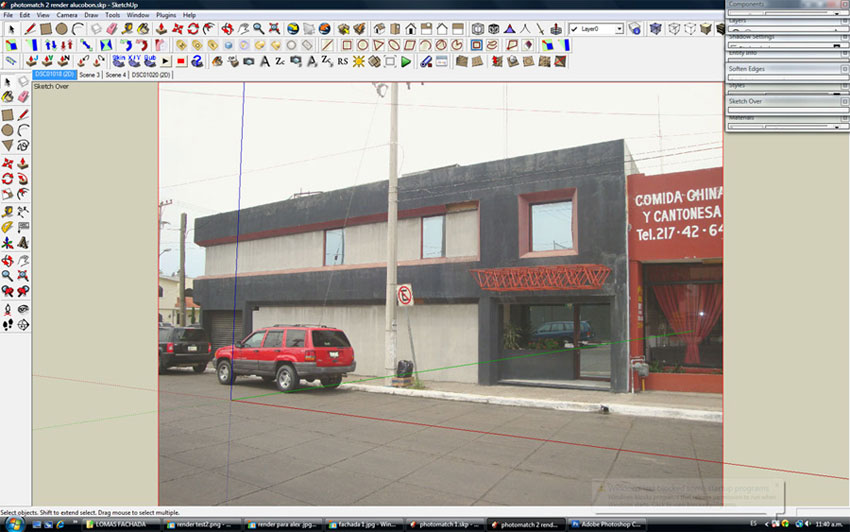
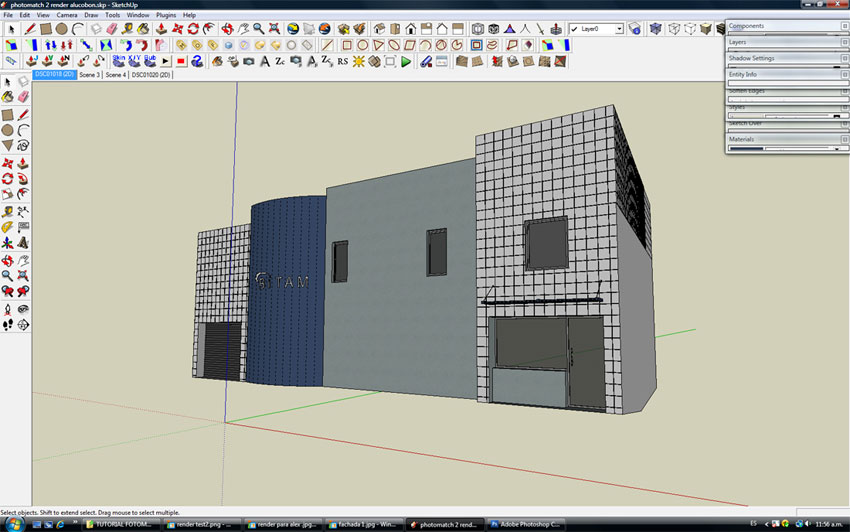
1. Import the image you are going to work on as a Photo Match.
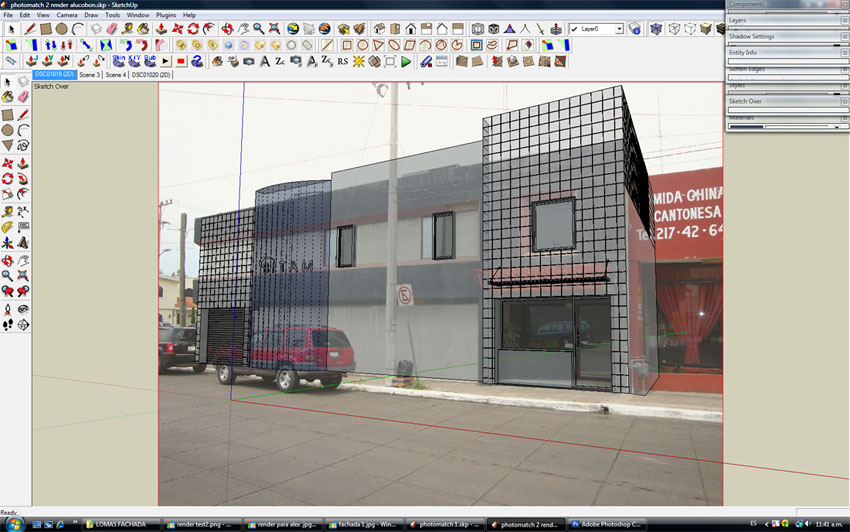
2. Model the new proposal using SketchUp. In this case I worked on a new facade for a building in my city.
3. Once you have your model finished, render it and remember to try to match the sun position in your model with the one in the photo the best you can.
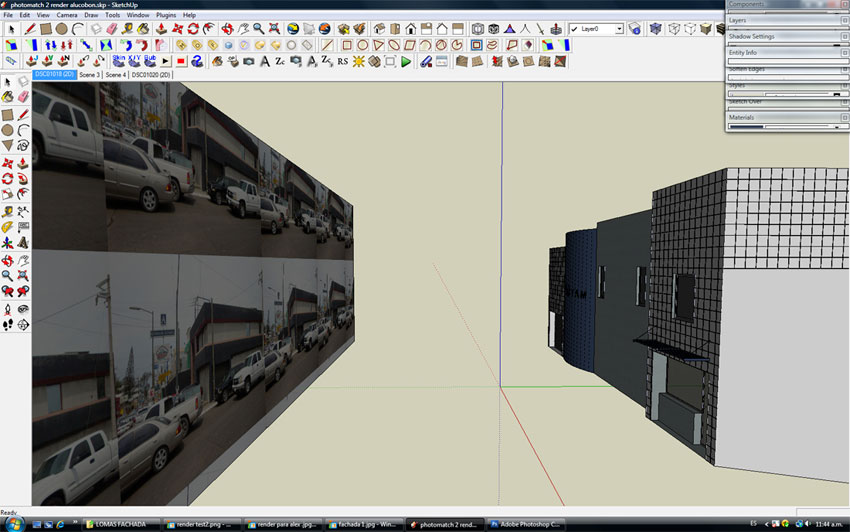
4. For the reflection in the windows I used a photo of the building, but you can do it more accurately taking a photo of the street in front of the future project. In this case for me it was just fine like this.
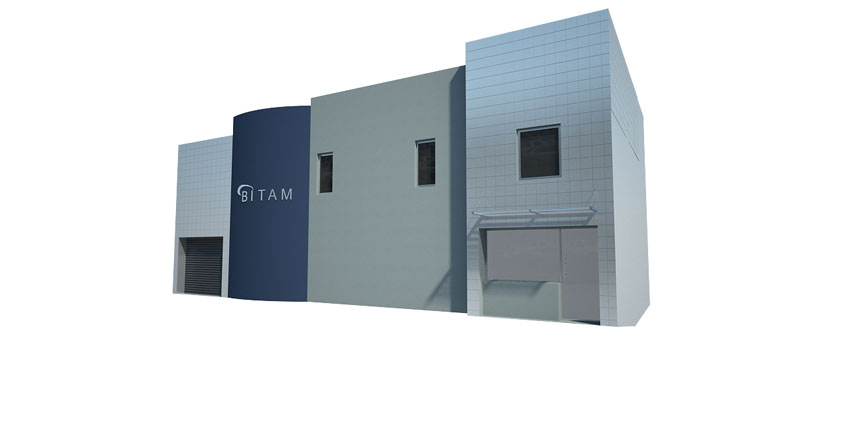
5. This was my render result, done with V-Ray for SketchUp. Remember to save it as a png.
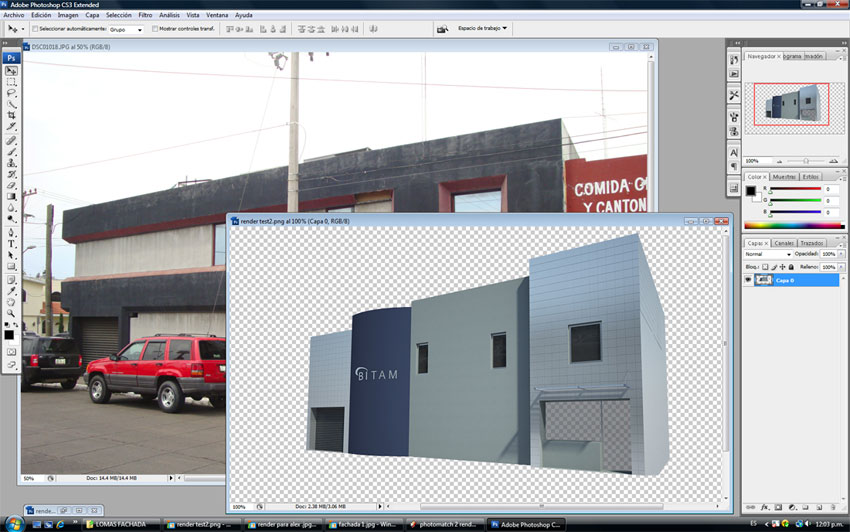
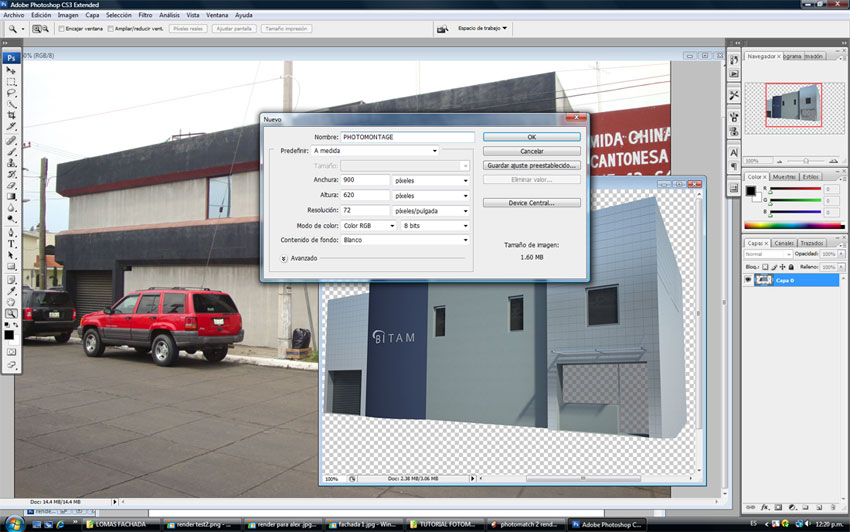
6. Next we will start working in Photoshop. In this case I open the render and the original photo file.
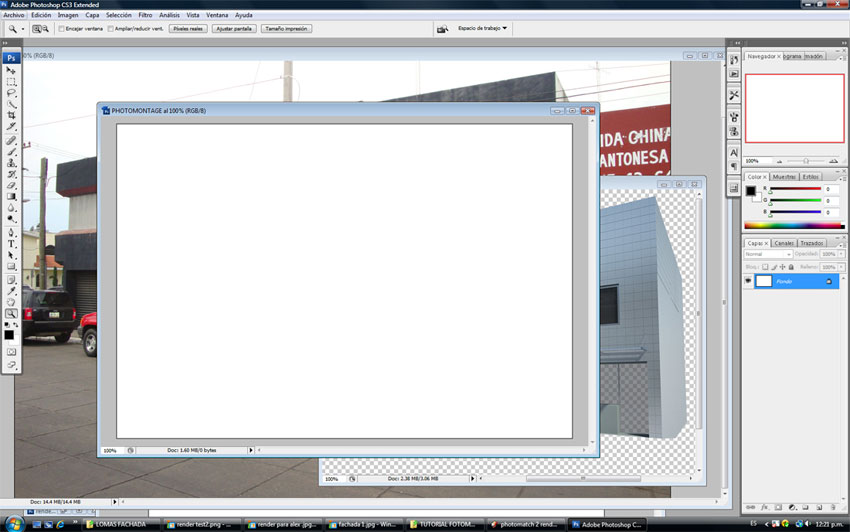
7. Open a new file and name it Photomontage, with a size of 900 x 620 pixels as we don’t need a very big resolution.
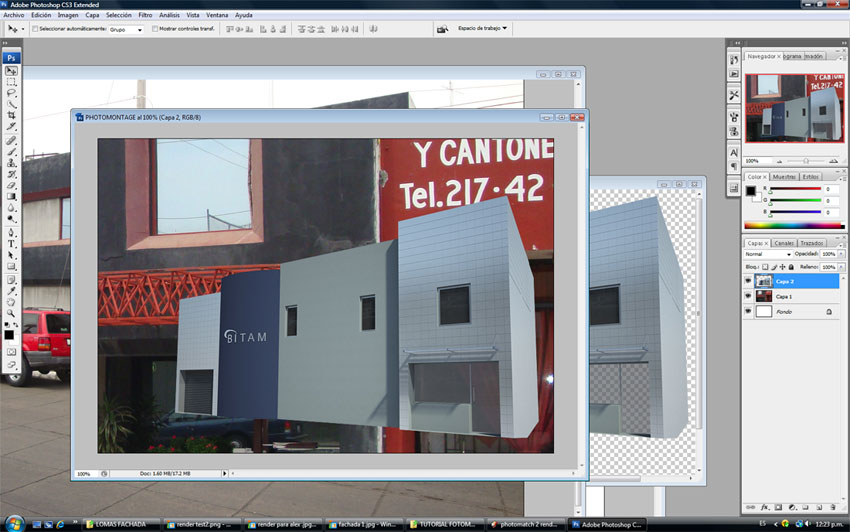
8. I open a new page and I click and drag the two images, the render and the photo to the new page.
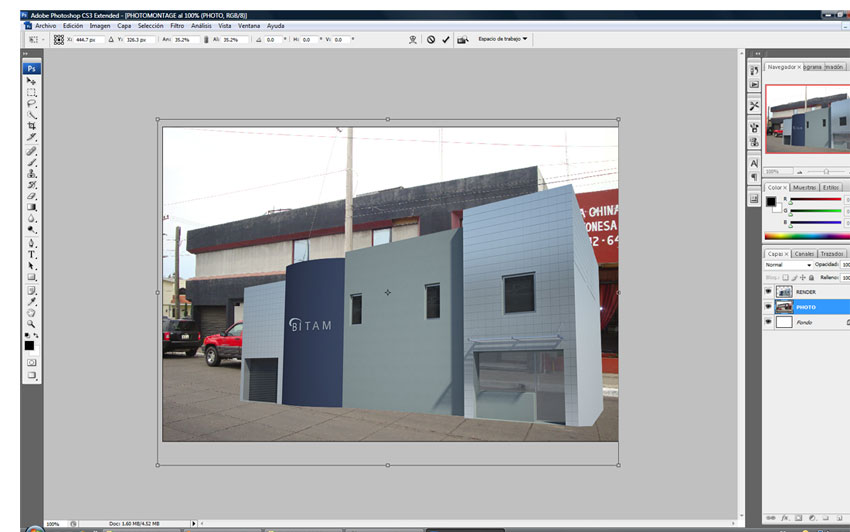
9. I will try to be quite specific with these next few steps as maybe some of you do not use Photoshop, so for those who know how to use it, please be patient. Now as you can see the photo is too big so we will scale it down so it can fit to our work space.
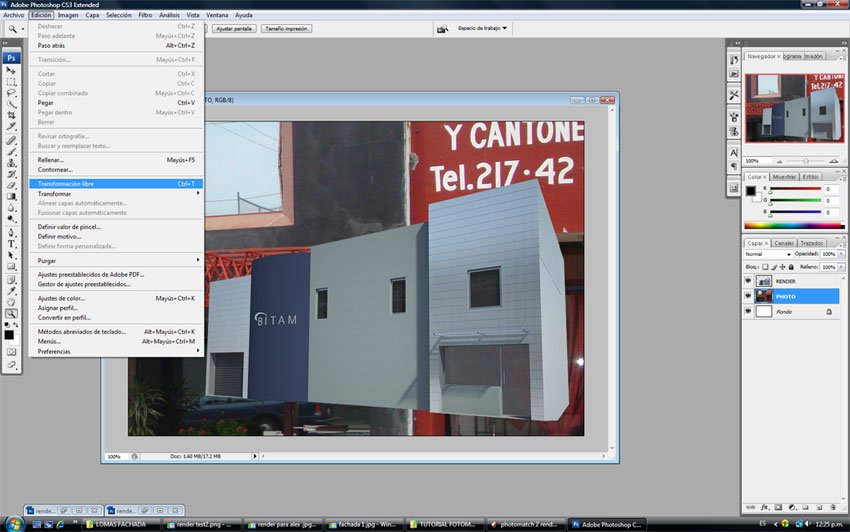
10. To scale the photo we will go to Edit > Free Transform. When you use the Free Transform tool, press Shift so you do not lose the scale proportion.
The result should be something like you see in the picture below. Now we need to blend the render to the photo.
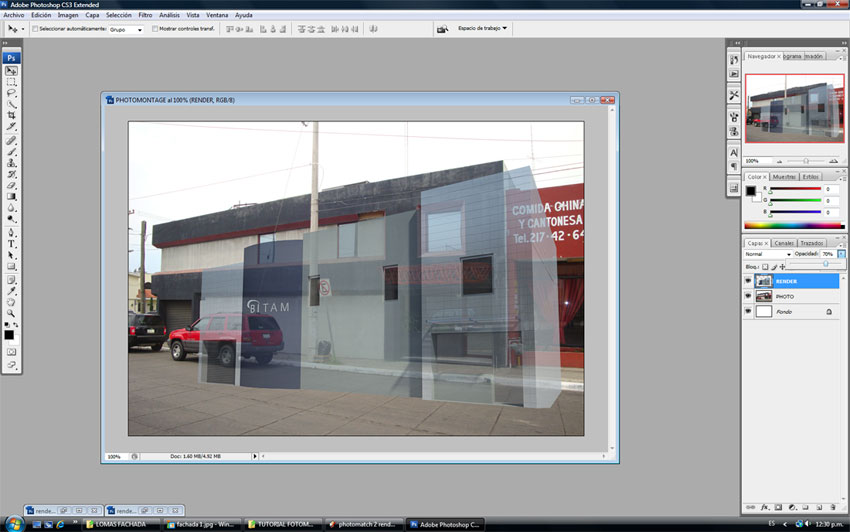
11. In order to do this I set the Opacity of the render layer, which I named Render, at 70%.
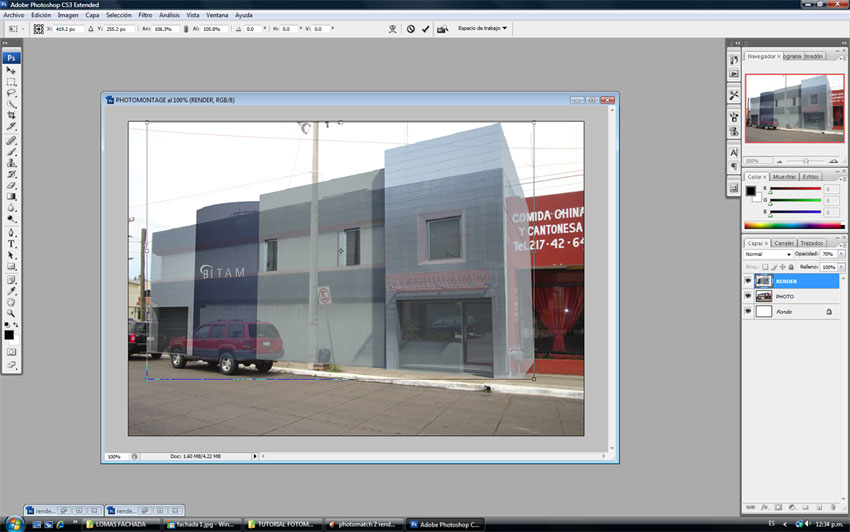
12. Next you go to Edit > Free Transform and modify the render until you are happy with the result.
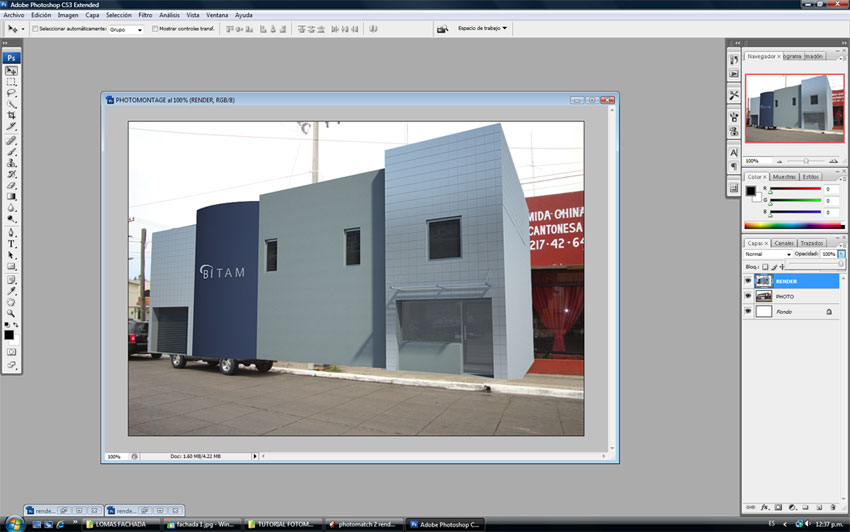
13. Then set the opacity again in 100%.
14. Next create a Layer Mask. This will help us to delete any part of the render or the photo that we do not want to see or want to hide.
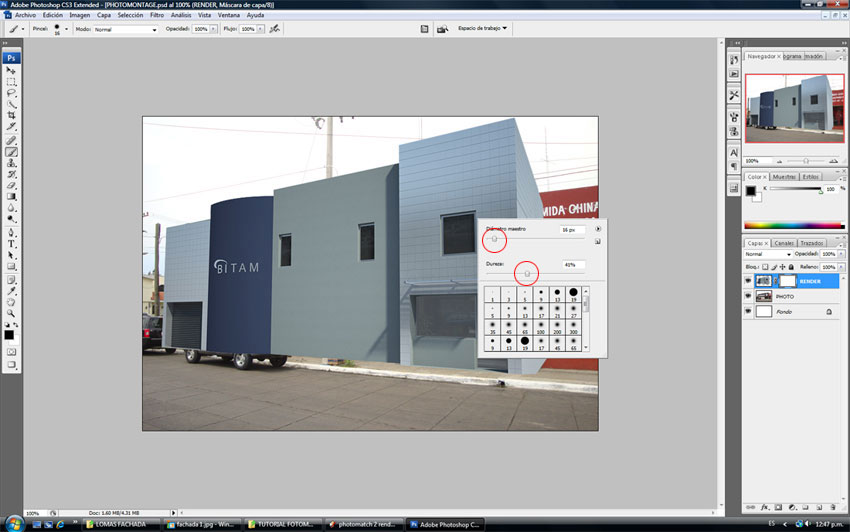
15. Select the Brush Tool and right clicked to choose the Master Diameter and Hardness of the Brush. Once we set this we can start passing the brush over the parts we want to hide. To unhide just press the ‘x’ key and pass the brush again over the hidden part.
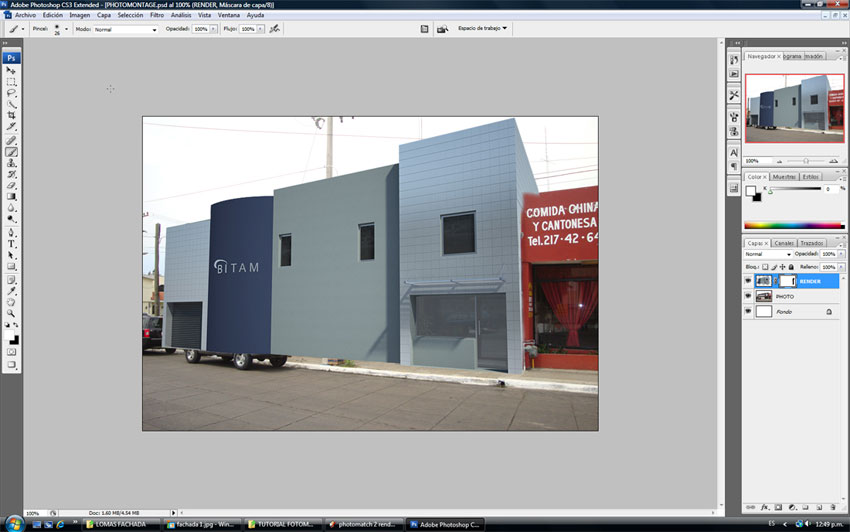
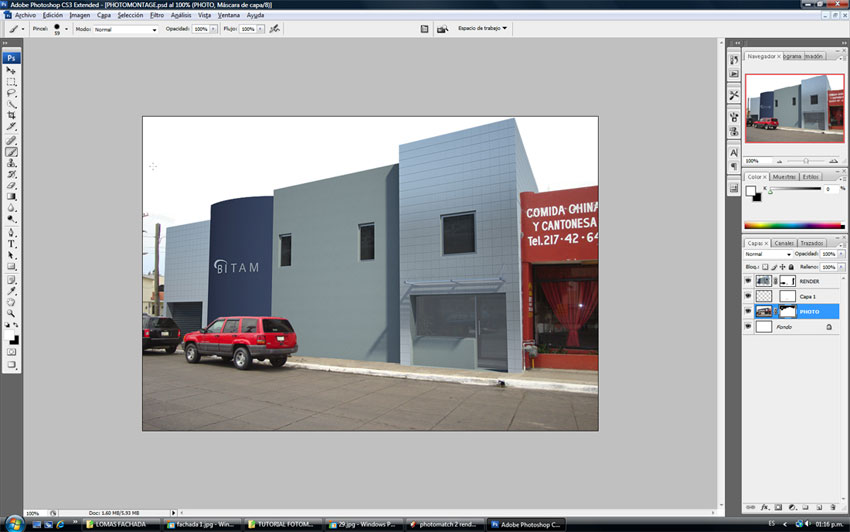
16. As you can see in the next picture I use the brush on the Layer Mask to hide some parts of my render so that the Chinese restaurant blends into the adjoining building like it should.
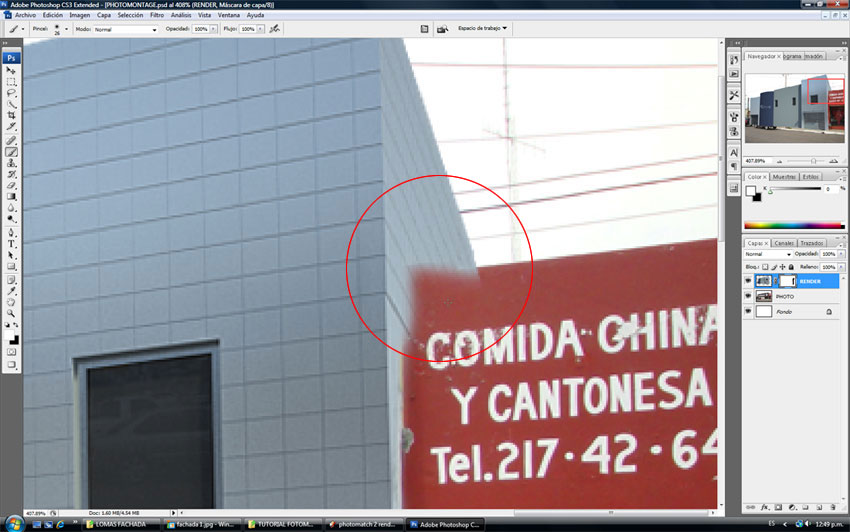
17. I recommend you use the Zoom Tool for the finer details in some areas, to be more accurate with the work and make sure to set the Master Diameter of your Brush as it is needed.
Here is the result after using the Brush and the Zoom Tool on the Layer Mask. Remember to select the correct Layers when working in Photoshop.
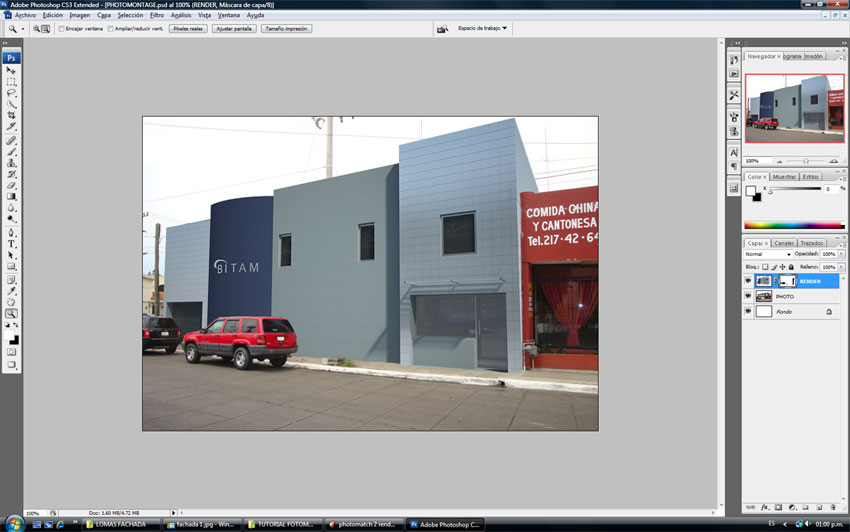
18. Then I did the same on the Layer Mask to unhide the cars.
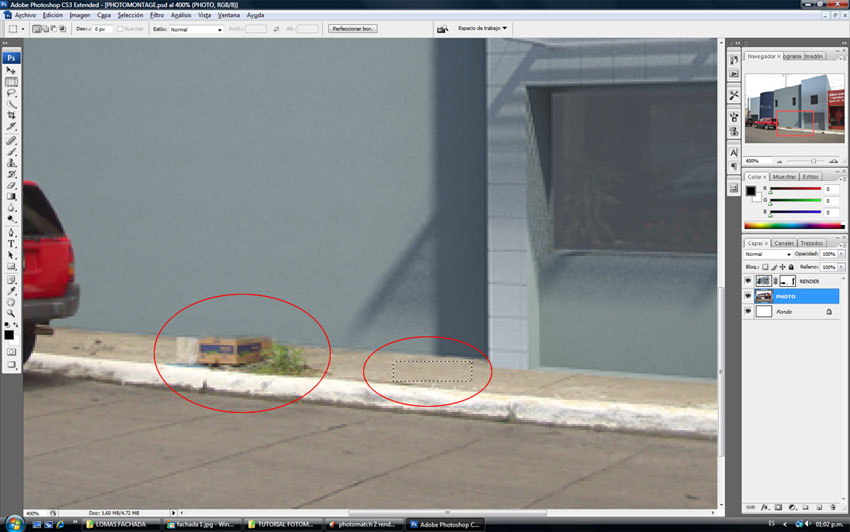
19. Now as can be seen in the next picture we have a little problem with those boxes because we do not want them to be in the scene. So we are going to make them disappear. First we need to select the Rectangular Marquee Tool, and select an area of the sidewalk, because this selection will help us cover up those boxes.
20. Once we have made our selection we need to go to Edit > Copy and then go to Edit > Paste and a new selection will appear in the Layers Window. That new layer is the selection we made with the Rectangular Marquee Tool.
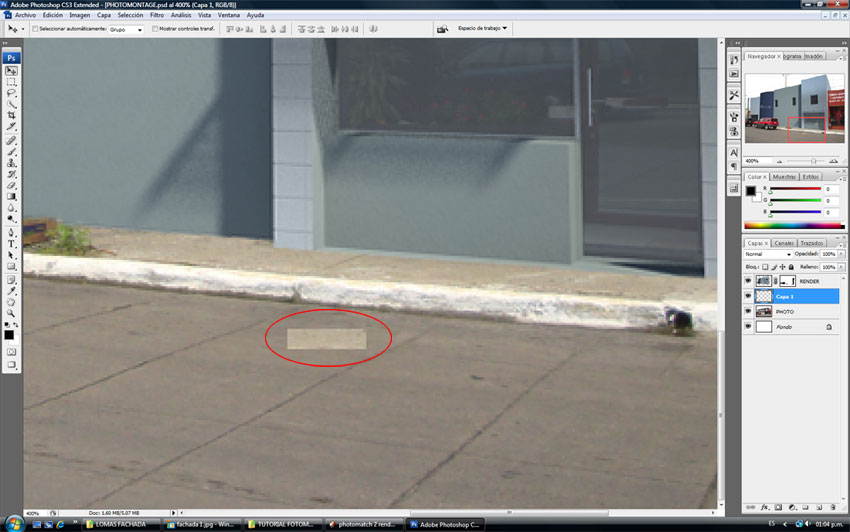
21. Next drag the selection over the box and the grass on the sidewalk to cover them up and use the Scale Tool or the Perspective Tool in Edit >Transform > Scale or Edit >Transform > Perspective and Transform the sidewalk selection so it will cover the unwanted box and the grass.
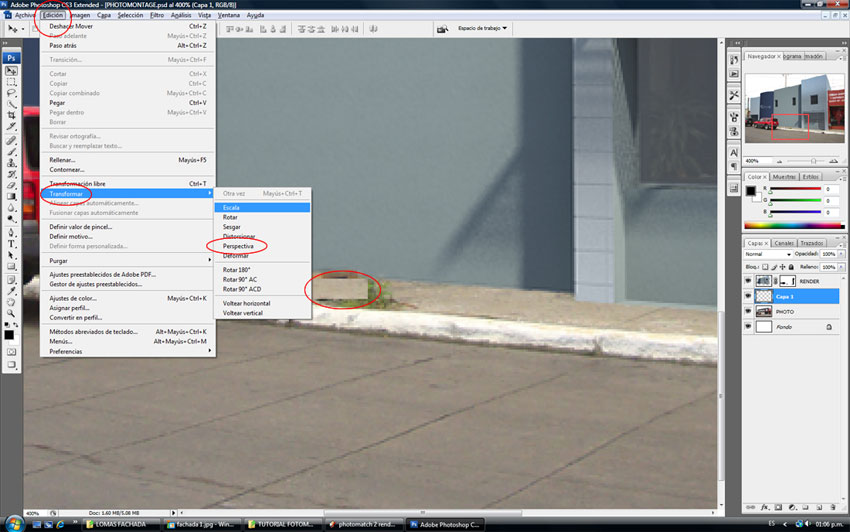
Step 21
22. Now you can adjust the size of the selection with the Scale Tool and cover the unwanted box and grass.
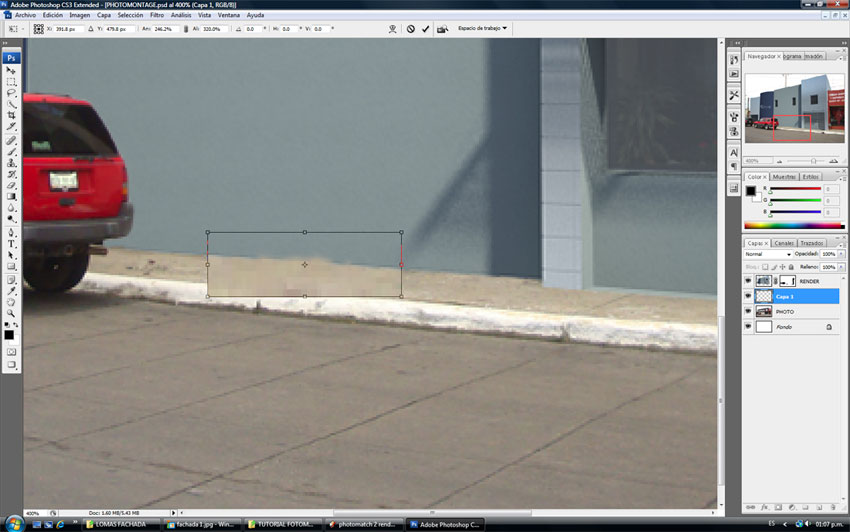
Step 22
The next picture is the result of your hard labor so far. Remember you can be more accurate with this by making some new layer masks and getting sharper results, but for this one I think it should be fine.
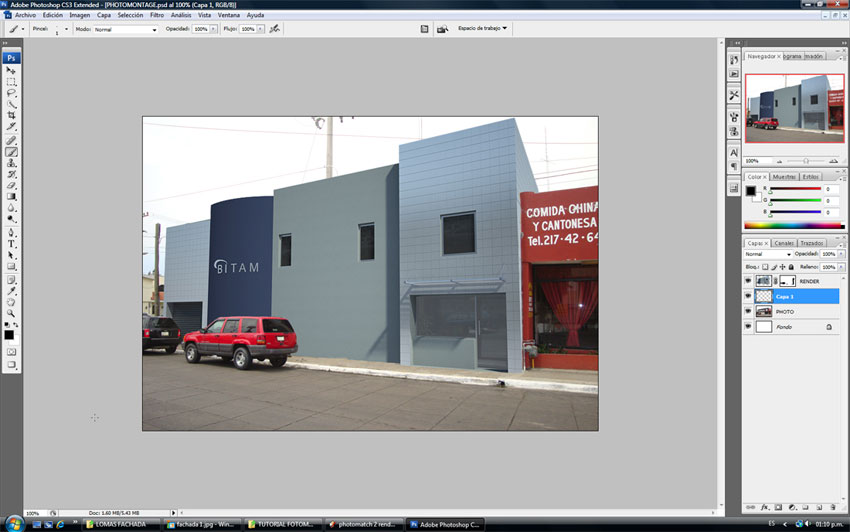
Result of Editing so Far
23. Here I have created a new Layer Mask on the selected layer so I can sharpen some details.
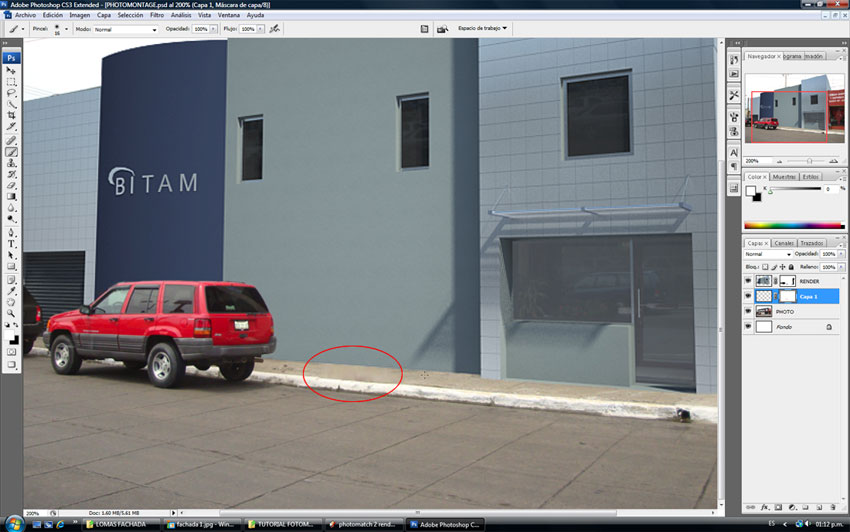
Step 23
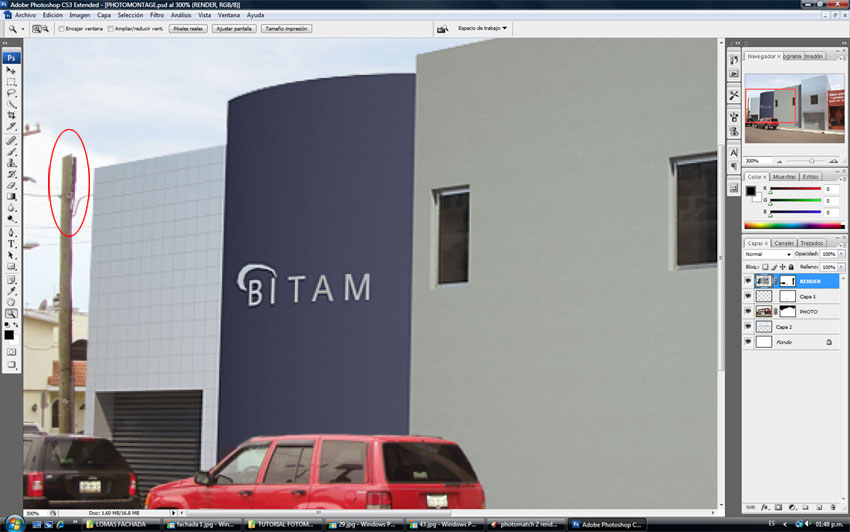
24. Now I want to erase the street post and some wires. I am going to make a new Layer Mask on the Photo Layer.
25. I hide them with the same method by selecting the Brush Tool and selecting the new Layer Mask and passing the Brush Tool over the street post and the wires. Remember to unhide, change from black to white on the Set Foreground Color.
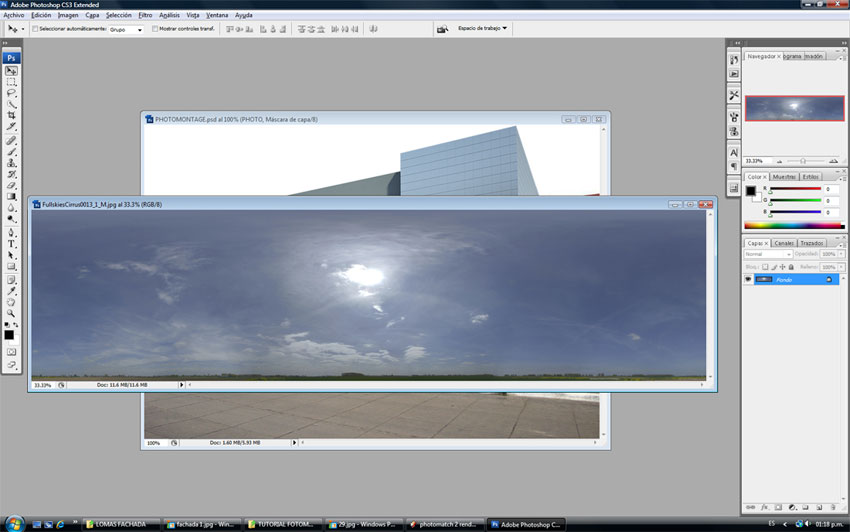
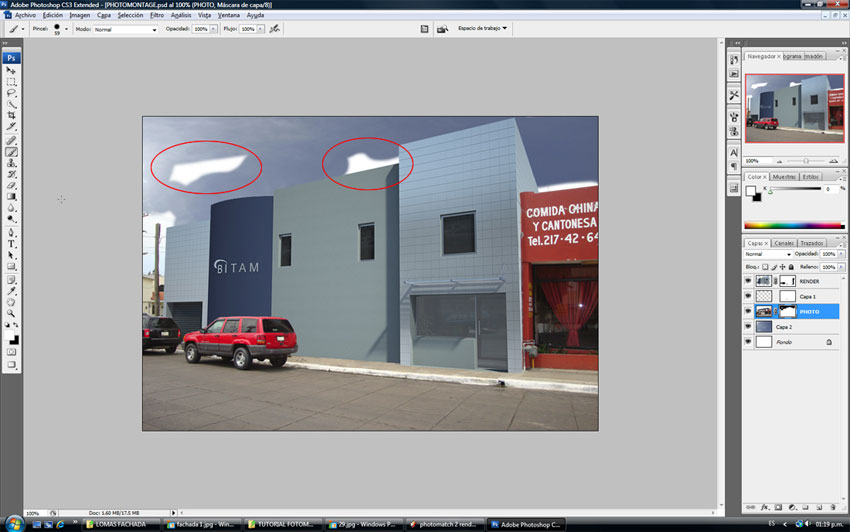
26. Now open a new image for the sky. This one is from CG Textures and is the sky I am going to use for the image. You need to click and drag it into the file you are working on.
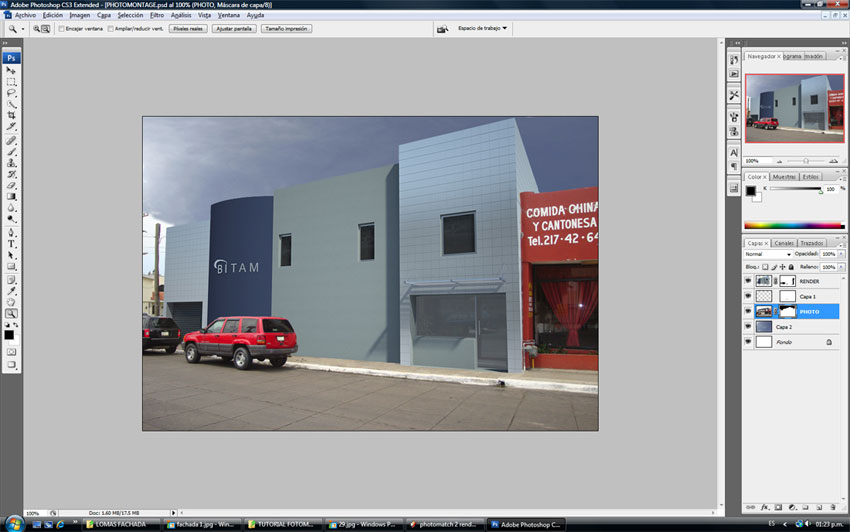
27. Once you drag it into the Photoshop file, the sky would look something like this and we need to use the Layer Mask on the Photo Layer to hide the white spots.
And this is the result.
28. Now scale the sky so it can fit on the image, until I get a nice result this is done with the Free Transform Tool.
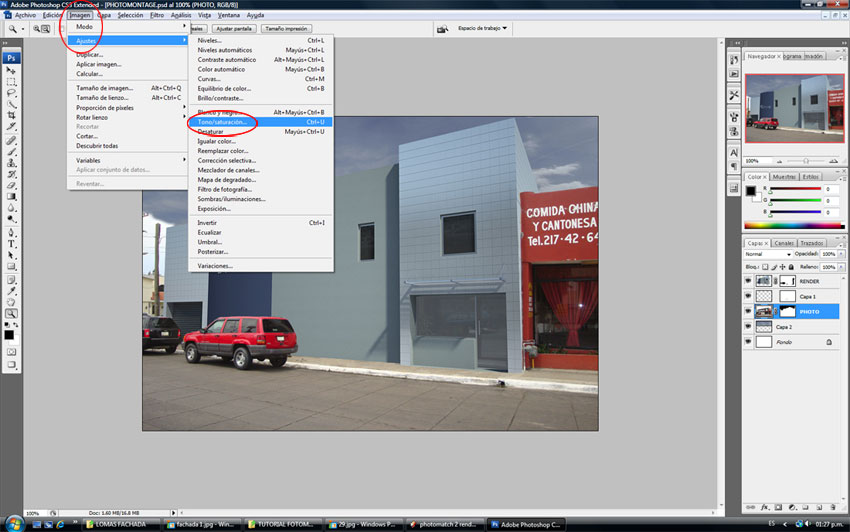
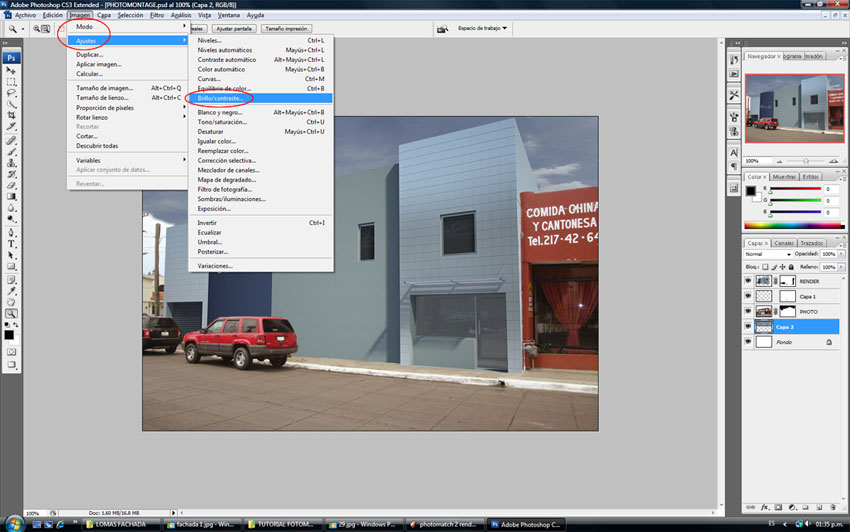
29. Now let us start working on the color and brightness adjustments so the sky, the photo and the render can blend nicely together. First select the Photo Layer and go to Image >Adjustment >Hue/saturation.
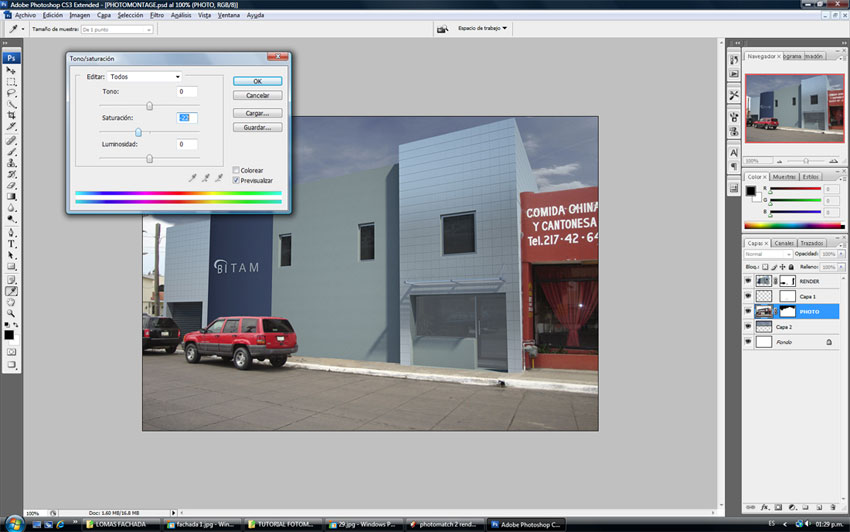
30. With this option set the saturation on -22 because for me the colors in this particular photo are too bright.
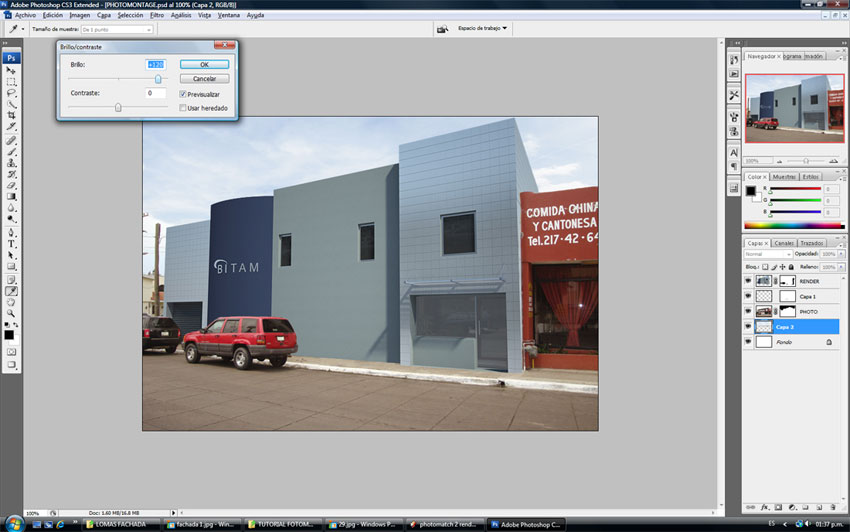
31. Now select the Sky Layer and go to Image >Adjustments > Brightness/Contrast.
32. Set the Brightness at +120.
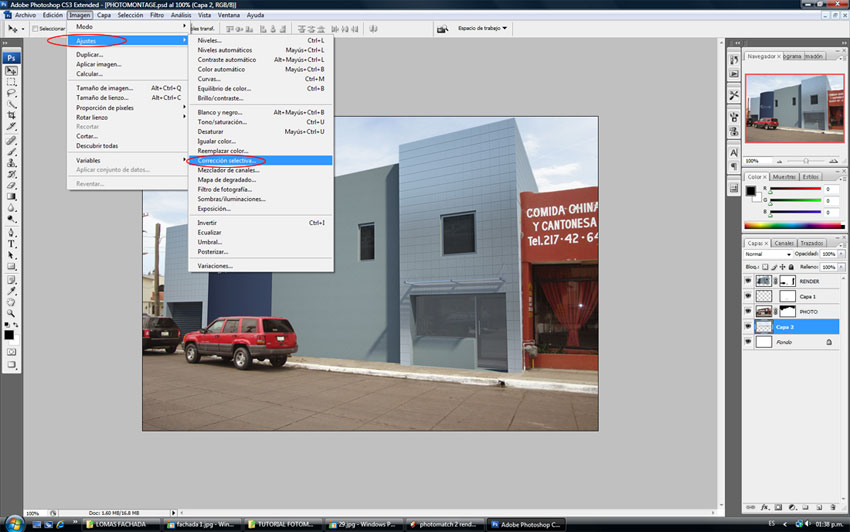
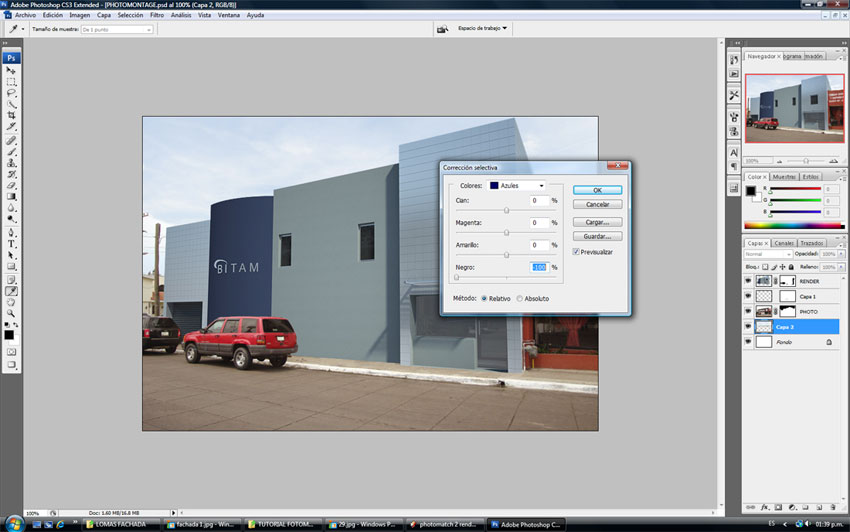
33. Next go to Image>Adjustments>Selective Color.
34. In the window that appears, choose the Cyan and the Blue color and change both to -100 in the Black selection slider. The blue color was to much and I wanted the sky to be more white like in the picture.
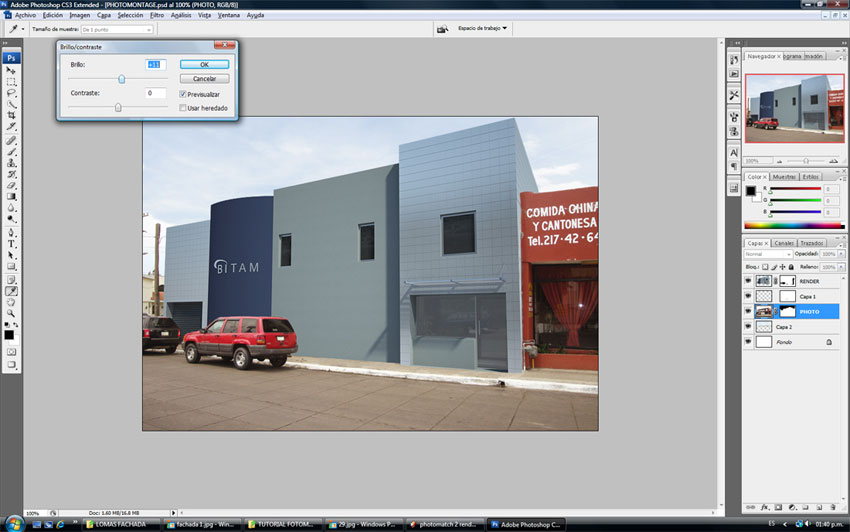
35. Now select the Photo Layer and go to Image>Adjustment>Brightness/Contrast and change the Brightness to +11.
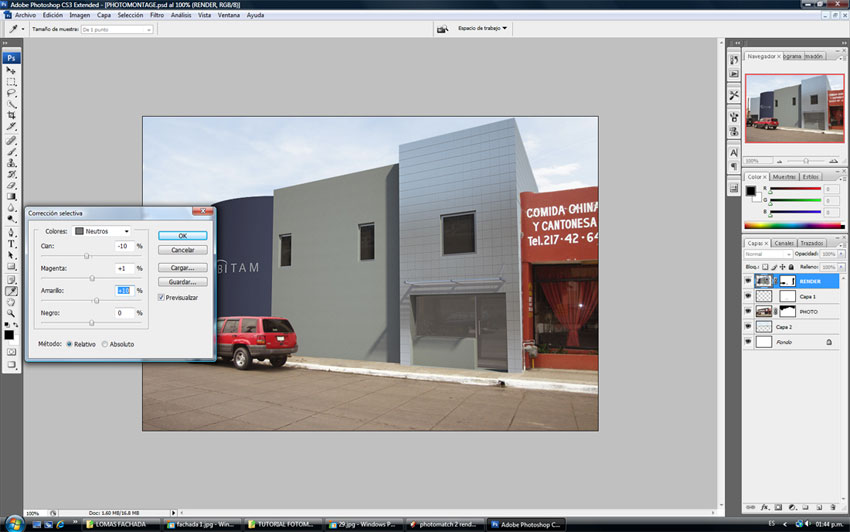
36. Next comes an interesting part. Go to the Render Layer and change the Color Balance. This can be done with the Color Balance option, but I do it another way. Go to Image>Adjustments>Selective Color then choose Neutrals from the top colors and choose in this case Cyan -10, Magenta +1 and Yellow +10.
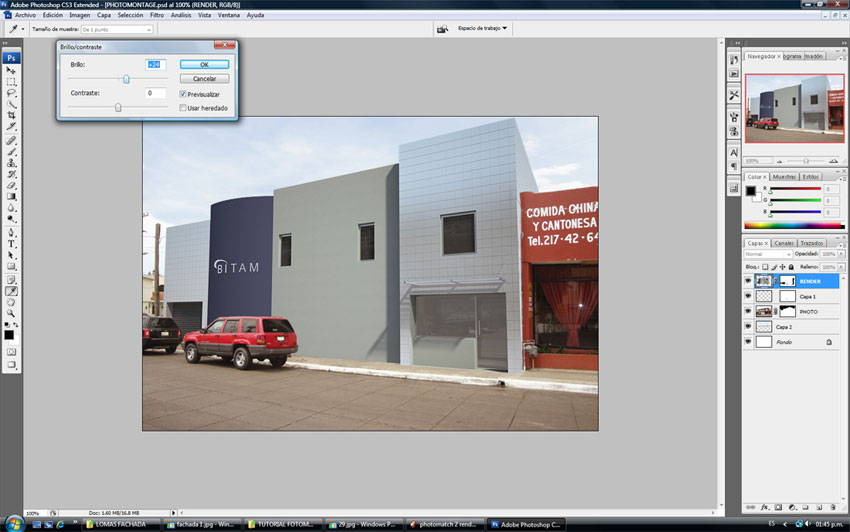
37. Also on the same layer change the Brightness to +24.
Now you can see that the photo has some chromatic aberration. You can see this in some edges because they look kind of reddish. Our render will not have those red edges because we are going to fix them.
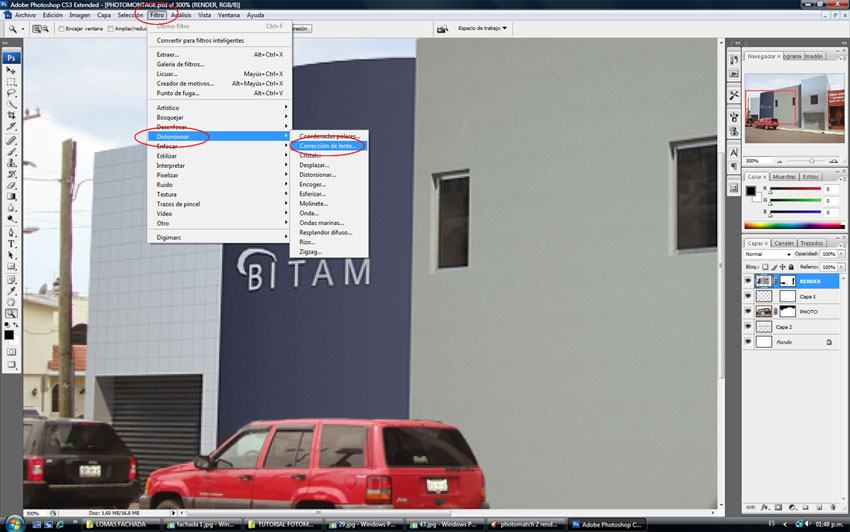
38. Go to Filter>Distort>Lens Correction.
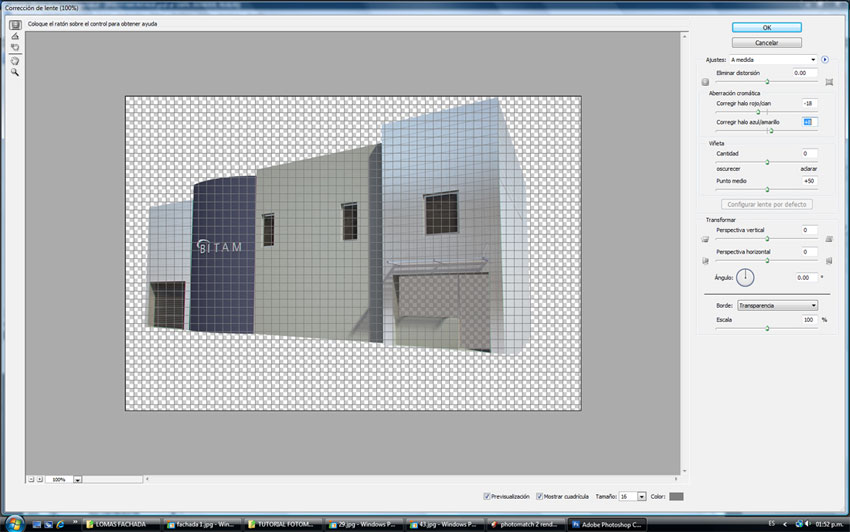
39. Next a window will appear as shown in the next picture. Go to Chromatic Aberration and set the Fix Red/Cyan Fringe to -18 and set Fix Blue/Yellow Fringe to 8.
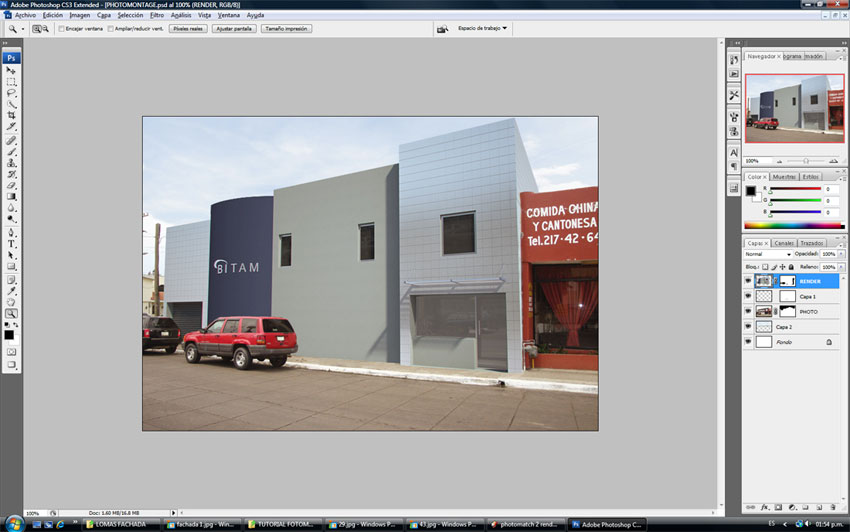
Now the render blends better with the photo because it also has Chromatic Aberration.
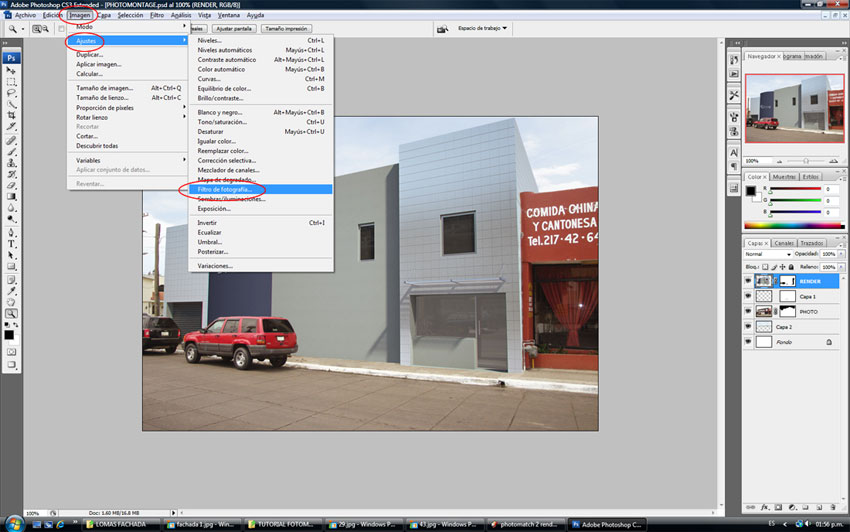
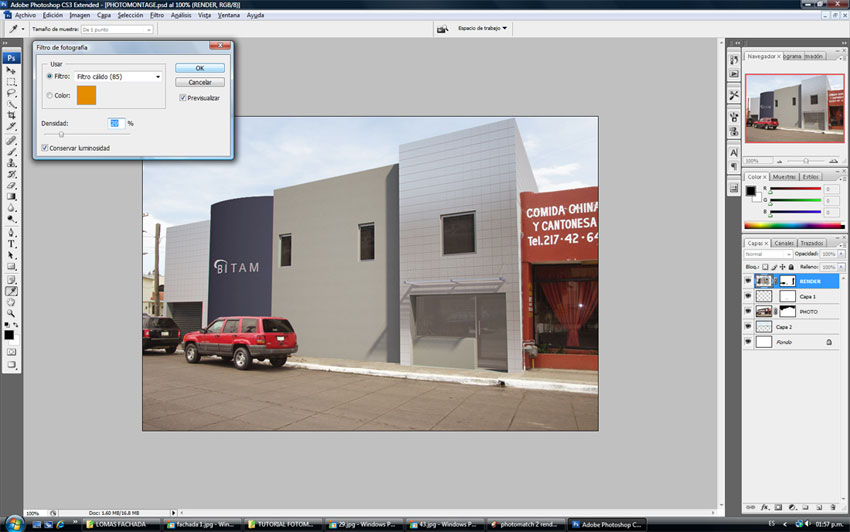
40. Still working on the Render layer, go to Image>Adjustments>Photo Filter.
41. Set the Warming Filter to 20%. This helps to blend even more in this case the render to the photo.
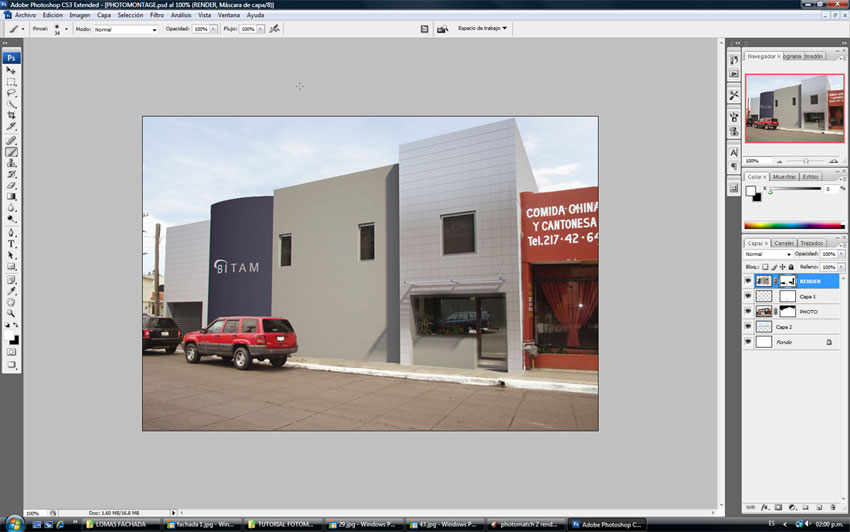
42. I also use the Layer mask on the Render Layer to use the same door and window in the photo, because with this particular project that area was going to stay the same.
43. Next change the Contrast of the Render because it is looking a little flat when comparing it with the photo. Just change the Brightness to +51.
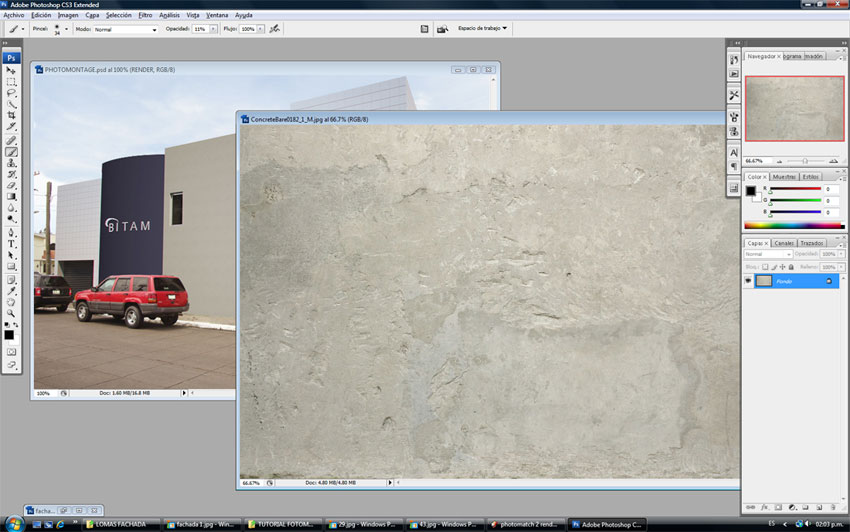
Now for the final touch, let’s open another image. This one is also from CG Textures and it’s a bare concrete.
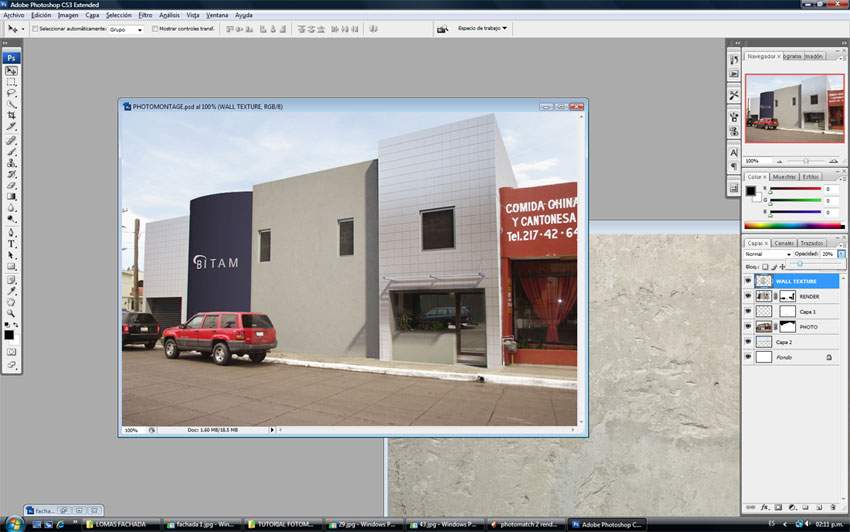
44. Go to Edit>Transform>Perspective and Scale the texture to the size of the wall.
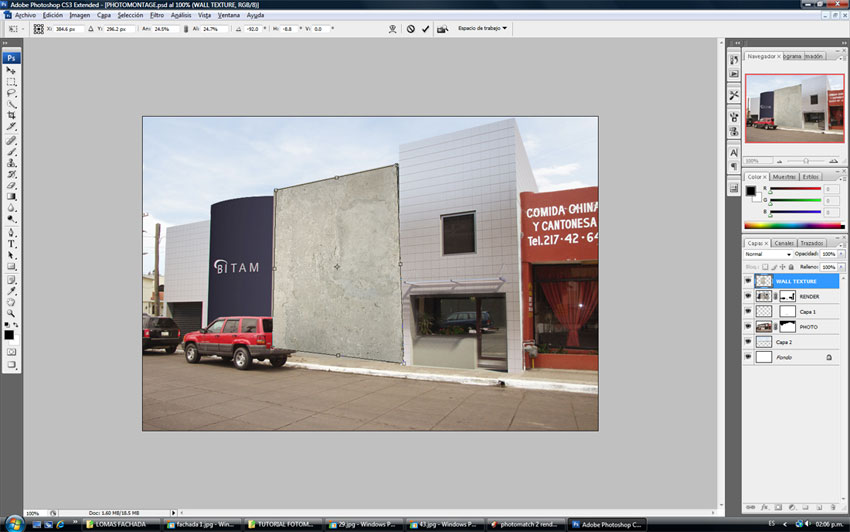
Step 44
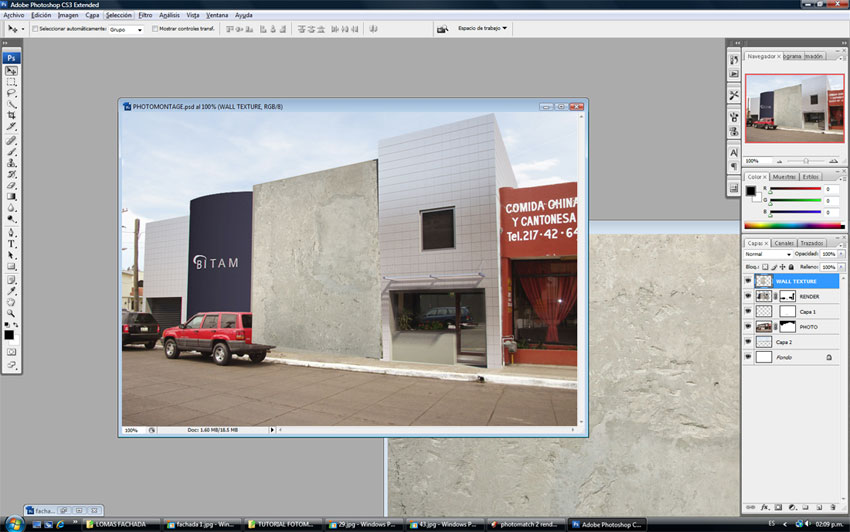
The next picture shows the result of this.
45. Next set the Opacity to 25%.
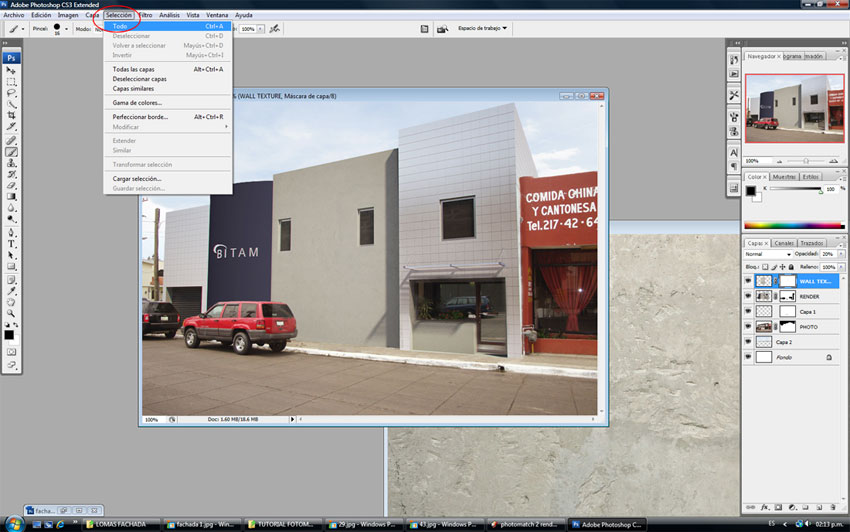
46. Following this, go to Select>All
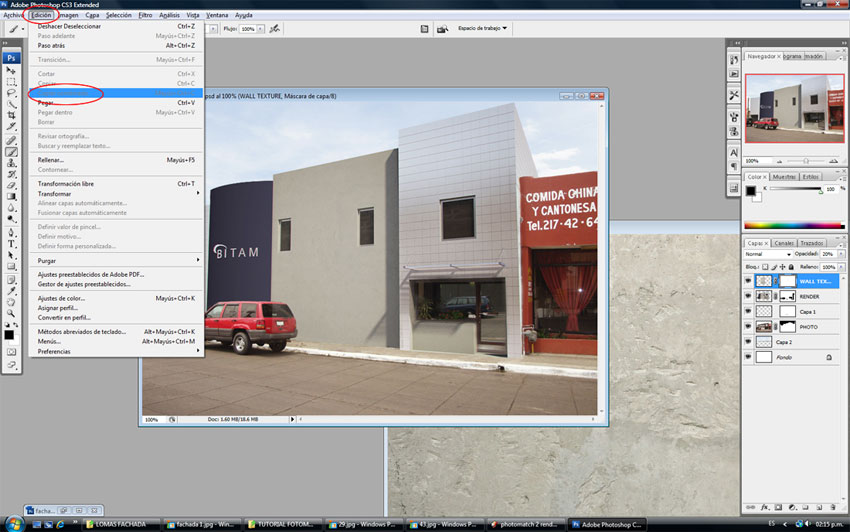
47. Go to Edit>Copy Merged
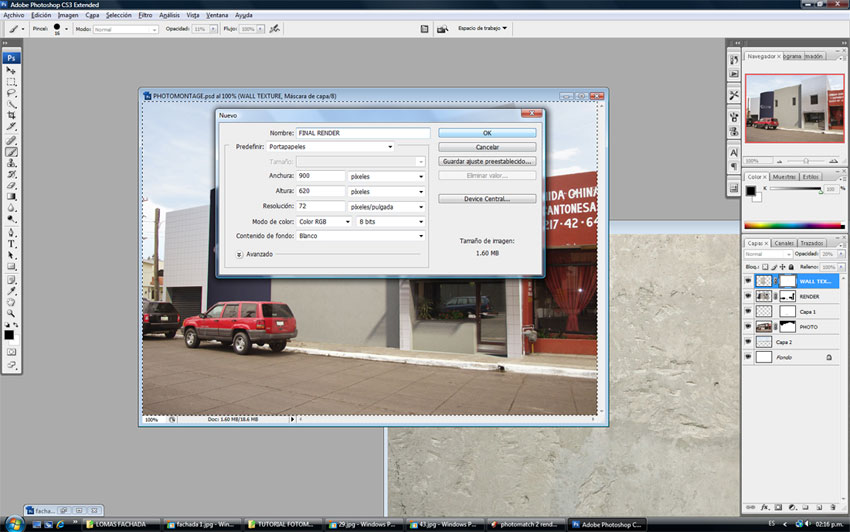
48. Create a New Page and name it ‘Final Render’ and paste all the layers into one.
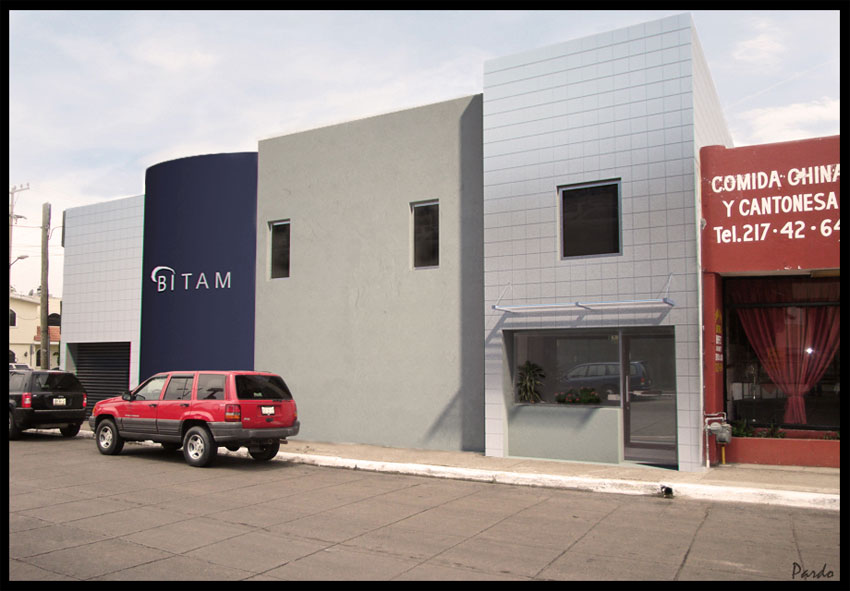
Add a frame, some more Contrast, signature and that’s it! Hope this tutorial has been helpful to you and that you may have learned some new tricks.
I hope you enjoyed this tutorial and learned some new tricks and tips.
Cheers
Teo








Very nice, thank you!
me parece exelente el tuto, mas quienes estamos aprendiendo foto realismo.
te felicito
Very nice, thank you!
the angle of the sun in your render is different than the sun in the photo, but I didn’t notice until nearly the end of the tutorial. Just goes to show that even if you don’t get everything perfect, if it looks close enough the eye will gloss over the imperfections
Thank you for all the explanations on photomontage.
I have a question regarding steps 2 and 3. How are you able to remove the background photograph in order to render the model in vray? In my case, even if I am able to remove the background photograph, the render comes with a different camera viewpoint or burned yellow tones.
wow… it’s great. thanks for tutorial brother 🙂 (y)