Making of Marina
 By Mateo Soletic
I hope that this tutorial involving SketchUp and post-process techniques proves useful to you. I have received some positive feedback and e-mails from people asking me how this is done. For some time now I have been experimenting on various techniques with the aim of producing high quality professional render outputs, yet one with a subtle brush and line work touch, that resembles the natural effect of SketchUp. Should there be more line or less brush it is all a matter of individual preferences, and you can of course experiment yourself to achieve the best desired effect. Here then is the basic process I use.
To be able to follow this tutorial you need to have some basic understanding of a rendering application of your choice and exporting and applying materials. A further knowledge of a image editing application is also essential. I used Photoshop here since it is the most widely used image editing program. In Photoshop I tried to be as detailed as possible for the benefit of less experienced users that don’t use this program on everyday basis.
The Image I started with
Step 1 – Exporting the Scene
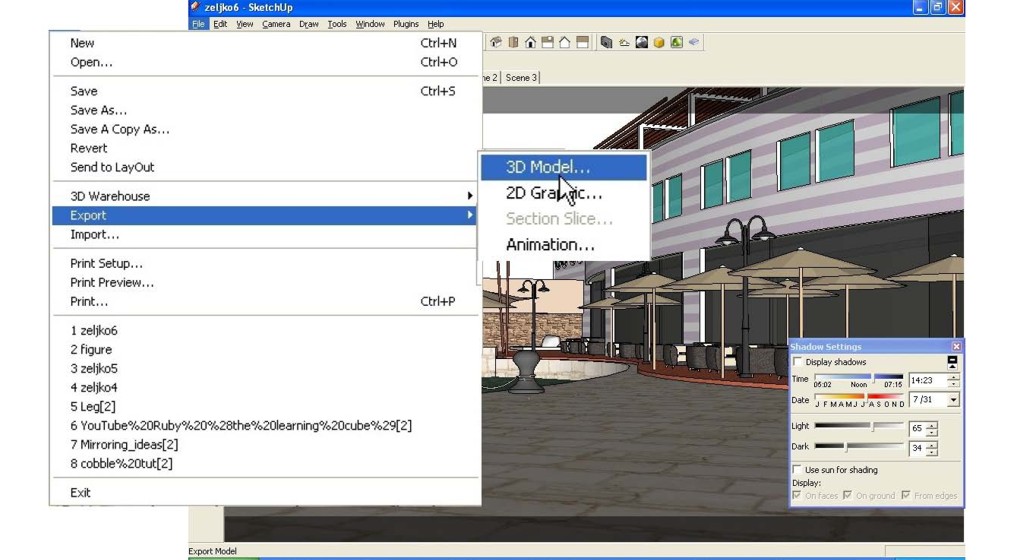
When I am satisfied with my model and composition in SketchUp, I set the final scenes for export. Now I need to export two identical scenes of the same size so that I can later perfectly overlay them in Photoshop. One is exported with lines textures and shadows (File> Export >2d Graphic as JPEG image). The second scene is exported for rendering. Here I will be using Maxwell Render 1.6, but You can use any renderer of choice, just make sure you are exporting exactly the same Scenes/Camera angles.
To export the scene for rendering I need to make some slight adjustments. From the plug-in’s menu Maxwell render >Export, I opened the dialog box set the width to 2000 and height to 1200 pixels and checked the Show Render Area box. Now I have the exact scene camera angle that will be rendered and the same as the earlier exported SketchUp JPEG image. I also have to fill in some other values such as Focal Distance and then I am ready for export. The Physical Sky is on by default as I want to keep this part of the process as simple as possible.
I will start the export ( File> Export> 3Dmodel), but just before I press the export button I want to make sure that along with the render channel the alpha channel is checked as well. This will save me a lot of time later in Photoshop since I will be using some of my own background images which I find more appropriate for this technique as you will see later on.
You have probably noticed that I have not added any Maxwell materials at this stage. I will do this later in Maxwell Studio. With this technique I don’t have to be precise since the effect I am hoping to get is not exactly a photo real one but a combination . I will later on in my rendering application add some simple default materials, such as glass and water to get the bumps and reflections that I desire.
Inside the rendering application (Maxwell) you can see that I have the same Scene/Camera angle as the exported JPEG one. Now I will be replacing some key SketchUp Materials with Maxwell ones, giving them some physical properties, bump maps and reflections. Basically just a drag and drop things. You don’t have to be a rendering genius to continue but however you should have some basic knowledge of your renderer.
Step 2 – Inside Rendering Application
Now that I applied all the materials and made any corrections to the settings I can set the scene to render.
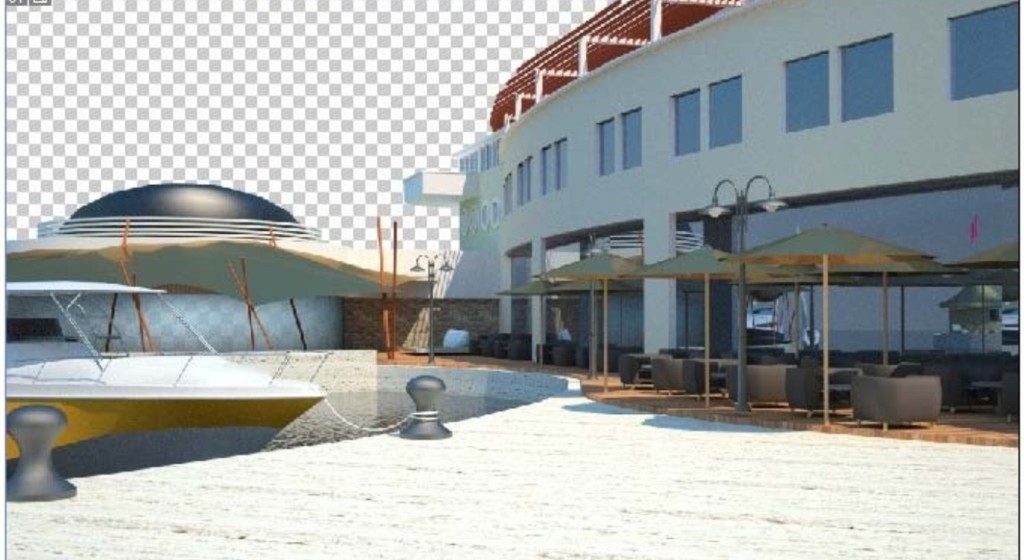
Here at the end of my render process I ended up with two images the render and the alpha.
Step 3 – Photoshop Work
Now in Photoshop I will go into more detail as this is where all the magic happens. First it is necessary to extract the background of a rendered image with the help of a layer mask. Now this is a good time to recap on one of the better ways to do this. I don’t use the renderer on a daily basis so often, I have to remind myself of how it is done. I have a small note next to my desktop so Ill just repeat the process below.
Removing a background using layer mask:
- Open both images in Photoshop – RGB Render and Grey Alpha
- Click on the render image and change it from background to a layer
- Add layer mask to it
- Select and copy alpha image
- Select layer mask of render layer (Alt – click on it)
- Paste Alpha into it
- Right click on the mask and select Apply Layer Mask
- Now go to Layer>Matting>remove black Matte
Step 4 – Adjust Image Sizes and Inserting Layers in Photoshop
Next step is to import the appropriate sky from my JPEG sky collections, with the command: File >Open> Sky>JPEG . I will convert my sky into a layer, tweak it to get the right size and place it behind the rendered image. Now I will Import the Natural SketchUp image. Now with the rendered image, sky and the imported SketchUp JPEG in Photoshop, I will adjust the size of the SketchUp image: Image > Image size, so that it perfectly overlays the rendered image. My SketchUp JPEG image was exported at a maximum resolution of 4000 pixels, so now I have to change it to 2000 pixels to correspond to the value of the rendered one.
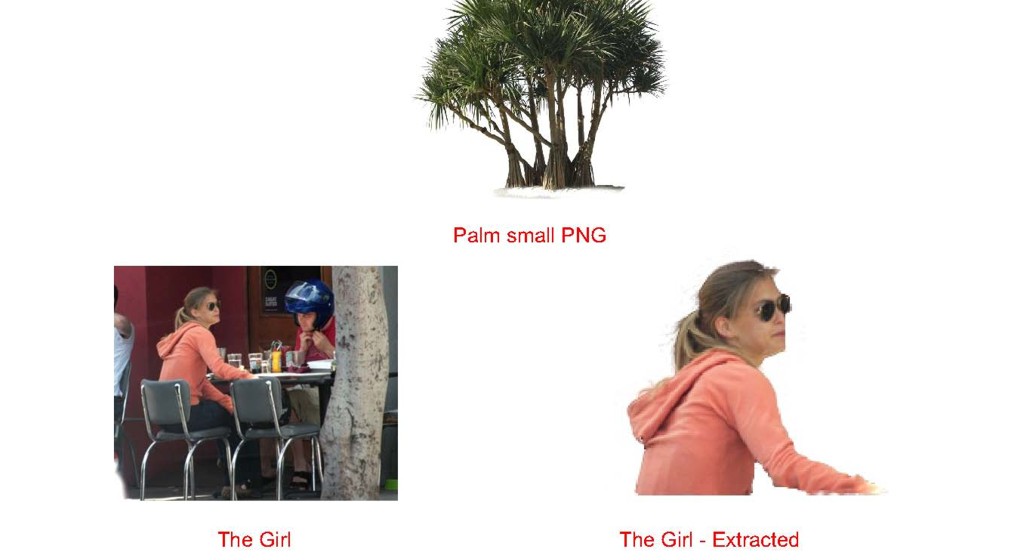
When done I converted the image to a layer, clicked on it and with the command : Select>Select all>Edit >Copy, and then pasted the image into the rendered one. I now repeated the copy and paste process with the sky and now I have them all stacked as shown in the image below. I have my SketchUp image now on top. I just need to move it around in order to perfectly overlap the rendered image. I made the image slightly transparent so that I can see what I am doing. The next thing would be to tweak and move the sky to a desired position. Finally I will insert the PNG palm trees from my tree library. After importing one, I adjusted it a bit and placed it in a desired position. I needed two so I just duplicated the first one and flipped it along so that it somewhat differs from the first one.
Step 5 – Using the Brush Tool in Photoshop
Using the Brush tool, my aim is to erase parts of the top SketchUp layer in order to reveal the parts of the rendered image but at the same time to retain some of the brush trace too. For that purpose I choose a Pastel Brush. You can also use the Watercolor Brush or a similar kind. The thing I like about these brushes is that they leave a kind of transparent stroke effect. As I go along, I change the size and Opacity and even repeat some areas more
than once. Now you can also see the size and opacity that I used. This part is really more artistic and personal taste rather than computer generated and its all a matter of practice to reach the right effect and the technique that you will in the end, be satisfied with.
You can even change the opacity of the top layer in the end if you feel the effect is too strong. I am working directly on the layer but my advice to you would be to work on masks, in case you are not satisfied with the result you can always go back and repeat the process. So finally this is the image that I ended up with.
Before going on further I would like to point to some artistic advantages that I discovered using this technique. In my opinion and experience, SketchUp natural output for more professional presentations can sometimes be too flat and on the other hand, the rendered image can be too photo real for my taste. I personally always prefer a somewhat subtle artistic effect.
Step 6 – Adding More Detail
As I feel that there is as yet not enough detail in the scene I will be adding some more to make the scene more interesting. Another small PNG palm tree in the foreground and something else that came to mind was someone reading newspapers so I did a search for such an image but couldn’t find one fast enough so I found this girl instead, extracted it and here it is..
If there is still something that needs to be adjusted in between the layers, now is the time to do it before merging all the layers into a single one. I probably will want to add some depth to the background palm trees so I changed my fill values to about 80% and 65 % respectively.
Step 7 – Merging the Layers
Now go to Layer> Flatten image, and all my layers have been converted into one single image.
Step 8 – Creating a Color/ BW / Sepia Effect
I will now finalize my image with a combination of Color/Black & White/Sepia effect . This is a variation of an effect used sometimes by photographers and in the movie industry. I have a rough idea of what I want to achieve but not really sure of the final look. So I am going work with Adjustment Layers. That way I can always come back and tweak the values to get the desired look.
I will start by adding a Channel Mixer Adjustment Layer, (Layer>New adjustment layer> Channel mixer). You can go to the main toolbar but it is easier to use the little circle of the fly out on the bottom. I could have used the plain De saturation but the Adjustment layers give us more options. Tick the box Monochrome and play with the sliders until you end up with the desired look. When done change the opacity to about 50%. Now you have a combined BW-Color look.
Now that I created a combined BW/Color effect, I will now add a Sepia tone to it. I will do that with the command Layer>New adjustment layer>Hue/Saturation. In the box I will tick Colorize and again play with the sliders to get the desired effect. My final values were: Hue -30 and Saturation -20. Again we will adjust the opacity of this layer to about 50%.
For my next step I will duplicate the Sepia layer with: Layer>Duplicate layer. I will set the Blending Mode to Soft light in order to add more tone and get more contrast.
Next I will set both layer Opacity and Fill to around 50% on both layers or just adjust to personal taste.
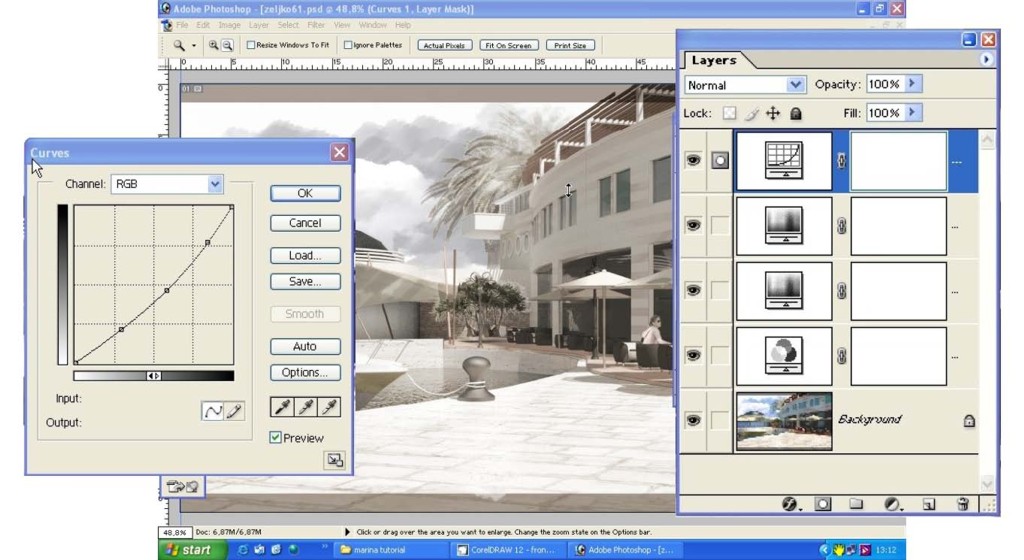
Finally I will add some contrast with a Curves Adjustment layer, again it will give me more control than simply a Contrast layer (Layer>New adjustment layer > Curves). You can play around with this until you get the right feel. When I am satisfied with the results I will again Merge all my Layers into a single one.
And this gives me the final result . All I have to do now is to Crop the image so that I get rid of the two transparent lines and place my watermark of my company.
I hope you enjoyed this tutorial and learned some new ideas from it.
Thanks
Mateo


I’m sure there have been lots of people viewing this, so please take the time to express thanks if you think that you at least learned something… as I did. Very good, thanks.
哎 英语不好真烦 谢谢
you teach me a lot
your tutorial is easy to put into practice!i love it!
Ive been looking for clear tutorials like this! thanks!
try hard to understand english,but 3q!
This is nice….
Muito obrigada por compartilhar seu conhecimento, o tutorial é ótimo ajudou muito!!!
Thanks, great post – processing tutorial.
Great post processing Tutorial. Thanks