V-Ray for SketchUp – super crash course

By Steven Man
V-Ray for SketchUp is a rendering plug-in that can require a lot of time to learn properly. To fully understand V-Ray would be very difficult to explain in one tutorial so I will not be doing that here. Instead, in this tutorial I will be posting up screenshots of the settings that I personally use (from lots and lots of trial and error, experience, questions and answers). I will try to explain some of the common variables also. As well as this, I will post up links to other useful reference websites for V-Ray. This tutorial will not discuss materials and how materials are made, only V-Ray option settings.
Please first understand that V-Ray is not a magic weapon that allows you to instantly create fantastic images. It is only one of the tools in your toolbox. For me, Photoshop is probably the ultimate tool, but that’s only my opinion and personal experience with the software. To me, I relate using SketchUp, V-Ray and Photoshop to building a real model. SketchUp is the mold and V-Ray creates the model formed from the mold. Photoshop is then used to refine and add the ultimate details to the model.
Having knowledge of photo composition, if possible, is ideal. Understanding perspectives and how a good photograph is put together is critical. Analyzing striking photos, reading photography magazines and books, will definitely help you understand what makes a good image.
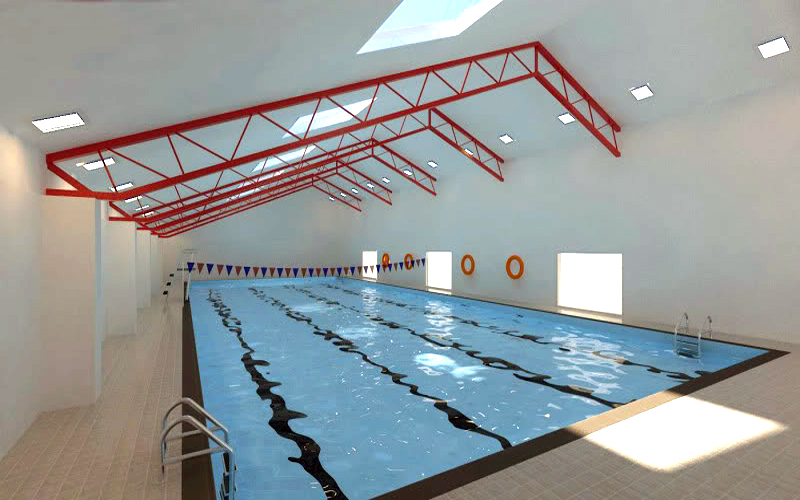
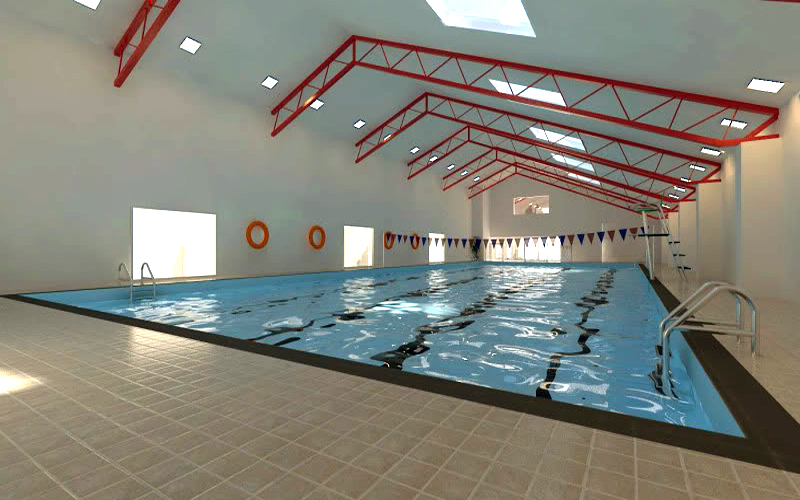
I am not using the latest version of V-Ray for SketchUp so the settings and names of settings will differ slightly if you are using the latest version, but it should be very similar. The settings in this tutorial created the sample images below.
In the images above, the water material was very fiddly to play around with. In other tutorials, I will have advice on materials. Bear in mind that these settings are quite high and take a while to render. I will highlight some points which you can change to decrease the quality and render time for test renders.
Let’s begin….
First thing… where is the options tab on the toolbar after installing V-Ray?
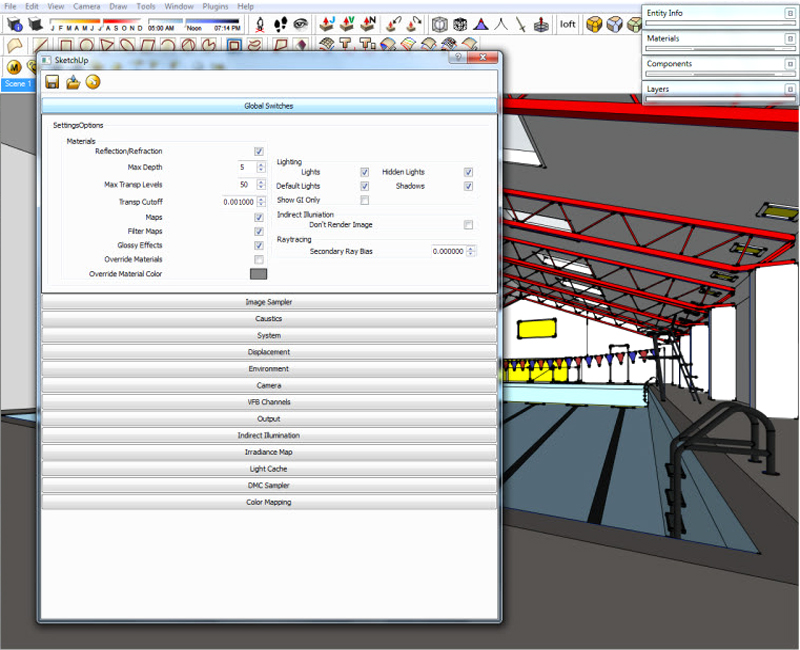
Global Switches
Only thing I touch here is override materials. This does what it says… when you render, it will override every material to the Override Material Color.
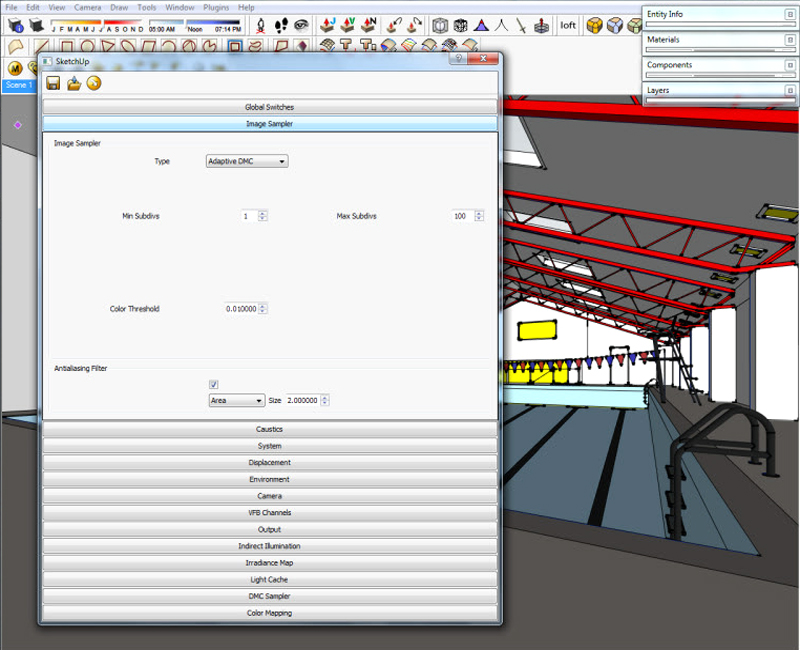
Image Sampler
Use Adaptive DMC as your image sampler. On previous versions of V-Ray, this may be known as, I believe, QMC. The anti-aliasing filter softens edges producing better edge results. I always have this on. Different filters produce different effects. For architectural renders, often it is good to use the Catmull-Rom filter as it produces sharper results. However, it can sometimes produce a moire effect. The Color Threshold value can be reduced to say 0.1 for faster test results.
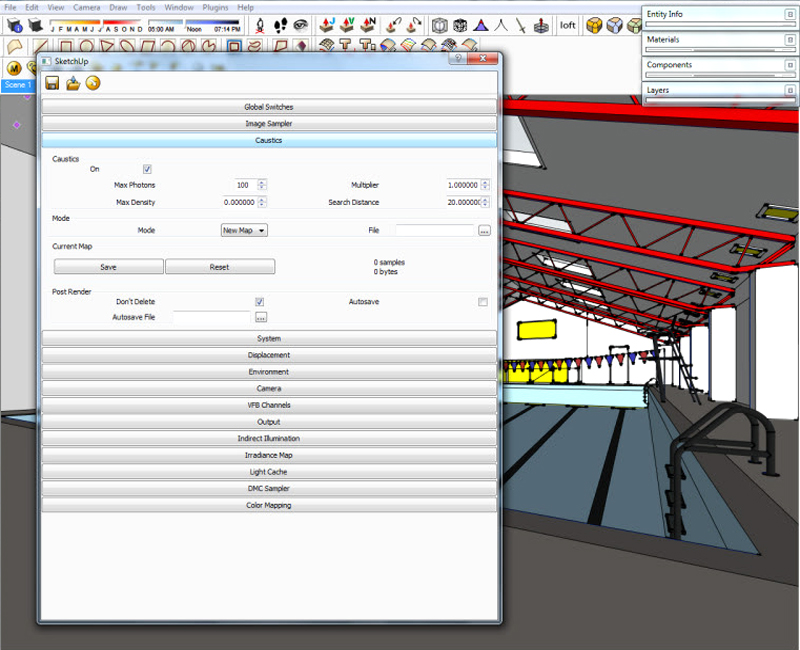
Caustics
Quite a difficult feature to use. It creates the shimmering results seen in the render above. Caustics also create the light effects you see when you shine a light through a diamond, for a example. It takes up a lot of render time and is not always necessary. Usually, I turn this feature off.
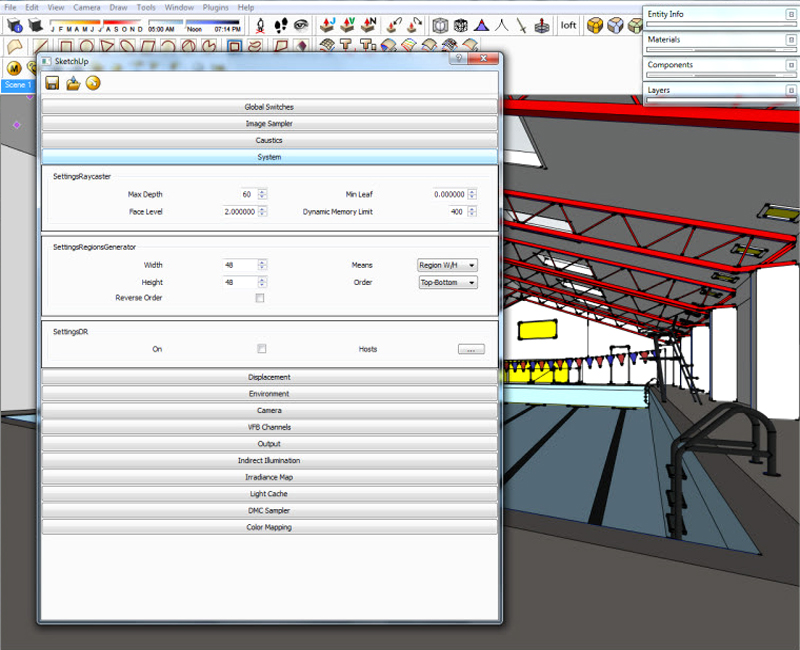
System
Only setting I use here is the DR setting, which means distributed rendering. This allows multiple PC’s to be used for one render, sharing the power of the PC’s. You need to input the IP address of each computer in there, as well as having the program DRSpawner on each of the PC’s (which comes with V-Ray), if you choose to use this.
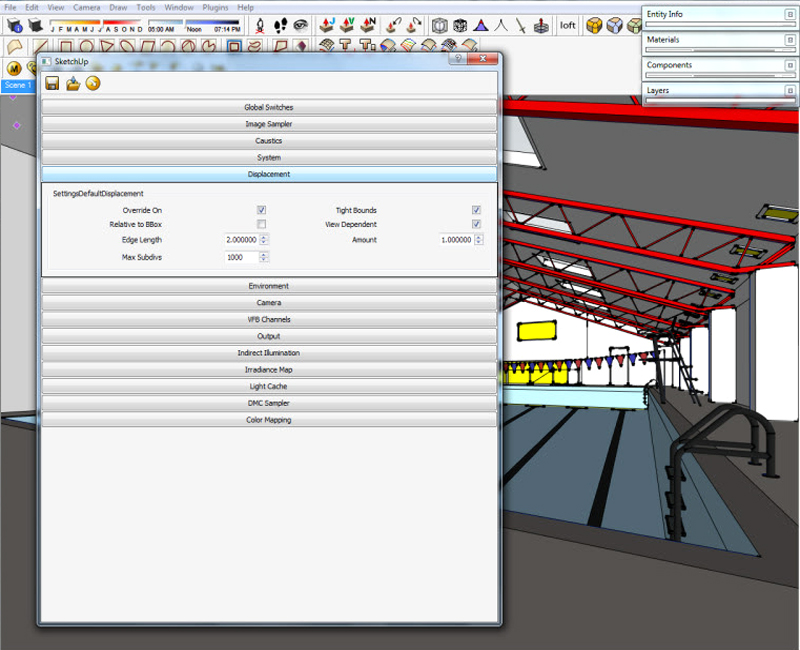
Displacement
Unless you have materials with displacement, this setting need not be changed. 1000 Subdivs provides decent results.
Environment
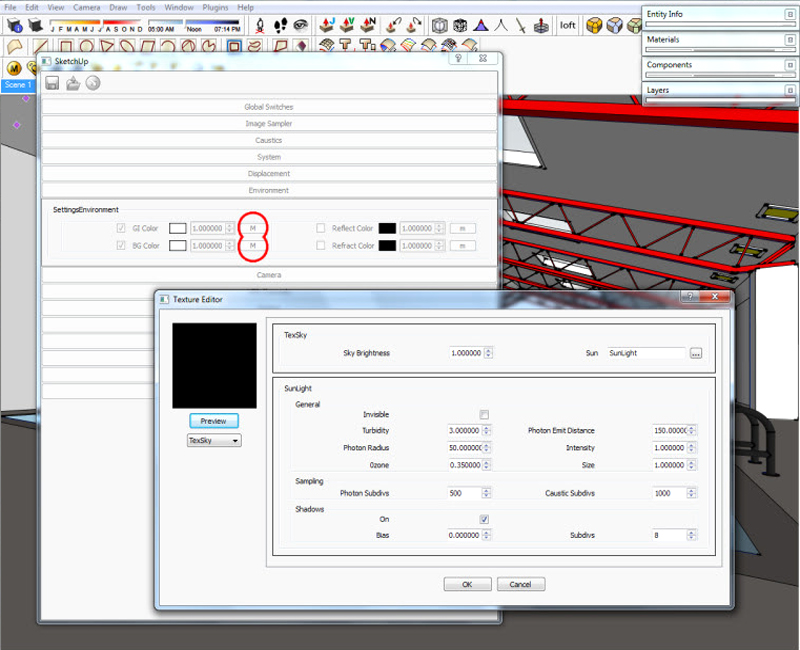
GI Color controls the lighting that affects the image. BG Color does not affect the lighting but only creates the background of the image. Unless it’s something special, I keep the texture of each as Sun/Sky.
Camera
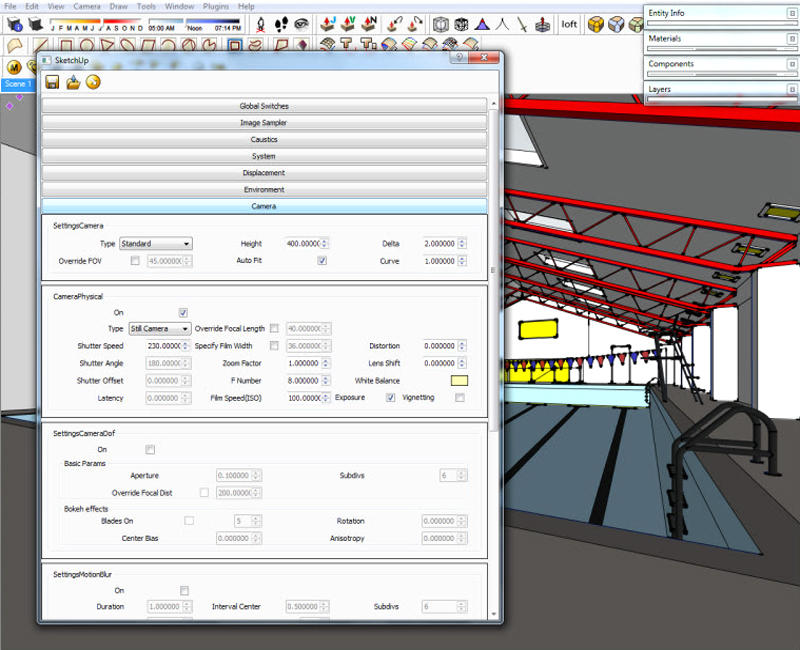
This is where you’re photography skills can pay off. I always use the Physical Camera which essentially acts like a real camera, where you can change the shutter speed, ISO, F number, etc.
VFB Channels
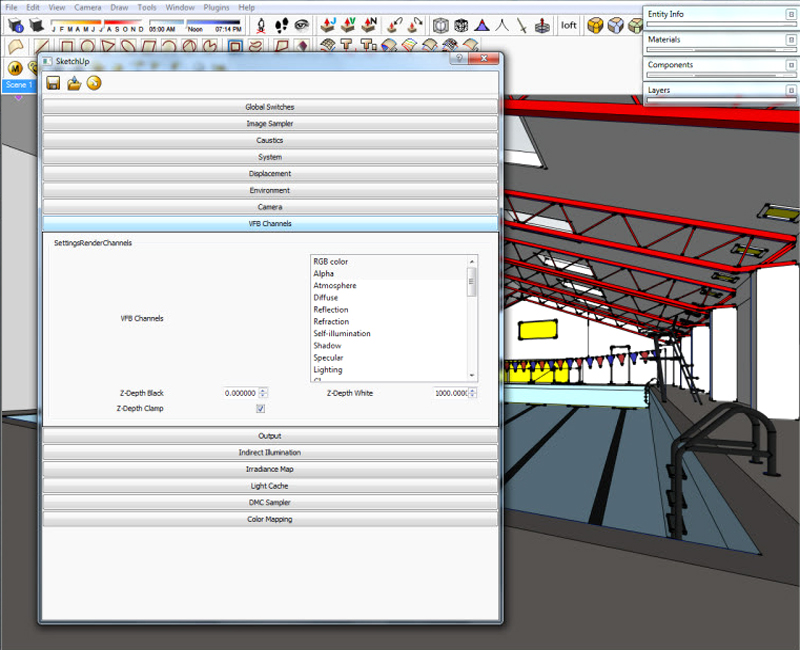
These are additional channels that will also be rendered should you wish to. As a default, RGB color and Alpha are required. Some of the others can prove to be quite useful when using in post production. I haven’t used many of them, but one that I have used is Render ID, which differentiates materials by color.
Output
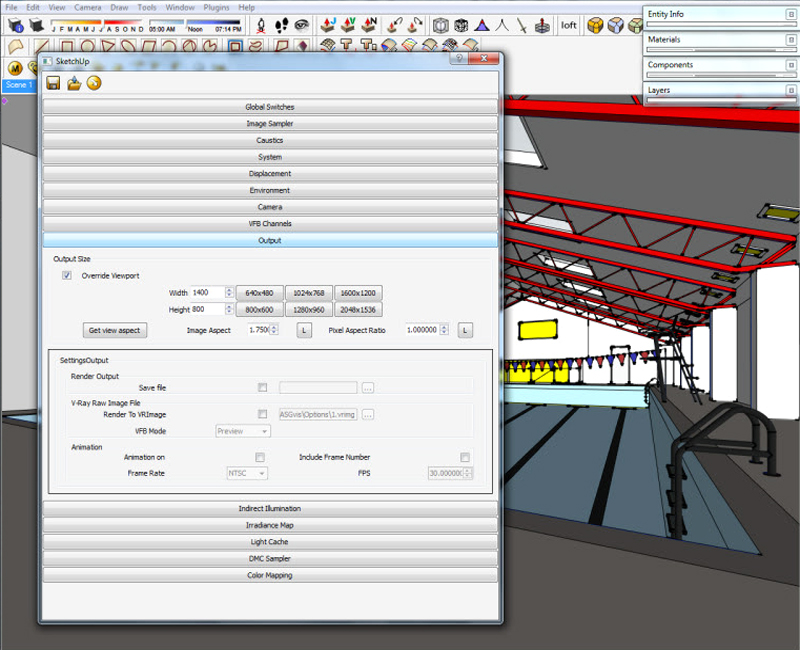
Here, you can change the final output size. You can also choose to render directly to file or render to something called a VRImage. This is useful should you wish to render a large file and you are running low on memory. However, you will need an extra program found on the ASGVIS website, to convert the file to OpenEXR.
Indirect Illumination
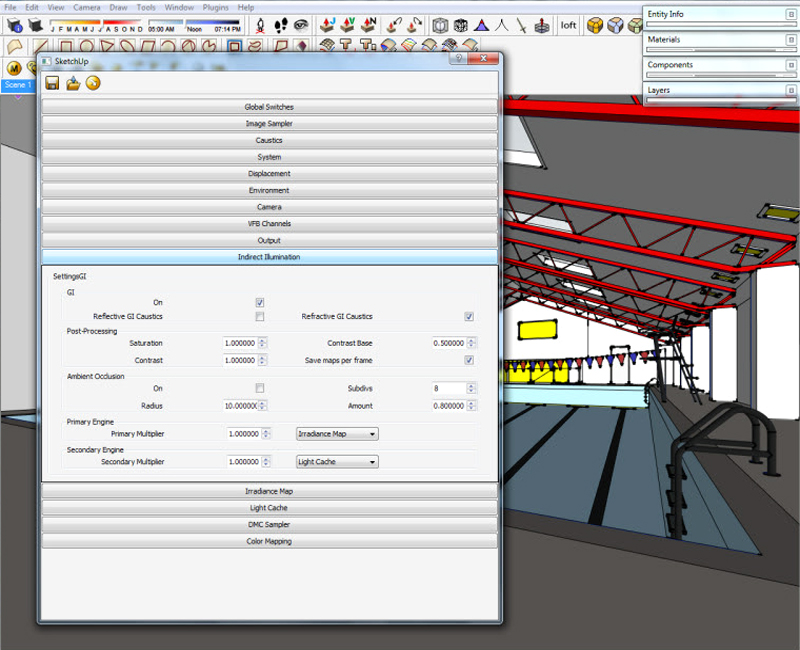
GI (Global Illumination) – always on. Ambient Occlusion is a new feature in the latest version of V-Ray. Very useful tool that helps create wonderfully realistic results. The Primary Engine, I always use Irradiance Map and Light Cache. DMC/QMC really eats up time, so I would not use that… plus it doesn’t give great results.
Irradiance Map
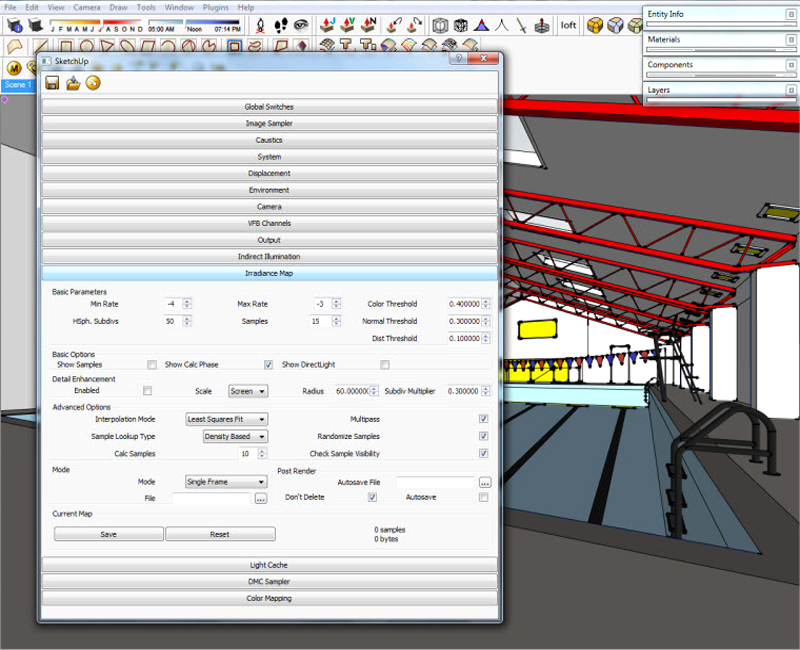
The Min Rate and Max Rate can determine the quality of the render. Play around with it to see the different results. Always keep the Min Rate at a negative value. The HSph. Subdivs also control the quality. 50 is quite decent, but for higher quality renders, a value of 100 can be much better. However, this does greatly increase the render time once again.
Light Cache
The default value of 1000 Subdivs produces rather good results. I never go beyond it. However, for test renders, I would lower that value way down to the values of 100 or so.
DMC Sampler
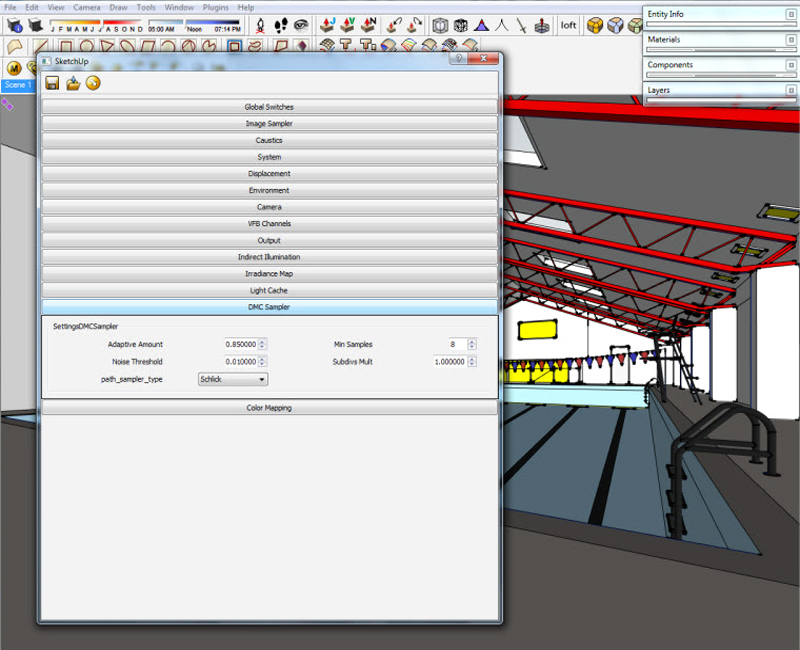
The default Adaptive Amount value is 1 on previous versions of V-Ray. Make sure that this value is changed to 0.85. Just do it! The noise threshold value here is 0.01. This produces quite good results and a sharp image. You can reduce this value to say 0.1 for quick tests.
Color Mapping
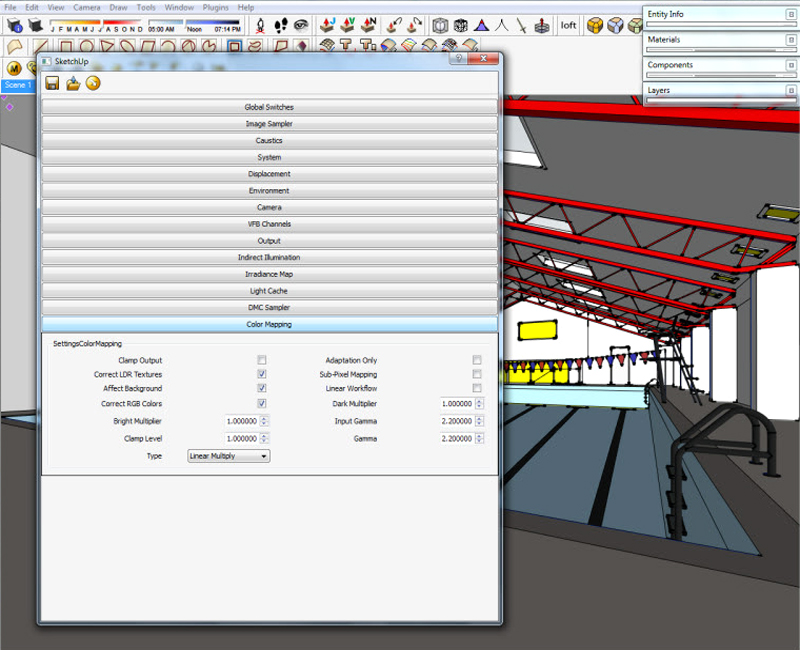
Play around with the Color Mapping type to test the results.
Thats it! …I hope this somewhat comprehensive tutorial will help you in some way or another and thanks for reading it. Here are some resources I have found useful in learning more about V-Ray and rendering
- ASGVIS Forum – this website is the home of the V-Ray for SketchUp forum. Many professional users reside here and can answer many of your questions.
- Spot3D.com – is a very useful website. The tutorials and information are actually for V-Ray for 3DS Max, but there are a lot of similarities between the programs and you can learn a lot there.
Thanks
Steven Man
© 2010 Detail Design Online





dear sir or madam is there anyone that knows of one to one tutorials in london of vray for sketchup
would u please tell how can i make water fall effect in which water fall from some level .tnx
thanks for that great tuto ☺
d Hey. I wrote this tutorial quite a long time ago. Whilst I’m happy that it has been well received, I would like to point out that I have a greater understanding of Vray now that I am a full time visualisation artist.
For example, where I have talked about increasing hemispheric subdivisions to improve render quality, “increased quality” is a very generic explanation that I have not fully explained. And whilst saying that increasing the subdivs from 50 to 100 CAN be beneficial, it most likely will be hugely detrimental to the render time. Whilst I am on the point of hemispheric subdivisions, I would suggest not to exceed 80 and go up slowly, and only increase it if you are experiencing problems with light blotches in the scene.
I may rewrite a more comprehensive, up-to-date tutorial, but for now… please take this tutorial as a quick ‘crash course’ in V-Ray.
@roobinaa: I would suggest modelling the water with a water material applied. Although this would probably be far easier in a more powerfulpoly modelling software such as 3Ds Max.
Steven
Hello, I’m french, so forgive me if that my english isn’t very well.
I start Vray for sketchup but I don’t understand all the steps to properly configure the scene.
Thanks for help
Clémentine
Hmm is anyone else experiencing problems with the images on this blog
loading? I’m
trying to figure out if its a problem on my end or if it’s the blog.
Any
feed-back would be greatly appreciated.
Hi,
I’m new to v-ray and I’m rushing a design proposal for our local church.
Im using sketchup 8 and v ray version 1.48
My newbie question is how come when I render, The v-ray frame buffer does not show just my scene but a whole lot of background ( Output setting is at 2048 x 1536.
I need to print it in 36×24 for community presentation and all I’m getting is a 9×8 image .
Many thanks,
JIm
Is the model available to download?
Thank you very much for this great tutorial. It’s my first time with Vray and it was very helpful.
Keep up the good work and good luck!
Chiara
[…] V-Ray for SketchUp – super crash course :: SketchUp 3D Rendering Tutorials by SketchUpArtists. […]
Hi! Steven Man
Thank very much for making this tutorial which is easy to understand ,short & sweet yet very illustrative,effective for beginners
Web links provided at the bottom of tutorial are very helpful Thank you for all this
Keep it up!good luck
Pankaj A. Tamore
Olá steven man, queria saber se tem como fazer tapetes felpudos ou peludo no sketchup pro 2014 + vray 2.0. Muito obrigado que Deus te abençoe.
Queria fazer mais uma pergunta, quando exporto arquivo 3d no arquive 3d net eles vem todo cinza, como faço para isto acabar?
How many day/time of v-ray course…
Thank u so much for making this tutorial is understand very easily ….
i study sketchup vary rendering setting
Good afternoon, i need help in vray+sketchup. May be by paid online lessons.
e-mail: strawberry_pink@bk.ru;
vkontakte: https://vk.com/id177474498
facebook: https://www.facebook.com/profile.php?id=100000337977476