Google SketchUp and Kerkythea – fast start 4Architects

By Majid Yeganegi
Hi every one! I embarked on this project to show my appreciation and respect to the Kerkythea team, who have had a great impact on my insight into easy high-quality rendering. I hope you too will find Kerkythea easy to use and as fun as I did. This is an updated and revised version of a tutorial I posted over at the KT forums.
There are a few points that I need to mention first before you start to learn KT using this tutorial. First of all, because this is an easy-to-use and simplified tutorial and also an architect-oriented guide, I have ignored some intricate technical material tips. Maybe in the future you will be so impressed by KT that it will encourage you to learn KT deeper. I have done another follow-up tutorial called Kerkythea – take a deeper look at materials. It is based on more accurate material making, which may be worth looking at once you have gone through this one. One thing for sure, if you are interested in making true materials, you need to know about them, so that tutorial will come in handy. In the mean time at this early stage don’t worry about the advanced stuff, you can ignore it and enjoy simple material making. Also, there is a little known fact about KT that by knowing and using some simple material, light, render settings with a few simple tips, you will almost certainly start creating great photo-realistic renders. Please note that this is a SketchUp based tutorial. On other 3d software it may vary somewhat.
Installation – Placing Lights in Google SketchUp – Export
Ok, let’s get started; first of all, be sure that you have installed the latest version of Kerkythea, and appropriate exporter for exporting your model to Kerkythea. Just ask at the Forum if you have any problems. I strongly recommend you to use this installer because it is the easiest to install. If all is successful you should have a new toolbar called SU2KT like the one shown below.

Kerkythea Toolbar
If you don’t see this tool set in SketchUp go to View>Toolbars>SU2Kerkythea and ensure that you have selected and activated this menu. I will only describe the ones we are concerned with at the moment and these are the first, fourth and fifth icon. They are: “Export to Kerkythea”, “Point Light” and “Spot Light”.
After you have completed your modeling and texturing in SketchUp it is now time to place your lights and then export your model to Kerkythea. Generally we have two kinds of light, a Point Light and a Spotlight. A typical example of a point light would be a general tungsten light bulb and if you put it inside a shade, then that would be a typical example of spot light in general.
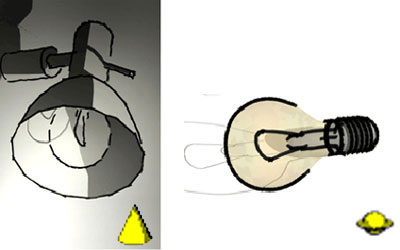
Spotlight and Point Light
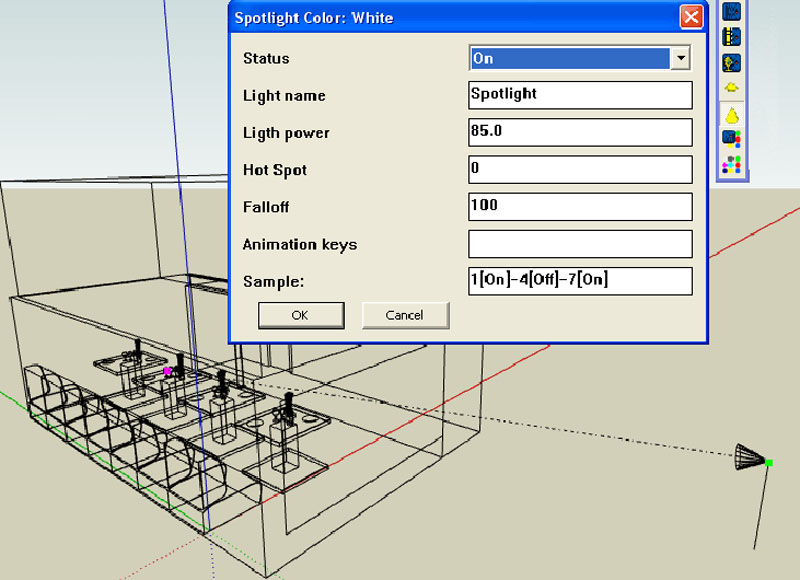
Now lets use point/spot lights. The icon that looks a bit like the planet Saturn, is the point light while the cone shaped icon is the spotlight. Choose a point light, click where you want your light to be placed, and click somewhere in your model that shows the range of your light. A dialogue box will appear that lets you to rename and modify your light’s power. If you use spotlights, the second point shows the light’s target. Easy?….yes that’s all there is to it!
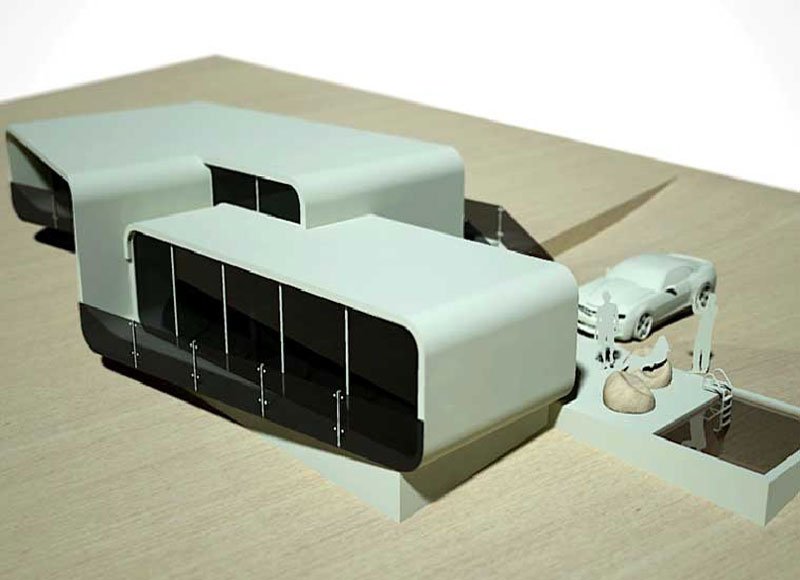
After placing all of your lights now it’s time to send your model to Kerkythea to be rendered. Be sure that nothing is selected because if you have something selected, a dialogue box will ask you do you want to export selection only? We want to export whole model so make sure you have nothing selected. So now click the export button, the first icon in the Kerkythea Toolbar. Now you can answer dialogue box with yes/no ( you can change nothing so just click OK). Maybe you are interested in a clay render that makes your render something like Maquette. If so, then the third question asked “export clay model?” must be answered by “yes”. This is a sample of clay render:
If you happen to select this, then none of your textures will be exported to Kerkythea, and your entire model will have one material (but every object is selectable separately so that you can modify it, and if you haven’t textured your model then Kerkythea will not let you modify each object separately).
TIP: As Kerkythea is physically correct, so you must pay attention to your model scale and try avoid off-scale models!!! When your model is opened in Kerkythea at first it’s a bit confusing because of lots of gray lines you see!!! Press “V” on your keyboard. Now it’s better to understand….. isn’t?
Graphical User Interface (GUI)
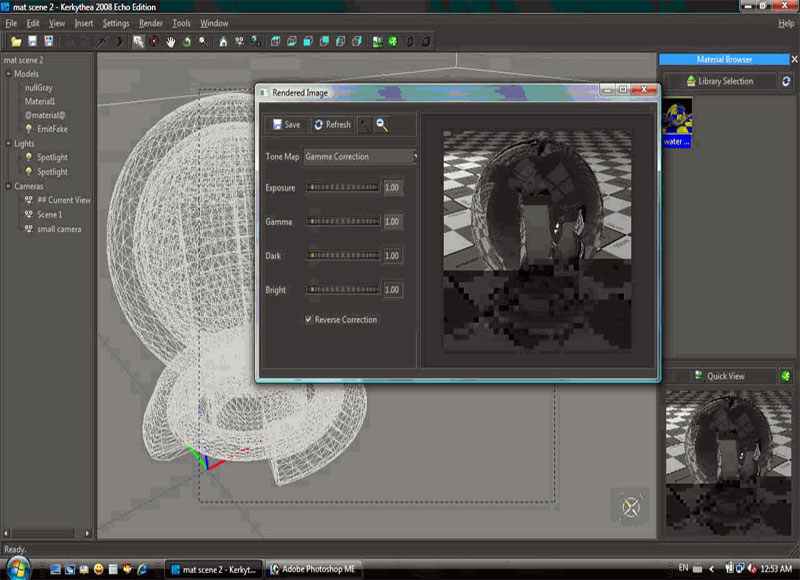
Being more familiar with the Kerkythea interface maybe is the next step we need to quickly look at. You will find these major parts:
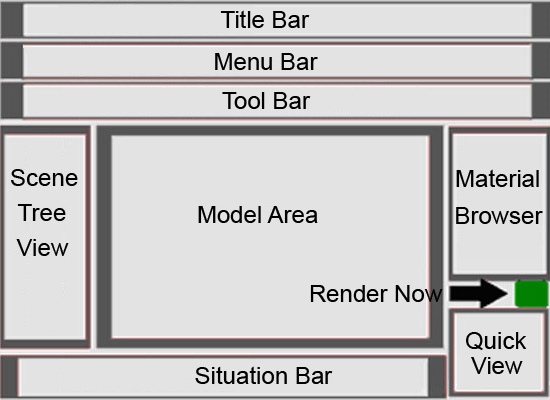
Common Bits
Materials
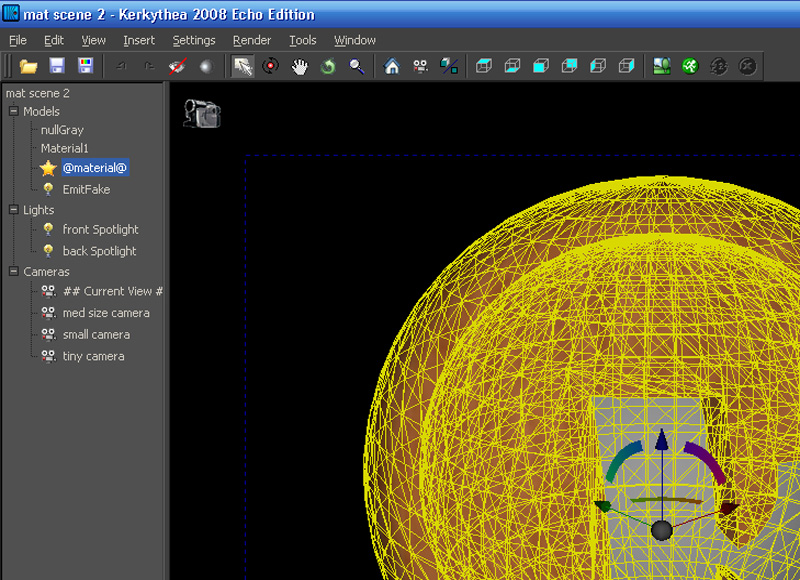
Now we are going to learn about the materials, adjusting them simply and then we can start our architectural rendering job. You can download the files you need for this here. Using “Ctrl+O” open “mat scene 2.kzx” file. Hit the “Esc” and “Space” on keyboard to ensure nothing is selected and you are ready to select objects in your scene. Hit “V” to see your model with textures/colors. Now double click on @material@ the wood-textured object will be selected. As you see the selected wooden object is wrapped in a yellow mesh and in the “Scene tree view”. A tiny yellow star has appeared beside the material’s name and shows that it is now selected. Press “Alt+m” for the material editor to appear.
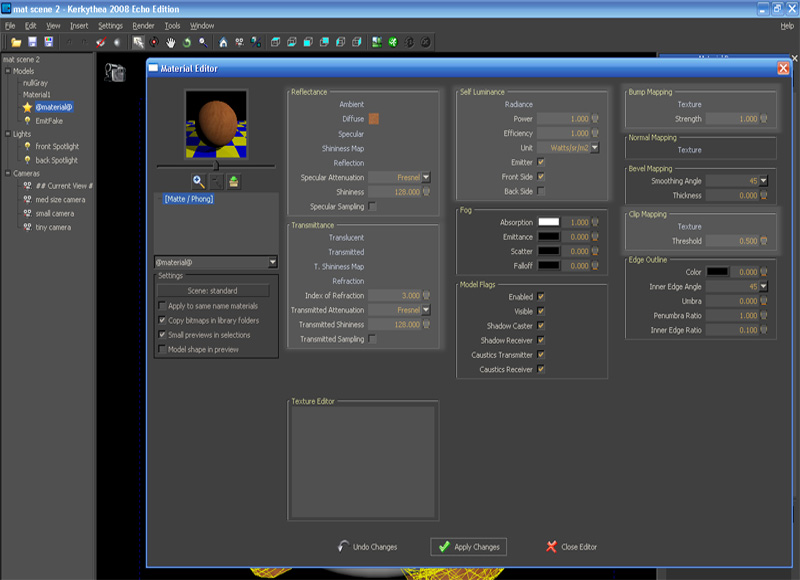
Kerkythea material editor can be a bit confusing but in fact very simple and handy. There are a few elements within the material editor we need to look at first and I will go over the most common ones:
[Matte/Phong], Reflectance, Transmittance, Self Luminance, Bump Mapping and Clip Mapping are most used and common parts. Trust me, understanding just these parts will end in acceptable renders. Now what do these names mean? Most materials we see reflect the light that hits them. The “Reflectance” part of the Material Editor lets you fine tune this property of materials. Some materials like glass, camera lenses and water, let light transmit through them so the “Transmittance” part is about this characteristic. You have seen that a candle, neon tubes, safety match or fire and also your computer monitor glow when it’s dark. “Self Luminance” is about glowing emitter materials such as above. There are lots of materials that when you touch them you will find that they have scratches, grooves and small dents, or small bumps like raw fabrics. This is very hard to model. You can achieve this type of relief using a bump map. Another difficult thing to model would be something with lots of tiny holes and very pitted, like a wooden fence. It would not be wise trying to model this kind of relief. Using a map that masks some part of the material can make it easier to create this kind of effect. This is where the Clip Mapping part comes into play.
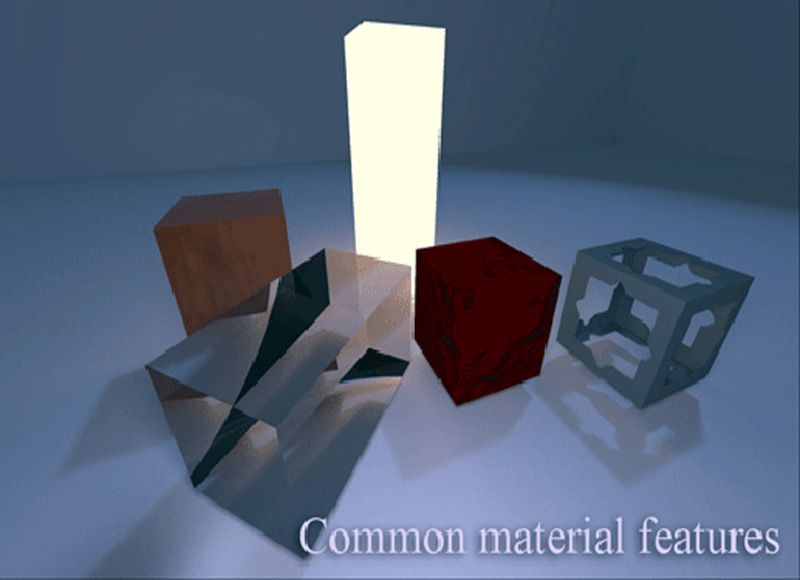
Common material features are:
- Reflecting – like a wood material
- Transmitting – like glass
- Emitting Light – like neon bulbs or fire
- Bump and Clip Maps
Reflection and Shininess
Our wood material has a texture, and its thumbnail is shown as a brown square in front of the “Diffuse” word. Generally we call these colors or textures as “map”. By right-clicking on the actual word “Diffuse” you can change it. First colored circle lets you to add color, second checkered square lets adding or change the material texture, the third one is for procedural textures and finally the red multiply sign is to delete color or texture or any other “map”. It is the same for other items like “ambient” “Specular” “Shininess Map” etc. . . . Note that each time you add any map such as color, texture, etc. to each item a “weighting” panel will appear further down the material editor panel. Note that if you are adding more than one map at the same time (at this stage I strongly recommend you to avoid! And if you have done you can delete it by right clicking) whole weights sum must not exceed more than 0.96 because it means that your material is reflecting more light than receiving!!!
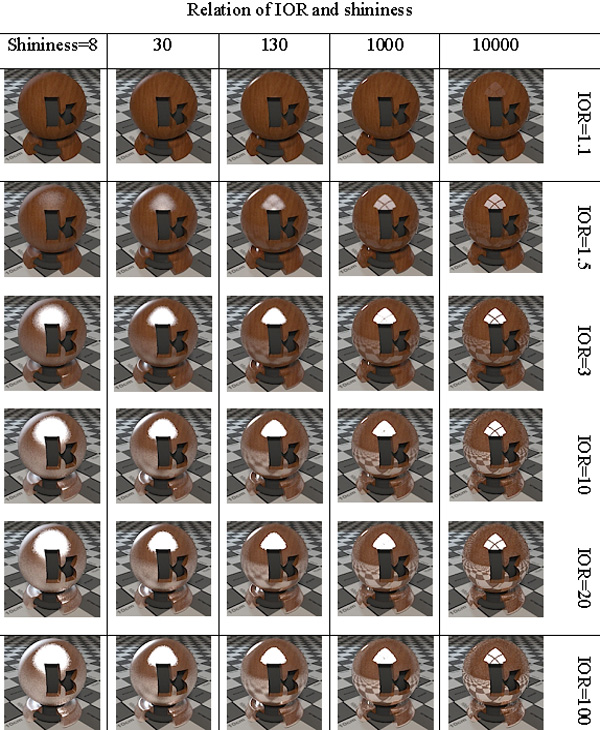
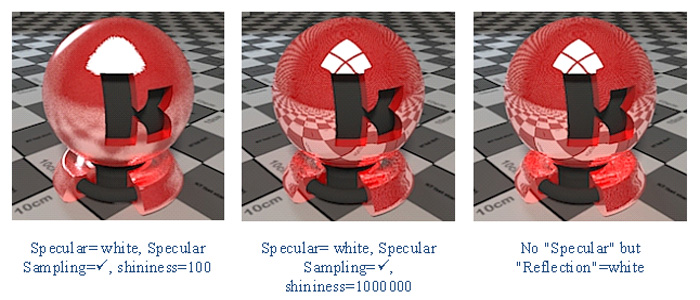
Our material is too matt and dull and needs a bit of polish in my view. To do this add a weight color (white for example) to “Specular” item and tick the “Specular Sampling” box at the same time to have some reflectance on your material. By adjusting and increasing the “Shininess” item, you can have a polished wood while by decreasing it your wood goes more matt. Change “Shininess” to 5000, 2000, 500, 100, 50, 20, 5 and carefully observe the differences. Greater number end up as a clear reflect.
To decrease the amount of shininess simply lower the material’s “Weight” (as a tip: how shiny is your material, is directly linked to “Index of Refraction” under the “Transmittance” part. Note that your IOR (index of refraction) is normally more than 1. Increase it and see the result).
Consider that by increasing the IOR amount our material goes more reflective, while how shiny is our material, determines clear reflected environment on our material. Now if you increase the “Shininess” amount, you’ll reach a point that your material is mirror-like. At this point you can delete specularity and instead, use reflection. Reflection is much faster. It doesn’t depend neither on IOR nor shininess and you can control it’s amount by “Weighting”.
We are going to make a shiny red plastic. Change materials “Diffuse” from bitmap (I mean wood texture) to red color by right-click over “Diffuse”. Add white reflection to it. Hit Quick render, and you have a shiny red plastic. When you increase the “Shininess” with a fixed specularity amount (i.e. .96) you will reach a point that you can use “Reflection” instead. You can also decrease reflection by lowering “weight” of reflection as desired.
Now you can make lots of materials, like porcelain, ceramics, polished shiny wooden floors and shiny plastics. All of these materials have a “Diffuse” (that maybe a color or texture) and some reflections that could be achieved in 2 ways:
- “Specular” + “Specular Sampling” and “Shininess” + “IOR” for controlling
- Just adding “Reflection”
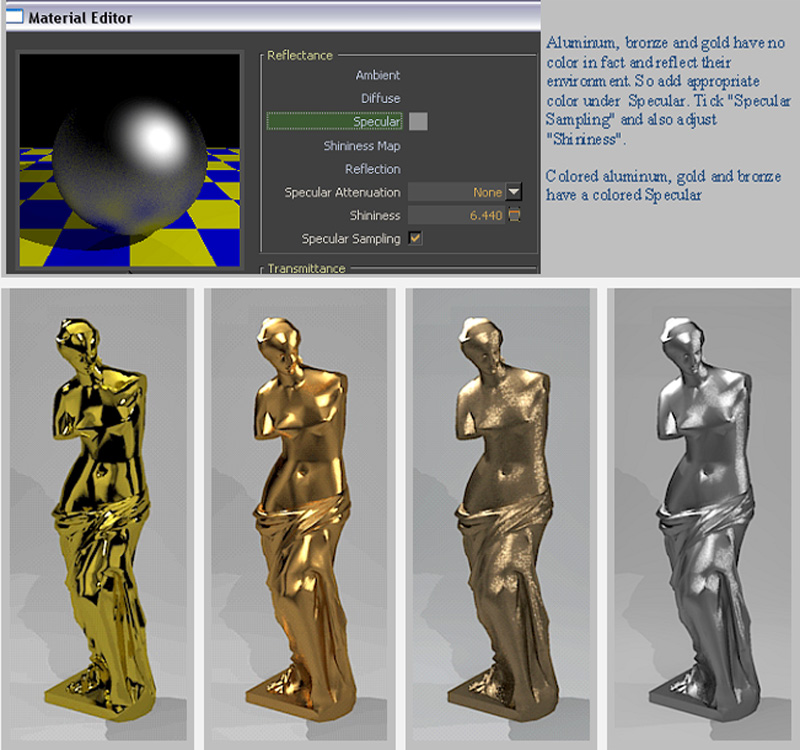
Obviously if you have a perfect reflection , you must use reflection, but if you have a jaggy reflection use Specular. Usually there are a few materials that have a perfect reflection, in fact most of them have a soft and wide-range which means you can use some “Specularity” on them. For example, aluminum has no color and just some gray specularity while colored aluminum has a colored specularity.
Bump Mapping
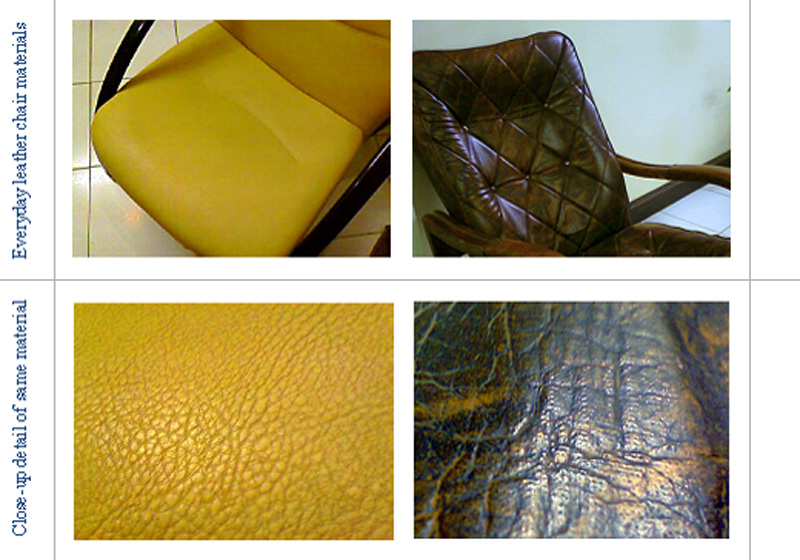
First of all take a look at these pictures and pay attention to the materials:
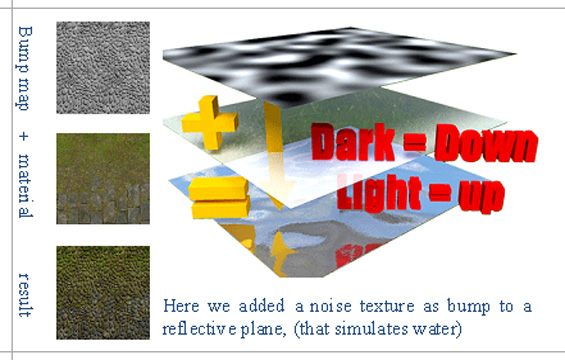
There are plenty of materials that have a tiny or huge bumps. In such situations you can add a bump map to your material so you simulate this feature in the material.
As a rule, bump maps are black/white maps, the dark parts are deep, and light parts are bumped up parts of the material. Now look at a leather material setting:
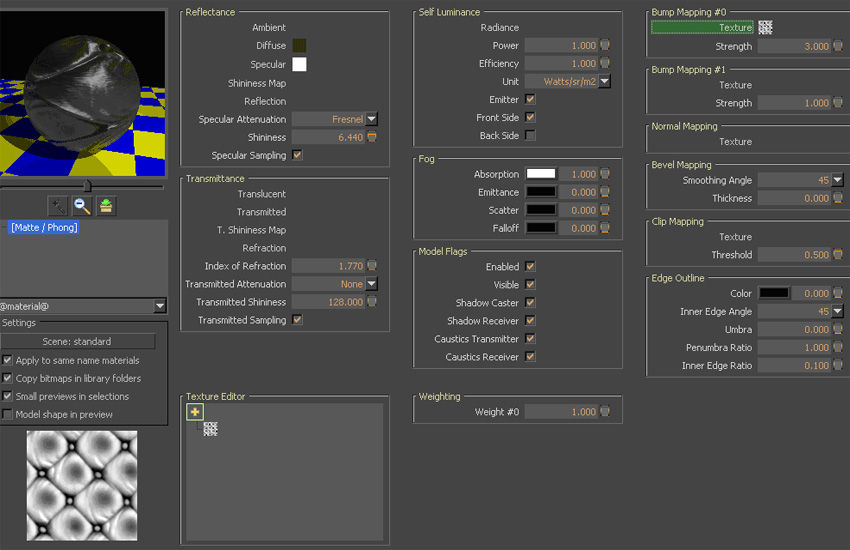
As you see this is a brown material (though I’ve used color you may use a texture instead) + white “Specularity” and also a black/white map as the material’s bump. I’ve reduced “Shininess” to about 7. This causes a wide range of specularity over our material. You can bring lots of your texture to life by using a good bump map . For example, ceramic tiles, bricks, rough fabrics, textiles, rough wooden textures etc. After a while when you became more expert, it’s possible to use multiple bump maps over your materials.
Self Luminance
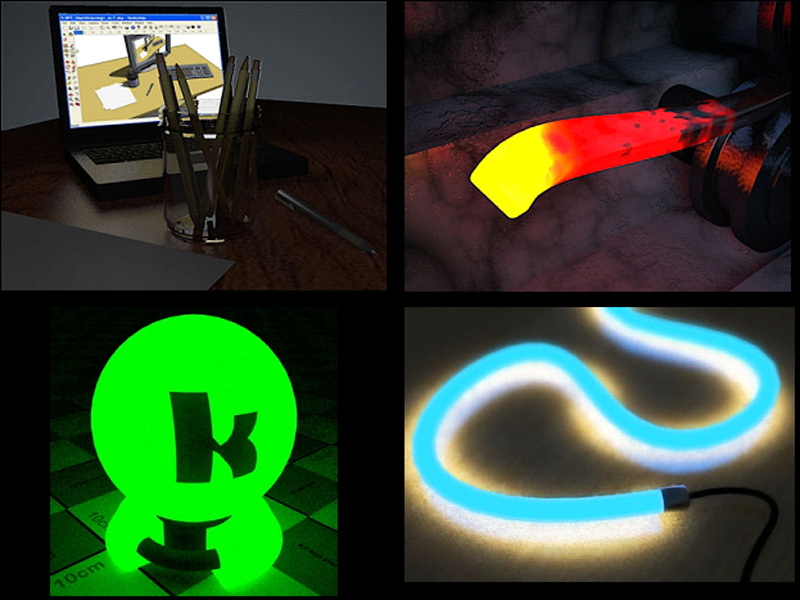
Some materials emit light. Candle, neon tubes, computer screen TV and LCD’s are sample of these material type. If you give some “Radiance” to your material , it will behave as a light source so we call it “emitter” material. If your emitter material has a complicated geometry, render time will become very enormous. So it’s wise to avoid use of such geometries as light emitter sources. As a trick you can give a color to “Radiance” part but uncheck “Emitter” part, and then your material will glow but doesn’t give light to environment. Then you van add a point light beside it to gives light. Here are some samples of light emitter materials:
Clip Mapping
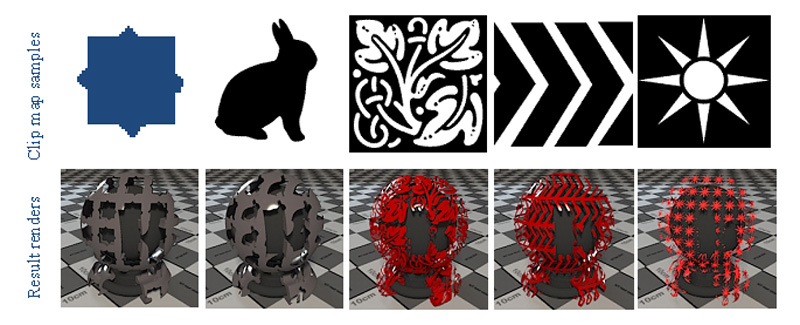
What about pitted materials that have many holes in them. Like fence materials, that have a mesh of tiny holes and pores. In such situations you can use a black/white map as your “Clip map” texture. Not that just the “WHITE” part would be “VISIBLE” after render. Here are some samples:
Transmittance
Water, paper, lamp shades, thin fabric curtains and also glass are samples of transparent materials that light passes or transmits through them. Glass for example lets light to be half-reflected and half-transmitted through it. Water also is the same but at the same time refracts the light and you must add an “Index of Refraction” of about 1.3 to it and maybe some bump to be more realistic.
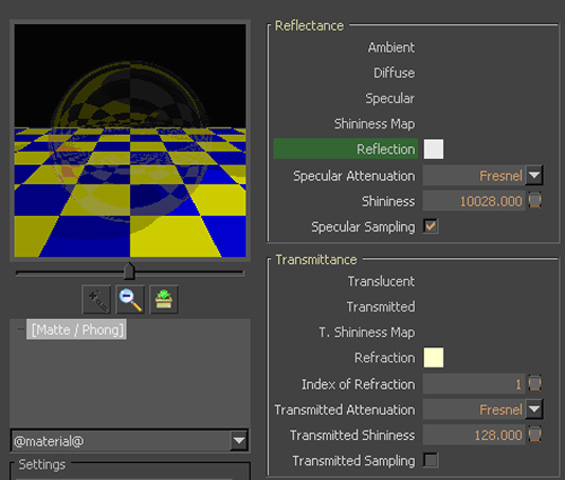
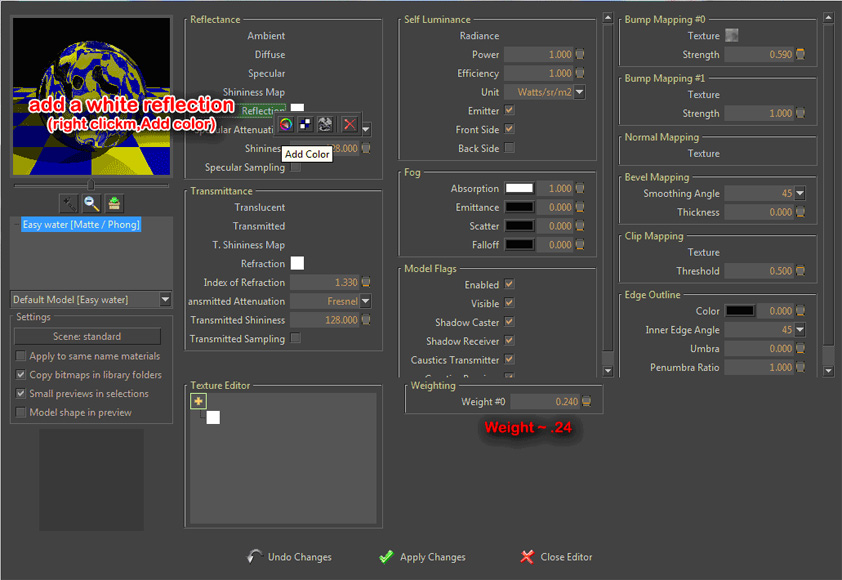
For a thin glass (that we use in windows) add a white “Reflection” and using “Weight” reduce it to 0.24 or a bit more or less (or you may add a color to the “Reflection” part to achieve a colored glass). Add some white (or color, if you need a colored thin glass) and don’t change “Index of Refraction” at all. See Image for settings:
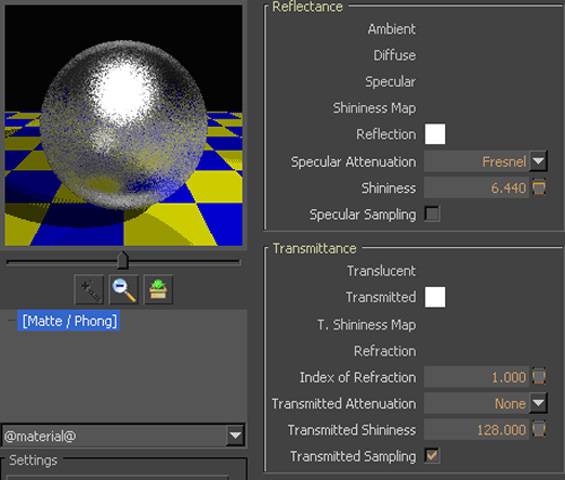
For thin frosted glass add some reflection (About .24), in the “Transmittance” pane. Add white (or color) to “Transmitted” part. Set “Index of Refraction” to 1. Set “Transmitted Attenuation” to “Fresnel”. Check and select “Transmitted Sampling”. See image below for settings:
For wavy water material do the same as thin glass material and then change the “Index of Refraction” to 1.32. also a water texture map to “Bump Mapping” part.
Thick glass material (i.e. glass vases or a glass cup) are like water but with “Index of Refraction” of 1.5.
Rendering
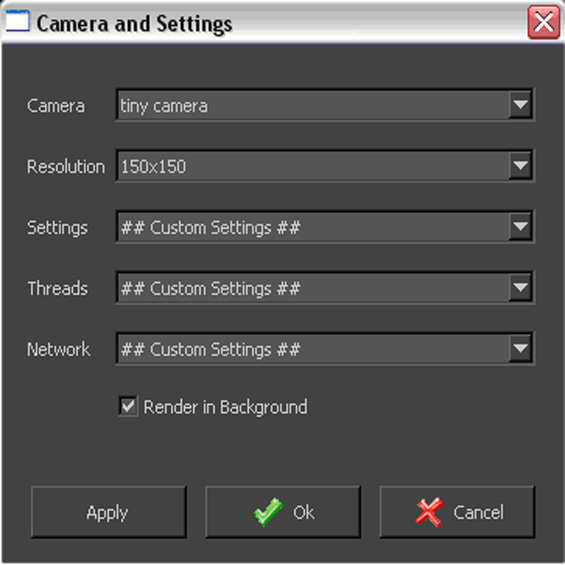
In the Toolbar ( Icon-Bar), the third icon from right that is represented by a running man in a green circle is for starting the render process (selecting the camera and render setting panel). Click on the green running man for the render setting panel to appear. The camera part shows as many “Scenes” as you have made in your SketchUp model with their exact name as your cameras in Kerkythea. “Resolution” part determines your render size. Simply type your desired render size by “width*height” to change it.
Just beneath it the “Settings” part is a preset of render settings that each one would end to a different result. For fast draft render, choose preset no 03 (Photon Map-Quick) and for final render preset no 06 should be good enough. Maybe for exterior renders preset no 17 is the best one. If your computer has more than one processor, you can choose a different number under “Threads” to match your processor numbers. For example if you have 4 processor you can force all 4 of them by choosing 4, in front of “Threads”.
To see the render result, at the left of the green runner, there is a tiny landscape icon. Click on it. When your render has finished, you can save it by choosing “Save Image”.
Tips and Tricks
- Save your scene for further reference using “CTRL+S”.
- Kerkythea separates objects by their material’s names. So give a different material to each part of your model and avoid use of same color/material for those parts that you need them to be defined and modified separately. For example if you need reflection for top face of your wooden brown table, then change the face material. Easily select the table material, hit “create material” key, name your new material, and repaint that face.
- Start name of your thin-glass materials (i.e. your windows glass is a thin glass) with TG_ , then when you export your model to Kerkythea, they will be recognized as thin glass materials.
- Easily paint your lights with desired color in SketchUp , so that they emit the same color in Kerkythea.
- Each time your confused, easily “reset” your material and start over.
- Always be aware of this physics law: reflection+refraction must not exceed more than 1.
- To avoid complicated geometry, when it is an emitter material and it is flat, you can use a single emitter plane+clipmap instead of making real geometry.
- If you need some partial changes and not your entire model or need more cameras or lights, there is no need to re-export your model to Kerkythea. Just add new cameras (scenes in SketchUp), lights and materials or geometries and select everything you need to be changed (scenes in Sketchup will be exported automatically as cameras) while exporting to Kerkythea and say “YES” to first question on Kerkythea exporter that asks you: “Export selection ONLY?”. Then in Kerkythea from “File” > “Merge”, merge these 2 files and adjust merging process as you desire.
- From the Kerkythea website download page, download “Globals” you need and install them (from “File” > “Install Library”). Now you can add virtual environments to your model from: “Insert” > “Globals” to change your environment from a plain sky to desired one.
- From the Kerkythea website download page, download material packs you need. There are plenty of them. Then open your library from “Library Selection” on right part of Kerkythea main interface. You can easily add the desired material to your model as follows – Select material or object you wish from left “Scene Tree”. Double-click on desired material in the right library.
- Install my “Fast Start 4Architects” material library (its full name is “Fast Start 4Architects.mat.zip”). There are some mostly used materials in it and you can change them easily or learn from them.
- Open the material test scene that I’ve uploaded. First unzip “mat scene 2.zip” and then open “mat scene 2.kzx” file and test your materials on it.
- Get familiar with the Kerkythea forum, there are lots of good helpful guys there .
My special thanks goes to Frederick (Kerkythea team member) who helped me a lot and invited me into the Kerkythea forum.
ENJOY RENDERING!!!!
Majid




Majid this is great and to the point tutorial.
fantastic resource! thank you very much majid.
mates, for more information (including material packs and test scene) plz see these: http://www.kerkythea.net/phpBB2/viewtopic.php?p=63986
http://www.pushpullbar.com/forums/showthread.php?10200-Sketchup-Kerky-newbie
these are a bit old, but useful still
Could someone help me simply install Kerkythea. I have it installed, but cannot locate the icon to open the program. I’m on Mac OSX and the Kerkythea file is in the applications folder, but no icon that I can find to open the program…could someone please e-mail if they have any tips on this..I would really appreciate. thanks for the tutorial. I look forward to using it, if I can open this program..
It’s the black icon that says “exec” in the top left corner in the Kerkythea applications folder; it will open terminal and terminal will open X11 (make sure you have X11 installed) and Kerkythea will launch. You can actually launch as many instances of Kerkythea as your system has memory and processing power for when bulk rendering.
Gratitude to Majid and probable answer to Keea
Hi Majid, thank you for your tutorial – it is fantastic for someone like me, starting from the scratch as it has all the answers to the the problems I had while trying to get KT up.
Keea, from what I understand of your problem, you have got your steps wrong. Try: open in Finder, Mac HD>Library>Application Support>Google Sketchup 8>Sketchup>plugins>copy and paste here the su2kt folder and su2kt.rb file that you have copied earlier from the downloads. In Sketchup, goto View>Tool Palettes and click on SU2Kerkythea to launch KT toolbar in Sketchup.
Great! I really liked reading it. Eventual I understood making materials and bump mapping 🙂
(there are a lot of trees). I tried using 2D trees but I am not getting the results I need. Any advice?
I am trying to create a forest scene in which spotlights are beaming through the trees. I am using sketchup to create the model. I tried using 3D trees but this produced no rendering since kerkythea could not handle the complexity (there are a lot of trees). I tried using 2D trees but I am not getting the results I need. Any advice?
Hi Juan
The latest release of Kerky (2008 echo) has the facility to paint your trees as instances (make groups,scale them, rotate etc.), lights as well, all in Kerky. You can make copies of trees in kerkythea in this way, in other words do it within the renderer. The Instancing Brush is a very handy new feature/tool. Here is the link to the tutorial http://www.kerkythea.net/joomla/index.php?option=com_remository&Itemid=42&func=fileinfo&id=68
Thank you thank you thank you!!
fantastic, y use Kerkythea is a good render
Hello Majid,
Wonderful tutorial! Brillant for beginners. I am just starting to learn Kerkythea and thought you explained it VERY well. I look forward to more! A hugh thanks for putting this together.
Thank you for the great tutorial! It was easy to understand and helped me a lot.
I cant find In camera setting “Photon Map-Quick”.It is empty. Plz help, what can I do!
hi majid, a perfect tut, but i still have a question:,when i open an exported file in kerky it recognizes all the materials exported from su,except the concrete surfaces.(they are white in daylight and completely black at night rendering!) got any idea that’s why?
Thanks man, helped alot.
Hello,
I have a huge problem since yesterday, I can no longer do I render my sketchup drawing. I’ve never had to worry but for two days I get the message: not enough resources to support the rendering technique used or the complexity of the scene. Please save the scene. I do not know what to do if someone has encountered this problem and a solution I would be very happy because I have to my work by tomorrow. Thank you very much in advance. Nath (sorry, I do not speak English I did a Google translation)
Hi,
I have a big problem exporting from Sketchup to Kerkythea.
I made my model and installed Kerkythea plugin without any problem. I exported the model to Kerkythea and did my first tests with the render.
Then I added some more textures in Sketchup. Now, when trying to export a new file to Kerkythea, after two minutes everything stops (I noticed it stops when “exporting texture 39\82) Sketchup crashes and an error message appears.
What can I do? Please help me, I tryed to change the views, the name of the file…but this always happens.
Thank you!
Can anyone help me to apply materials and lightings on kerkythea please… very much appreciated..ty
thanks a lot. i got it knw. thanks agin t teach us
Thanks for a great tutorial. I was looking for some info on getting a Kerkythea set-up with SketchUp and this was perfect.
hi majid- what a great tutorial. this is probably the best tutorial i’ve come across so far. i just started using sketchup and kthea renderer. initially i was not impressed with my results. normally i’m a fiddler- i fiddle with the program and thru trial and error get my results and i also learn my own tricks thru practice. but with kthea it seemed so much more daunting. i’ve been trying all the different renderers for sketch but each has their own quirks. so far vray gives the best results but needs a lot of tweaking. besides i’m using a trial version and don’t want to upgrade and pay more. so i’m going to wind up using kthea. and now thanks to your tutorial (i read both) i’m confidant i will get better results. just wanted to say a big thank you. the tutuorial was well written, well laid out, had all the right information and detailed support information without being too dreary. thanks once again. i hope to become a fantastic renderer in the future.
hi! i have a model with metal panels. these panels have a lots of holes and make a difficult geometry. i want to put a light inside the building and have a night scene but it take a lot of hour. what can i do?? thanks!!
Hello, i am trying to install Kerkythea on my Mac OSX, but it seems that the actual website: http://www.kerkythea.net, at this precise moment is not working, therefore i would like to know if anyone knows another website?? thanks!!
Are you asking how to install Kerkythea in SketchUp?
@ Ade Sudah go to View>Toolbars>SU2Kerkythea and ensure that you have selected and activated this menu…
bagaimana cara pengunaan nilai IOR
I have sucessfuly installed the kerkythea on my mac, but im having problems with the File_Instal Library, i have my folders of materials with the …mat.zip that is supposed to but when i try to install it the following message appears: The following archives had problems in installation: iluminants.mat.zip – could not import archive library.
Can anyone please help me with this?
Best regards
Dear Bruno
Try to share the situation at KT forum, and trust me it is a really helpful place. I myself started my journey right there.
M.
Mates
Nowadays I am preparing the very recent version of the KT fast start, and now it has more illustrations, well arranges with nice renders to depict each issue. You may trace the news on KT forum:
http://www.kerkythea.net/forum/viewtopic.php?f=9&t=12811
Hope you find it handy
Regards
M.
Hi,
When I export a model from sketch using the export to kerkythea in the plugins folder it allows me to save it as an.xml file.
When I open Kerkythea and go to open this file nothing appears on the screen. Can anyone advise me on what i am doing wrong please?
Regards, B
Thanks for finally writing about > Google SketchUp
and Kerkythea – fast start 4Architects :: SketchUp 3D Rendering Tutorials by SketchUpArtists < Loved it!
Mates , Thanks for all comments :).
I am revamping the whole “KT fast start” from scratch and must confess that it is gonna be a great and very handy ,easy to follow e-book. This time I hope to sell it in a really low price for each copy and it would be a bundle. I hope you enjoy it and find it useful.
I’ve updated the KT lights component collection and now they are mainly remodeled or having extra mode details. You may take a look at SCF forum here:
http://sketchucation.com/forums/viewtopic.php?f=81&t=63450&p=590959#p590959