Interior Scene with Twilight Render

By Frederic Yves Moro
My name is Frédéric Yves Moro. I am a French interior designer/contractor. I design for all types of clients, and I enjoy creating 3D models, scenes and then developing them into reality. I have been using Google SketchUp for 3 years now and Twilight Render for a year. I do all my post processing with Neat Image and ACDSee Pro. This brief tutorial will take you through my process of creating this interior render. Model is available for download here.
Step 1. Scene setup
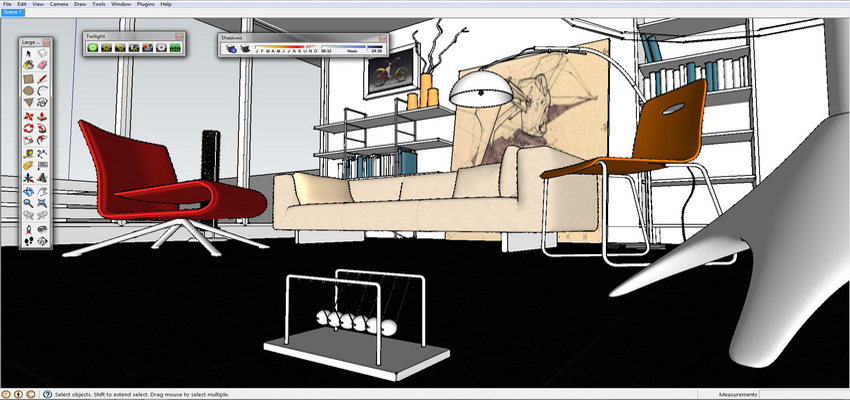
Firstly I setup my scene – walls, ceiling, furniture, decorative objects and materials, all in SketchUp. As I don’t have the time to model all furniture myself, I have a really huge 3ds model library (about 600GB). I usually download 3d models from www.archive3d.net in 3ds, and imported them into SketchUp.
Step 2. View and shadows
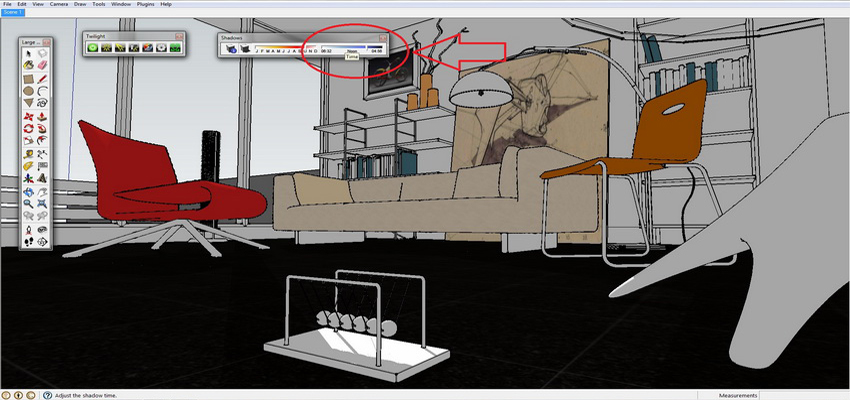
Inside SketchUp, I setup the camera position, to get the view I want, and the shadow position. The shadow position is really important to give life to your scene. Twilight Render will render the scene with the sun position setup in SketchUp.
Step 3. Material editor
Twilight Render is very intuitive and easy to understand. I think it is definitely one of the easiest interfaces around, if you compare it with all the render engines.
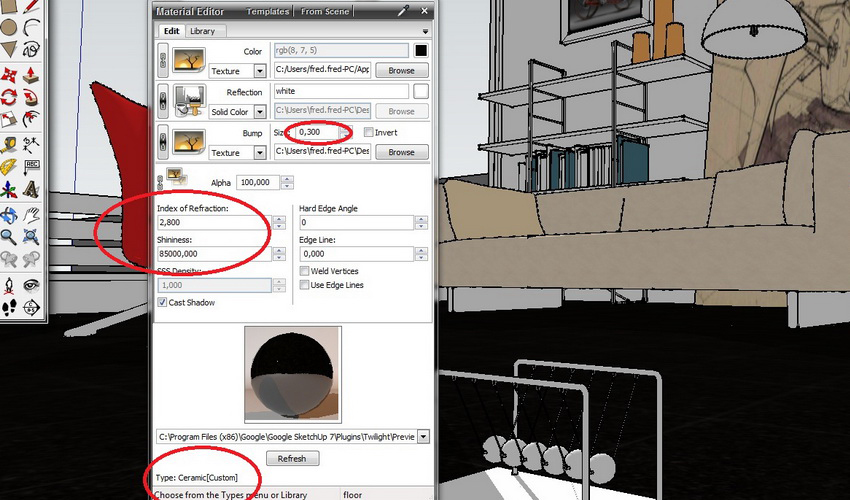
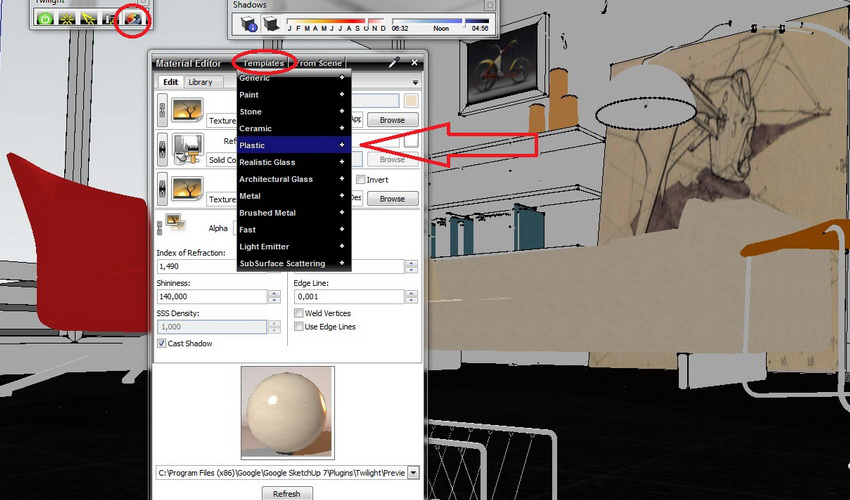
a) I always render with the progressive render preset, like easy 9 or 10+. If you want to get high reflection on your materials, you need to increase the Shininess from 15000 to 85000.
The floor tiles material is ceramic and the Shininess is set at 85000.
b) For the leather material I always use plastic satin template.
The chair’s material is Plastic Shiny, Shininess set at 15000
Step 4. Light editor
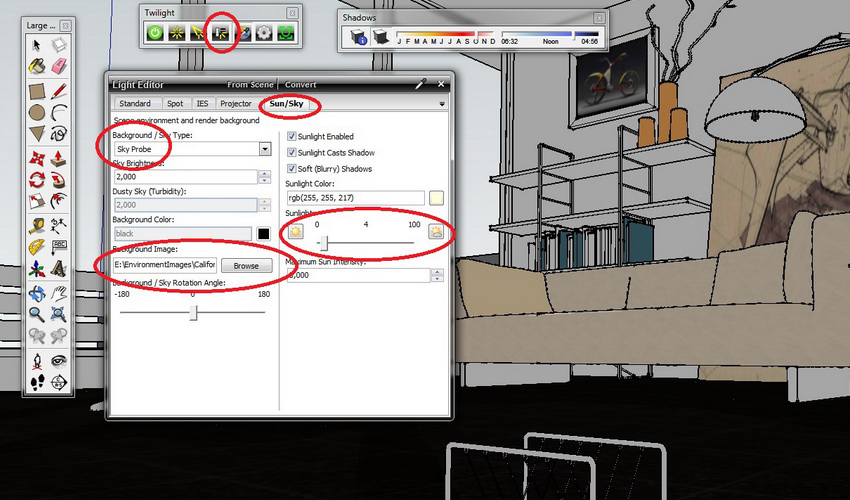
It is very important to always set the Shadow parameter at 4 or 5, as I feel it speeds up the render time and your shadows at the final render, will look more realistic.
In this particular scene I have used a HDRI image as lighting, and the Background/sky type. I select Sky Probe and choose my HDRI.
Step 5. Render
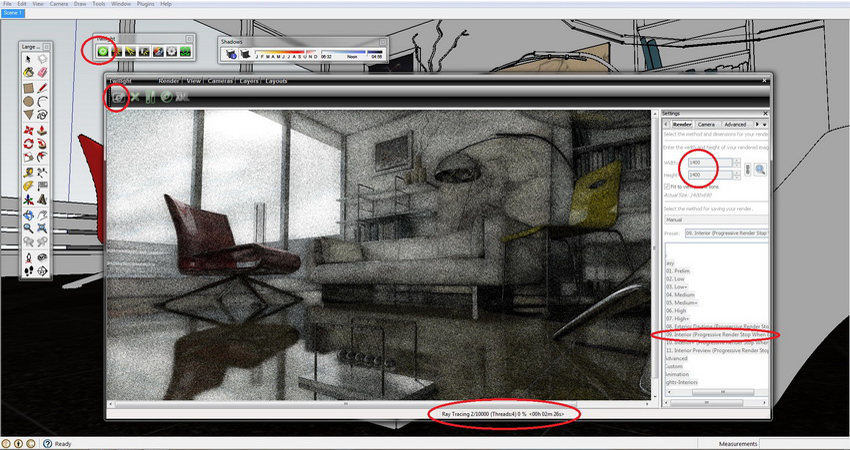
As I stated previously, I always use the easy preset, 9 and also 10 if I need some caustic reflection.
I set the size of my render image to 1400px wide and I select “Fit to view proportion”
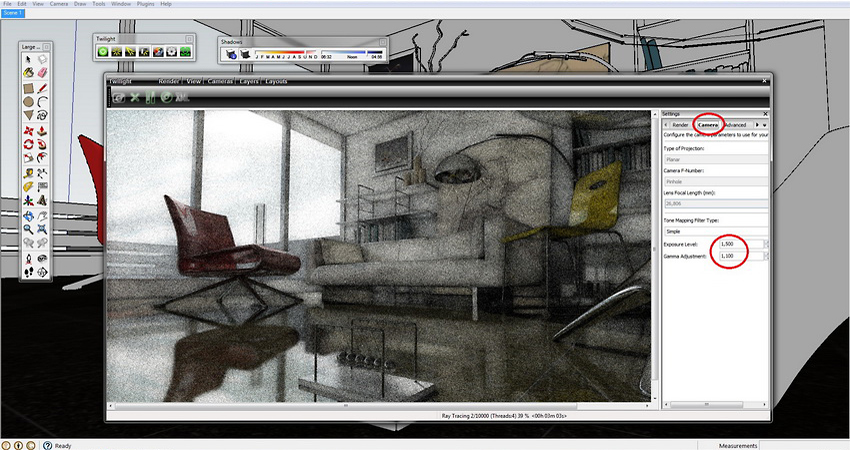
I also change the camera Exposure Level and Gamma Adjustment if needed, here set at 1.500.
Finally I click render…
Step 6. Post processing
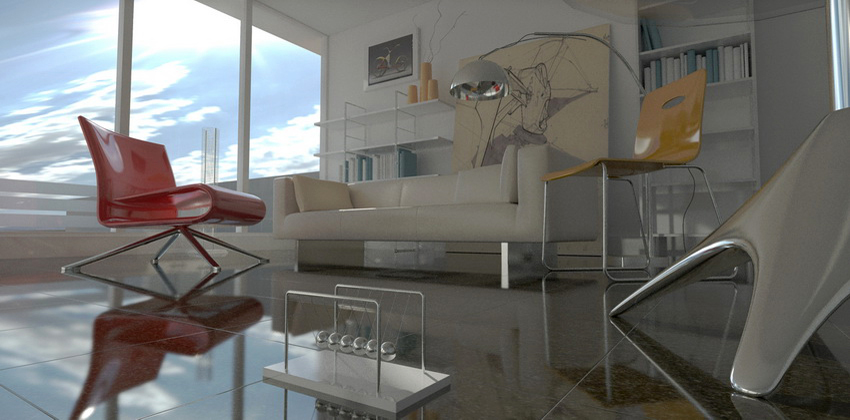
After leaving it over night to cook, I have my first render. I have to say that I have an old computer; you could probably have the same result with a better computer in 2 hours I think. Next I save my image, and now I am ready for a very short post process.
For my work, I find I really do not need Photoshop. Also for me I feel too much Photoshop post processing can kill the render image.
Step 7. Post processing part 2
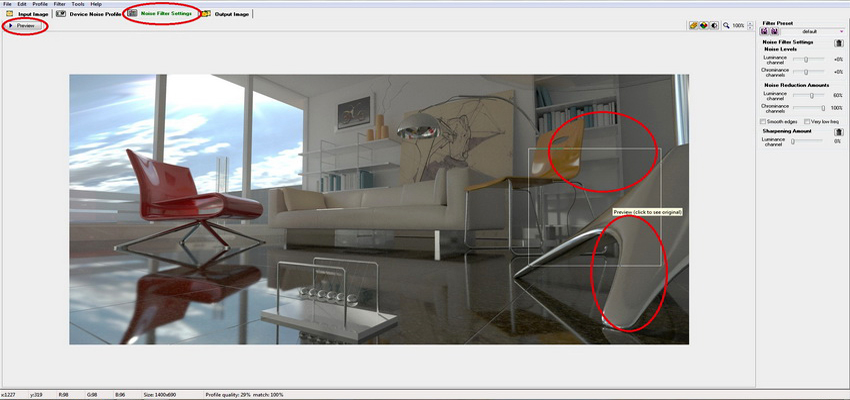
I always filter the grain of my image with ‘Neat Image’. It’s free and very useful image editing software (www.neatimage.com). I click on the Noise filter setting and after preview, I don’t touch the settings, as they seem good enough to me.
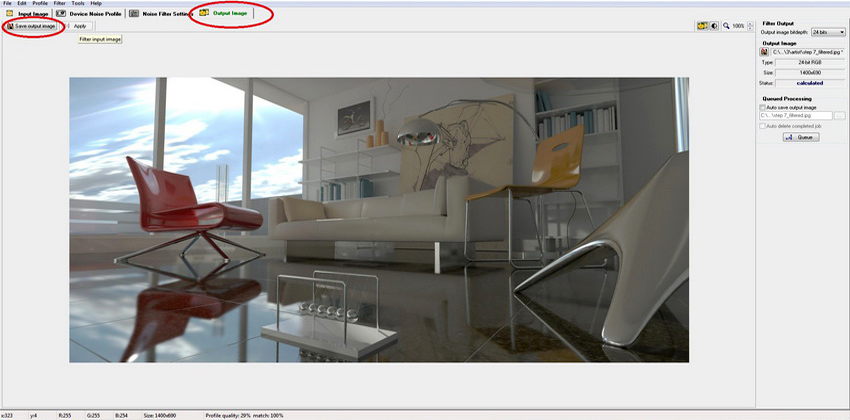
Next I click on Output Image + Preview + Save output image.
Step 8. Final image editing
To edit my image I always use ACDSee Pro, cheap and very powerful (www.acdsee.com).
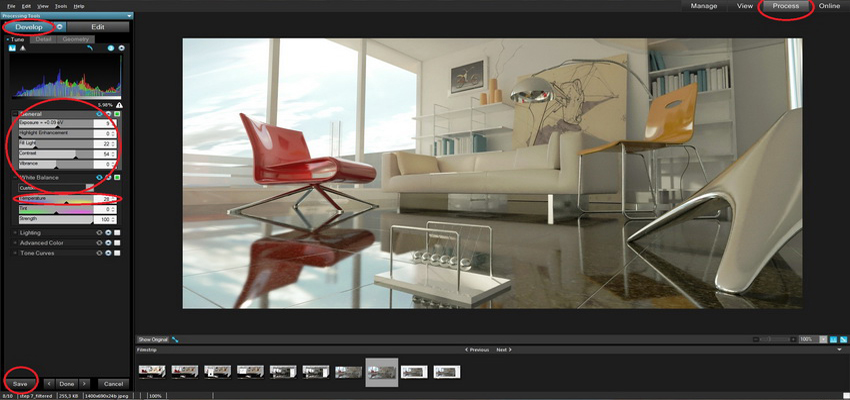
Click right on the image and process with ACDSee, my post processing only consists of increasing the contrast level, the exposure and the very cool temperature slider. It can really change the mood of the image.
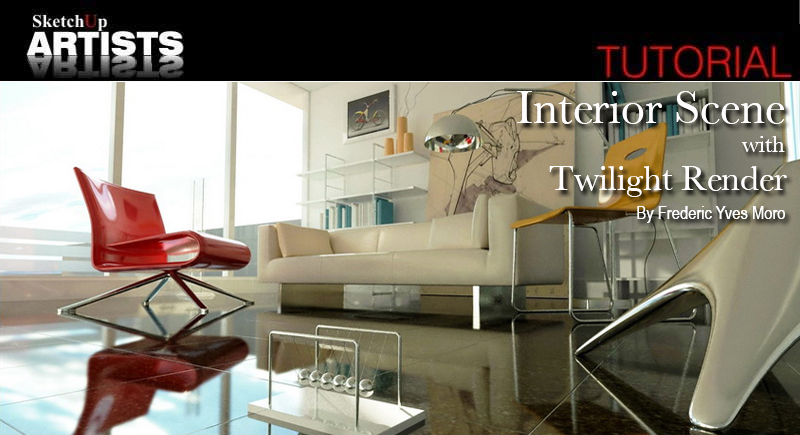
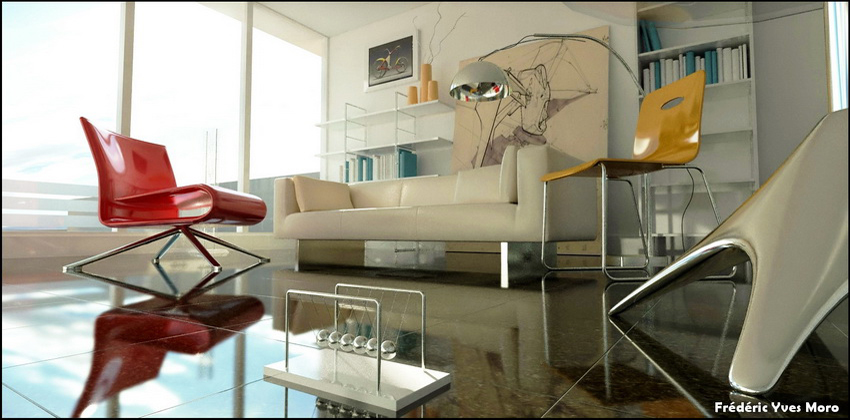
And that’s it, you can see the result.
A small reminder of all the software used in this tutorial:
For a modest amount of outlay for software, I can make good, acceptable 3D renders. Check out my site for more examples of my work Frederic Yves Moro.
Cheers and thanks for reading my little tutorial.
Frédéric



great 🙂 Fred…
Hello Fredreic,
There are four editions of Neat Image displayed on their wed site.
Which edition do you use or recommend? Thank you for the great
tutorial. Bob
Hi Majid and thanks…
Hi Bob, I use the first for Win 32bit
thanks fred for spend your time on doing this tutorial
cheers,
thanx amazing Frederic,great job
how can i get bigger rendered image?
i keep setting the width like 2000 or 3000 but it keep outputing an image of “800×500”
thanx
Thanks for your comments…:)
AhmaD, if you have a Twilight render licence, you can easily render at 2000 and more.
Cheers, Fred.
Hi!
first of all…nice tut and very nice renders….
I´m just wondering one little thing….where can I get the model
so I can follow the tutorial better?
thanks a lot
render time? thanks!
Hi FRederic, congrats. beatiful work. Why do you use twilight render instead of vray for sketch up? Which one is better/ easier to use? thanks. JB
very good tutorial! very easy to understand. this helped me a lot!
thank you so much! keep up the good work. ^^
Thank you for the tut. It’s very interesting. I’ve tried to import to sk some 3ds models from the page that you recomended, and I’ve found two problems: 1st. A model of 4 megas in 3ds turns in a model of 45 megas in sketchup (and I’ve checked the option to avoid repetitions with coplanar faces). 2nd. I’ve losed the textures, even situating the model in the same directory before importing. Could you help me?
Frederic…would love to see more of your work..however the link here comes up as a site containing malware…both on my Mac and Windows 7 PC…has this been corrected?
@jetsonjoe I will contact Frederic and see whats up with that link…
Thank your for this Tutorial.
Please anybody give a lighting tutorial.
Regards
Prakash
goog. i want study with you.
graciaas por el tutorial..! me sirvio de mucha ayuda para poder entender mejor de las funciones del twilight gracias por tu tiempo
Thanks for your kind comments, Twilight is that easy..:)
What pc specification lets you to render images like this in 2 hours??
hi, my old quad core and 6gb ram, and win 64
You have very, very good skills. Could you share some example scene? I’m learning to use Twilight Renderer and I have problem with lighting, can’t set it properly in my scene.
thanks a lot..
Fred thankyou for providing such a great tutorial ..iam a newbie…i have a question in my mind that when ever i import a 3ds object to sketchup …there are no materials on the object while materials are presnet in the file where my 3ds object is saved ….i download 3ds files from http://www.archive3d.net .
I actually have the same question as Usman about the materials missing. Also, do you have an online portfolio that speaks to this workflow of SketchUp and Twilight?
thx
awesome.. guys.. please make some video for me.. i wan watching how u do from 0.. please add my facebook.. i need to learn many more from u…… =(
dear fredric ,
thatnks for the previous effort was usefull.
if you don’t mind i’m facing a problem with the image size i set it for 1400 px but it gives me 800*600 i don’t know why if you can help i’ll be gratfull for you.
regards
I. Taher
You must be using the demo version of Twilight Render. The demo version is limited by 800 x 600 pixel maximum resolution…
amazing result! would you care to share the sketchup file with us, plaese??
great job- I’m searching for a floor texture just like the one you used…where did you score that? Thanks!
How do you import objects from http://www.archive3d.net into SketchUp.
They are not in skp. format, right?
Thank you
@Len go to File>Import and select the file type you want to import…you can import 3DS files (*.3ds) and others too…
James
Nice tutorial!
I wonder how you manage your library? (600GB)
Do you have a viewer wich can view different types of files?
Or do you print your thumbnails?
How do you do it?
I’m looking for a good way to manage…
Thanx.
Roel
Roel, all my library is arranged by type , I also print my thumbnails,
But the most important, I organize everything as soon as I download it, even the name of the file, I write for example “Chair classic wood fabric”
Thanks, very good job btw, im impressed on how to use the twilght so realistic!
FANTASTIC. U MADE MY DAY !
GOOD
SICK RENDER! never thought twilight render is this good.
what happened to the sky by the way? it turn shiny white… can we avoid it? so we can still show the sky?
thanks!
twilight render is one of my favorites! it makes great renders easy and fast
thank frederic, you are awesome man!
here you can see the Persian translate that i’ve done today for my people in order to introduce you and twilight to them 🙂
http://www.ran2.ir/forum/showthread.php?tid=62&pid=215#pid215
hope to see more tutorials and nice renders from you
regards
@ Mojtaba It might be nice to post a link here to our site so you can also share that with your people 🙂
Nice work, did not realize sketchup could be that good.
Do you have any advice on keeping the poly count reasonable?
Thank you
how can i give mirror effect to dressing mirror in twilight
Primeiramente Parabéns pelo o ótimo trabalho que você vem prestando a sociedade no meu ponto de vista se todos compartilhasse seu conhecimento nos teríamos um mundo melhor,achei seu tutorial muito bom e de fácil entendimento Parabéns pela a iniciativa.
Translation: Congratulations for this great work. In my view if everyone would share his knowledge it would be better world, I found your tutorial very good and easy to understand Congratulations on the initiative.
How is it possible to get this result in one night? I use demo version on my i7, 16gb ram, nvidia quadro K2000M at 800×600 and it takes ages to get similar results. Is the demo version limited somehow?
Olá Fréderic, gostei muito deste projeto seu e de todos os outros.
Tem como fazer tapetes felpudo no sketchup e vray com no 3ds max?.
Apesar que você não usa o vray. Ou em outro renderizador como o thearender. Fica com Deus.
Ur the man fred…
thanks so much for ur tutorial
it seems easy and as an architect who usually dnt always have time on my side… tis will be awesome if its tis easy
let me giv it a try
ty again
Thank you, this rendering is really great and works much better than V-Ray, no doubt (including rendering in 3ds max and Maya), because it is less pixelate and easier to control. Even with maximum image of 800/600px, still gets the job done.
nice work, im new to twilight rendering im still on research work how to
render. i need some more tutorial videos
I’m using Twilight Render Hobby. And the Light Editor doesn’t work. What is the next step ?
Thanks,
Gary Stanullwich
Is there a way to adjust the size of the Background image ? When rendering in Twilight Render, the background image always appears too large, making the scenery in the Background image seem too close to the model ?
Thanks,
Gary Stanullwich
@ Gary Stanullwich add your background image with photo editing software after rendering. You can scale it etc…
very beautiful thank you very much for this tutorial!
Regards
thanks a lot, I just put a file for rendering…..
I am so excited to see a final result